Permanent magnets are suitable not only for childish fun or engineering work, but also for everyday use. IN Everyday life There are many uses for magnets.
1. CLEAN AQUARIUM
To clean the aquarium from green plaque, place a magnet with a sponge glued to it on the inside of the glass, and another powerful magnet on the outside. They will be attracted to each other and press the sponge against the glass. Move the magnet along the outer wall of the aquarium, and the sponge will clean the glass from the inside.
2. "LOCK" FOR THE CABINET
If the cabinet door involuntarily opens, it is not necessary to insert the lock. Make a "latch" out of two magnets, fixing one on the door and the other inside the cabinet.

3. SEARCH ENGINE
The easiest way to find a lost metal item (nails, keys or a needle) is to attach a magnet to some kind of handy object and move it under furniture or on the floor for a while. During repairs, the location of the reinforcement in the walls can be determined in the same way.

4. FOR MOTORISTS
So that on a frosty night, condensate does not collect and freeze in the lock of the car, which makes it difficult to turn the mechanism with a key in the morning, when leaving, attach a magnet to the keyhole. It will block the access of moist air to the castle.

5. CHILDREN'S CREATIVITY
If you attach a magnet to the back of a small children's craft, you can hang it, for example, on a refrigerator.

6. FOR HEALTH
It has been proven that beads, bracelets, earrings, rings made of small magnets, belts, bandages and insoles with sewn-in magnets normalize blood pressure, speed up metabolism, strengthen the immune system, cardiovascular system, and relieve pain from rheumatism, arthrosis and arthritis. But remember that it is not recommended to be treated with magnets for people whose heart activity is supported by a pacemaker, as well as for cancer patients suffering from mental illness, hypotension, tuberculosis, patients with fever, pregnant women.

7. IN THE KITCHEN
If a piece of magnet is sewn into a hot cloth tack, you can always keep it at hand: on the wall of the refrigerator, on gas stove, car wash and so on.

8. IN THE GARAGE
The garage is, traditionally, the abode of any self-respecting man, and almost every member of the stronger sex wants all the tools he needs to be at hand and stored in an orderly manner. How to achieve this? Of course, you can build a whole cabinet or table for tools, but this will require a lot of time and effort from you. In addition, such a structure will take up extra space in the garage. A simpler and easier alternative is to buy magnets and attach them to the wall, after which you can attach your tools to the magnets. The advantages of this use of magnets are obvious - they will save you useful space in the garage, and all the tools will always be in sight.
In this article I want to tell you how you can make a cute fridge magnet with a photo. And not only to make, but also to profitably sell.
My site was originally dedicated to sublimation printing. But this does not mean at all that you can earn money only by selling mugs, plates, puzzles and other sublimation products. There are a lot of ideas! This includes thermal transfer and the manufacture of watches with a photo portrait and the printing of various calendars and much, much more.
The first article about magnets.
What attracts me most about making magnets from vinyl is simplicity (no equipment is needed) and a chic markup in price. Judge for yourself - a magnet measuring 65 x 90 mm costs me less than 5 rubles. I sell it in kindergartens for 120 rubles!
Magnets are different - plastic, metal, sunset. We will make a magnet based on magnetic vinyl. It looks like this:

In a nutshell - this is the most common photograph pasted on magnetic vinyl.
Choose any photo frame and insert a photo of the child. You can draw a photo frame yourself or download it from the Internet. Don't forget about copyright. Not all authors allow you to earn on their frames and templates.
To make a magnet, we need the simplest tools:
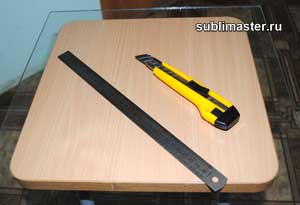
This is a small piece of glass, a stationery knife and a metal ruler. And it's all? - you ask! Yes, this is enough to make good money. You don't even need to have your own printer. You can always order photo printing on the side. And your magnets from this will become more expensive not much at all. Later we will count everything.
A few words about magnetic vinyl. It is sold in rolls, usually 30 meters. Such a roll is not only quite expensive, but also very heavy. And this increases the cost of delivery for those who order vinyl by mail or through a transport company. Those who have the Zenon company nearby are more fortunate - they will sell at least half a meter of magnetic vinyl there. Agree, it is very convenient.
Magnetic vinyl is available in different thicknesses. I recommend purchasing vinyl no thinner than 0.7 mm for making magnets. Thinner vinyl magnets look cheap and not solid.
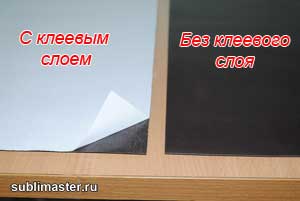
Also, magnetic vinyl comes with an adhesive layer and without an adhesive layer. With an adhesive layer, it has a protective film and, with an equal thickness, costs a little more.
You just have to choose a link:
Magnetic vinyl with adhesive + regular photo on paper
Magnetic vinyl without adhesive layer + photo on self-adhesive photo paper.
I will use the second option. I have 0.75mm glueless and Privision inkjet vinyl on hand.
So, let's start making our magnets.
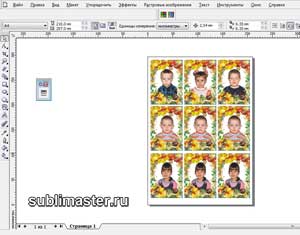
I think it will not be difficult for you to find a nice photo frame for you. Let's assume that you already have it. Adjust the photo frame to the size you need - I have 65 x 90 mm. With this size, 9 magnets are placed on an A4 sheet. Of course, you can choose absolutely any size.
You also took pictures of the children. It remains to insert the photos into the frame. This can easily be done with or .
By the way, a large section will soon appear on the site about how to photograph children in kindergartens and schools and how to process photos. Don't forget not to miss the announcement.
Photos are inserted, now they need to be placed on the sheet and printed. You can use Photoshop for this, but I like CorelDraw. I import one photo frame at a time and place it on A4 sheet. If more than one magnet is ordered, I duplicate the required number of times.
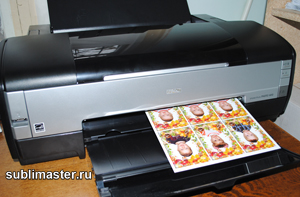
All photo frames are placed, self-adhesive photo paper is inserted into the printer. Sending a printable! We print with regular water-based inks.
Now we will stick photo paper on magnetic vinyl. I pre-cut it into A4 sheets. More precisely, they turn out to be slightly smaller - 20.5 x 29 cm. The width of the roll of magnetic vinyl is 61.5 cm. I cut it equally into three parts. And I specially reduce the length a little, with my sizes of magnets this is quite enough. You also try to calculate everything so that there is less waste.
For photo paper to lay flat on vinyl without bubbles or creases, just watch how I do it and repeat.
First, turn the sheet face down and fold back the protective paper about 15 mm along the short edge of the self-adhesive.
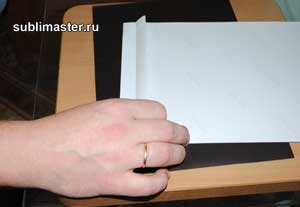
Now we turn the sheet over and, holding the edge with the folded paper (not letting it stick), place the sheet evenly on the magnetic vinyl.

With the sheet positioned as desired, carefully glue the edge of the sheet to the vinyl and iron well with a dry, soft cloth.
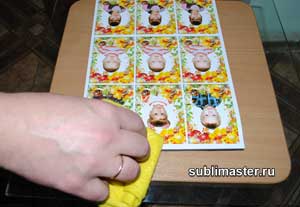
Now our sheet is securely attached to the magnetic vinyl and will not move anywhere. Left hand we place it under the sheet, grab the edge of the protective paper and begin to gently pull it to the side, exposing the adhesive layer, and with the right hand, with the help of a rag, smooth the sheet to the vinyl with translational movements up and down.

So we smooth it to the end.

Set the resulting sandwich aside for 15 - 20 minutes so that the adhesive layer grabs well. Now the magnets can be cut. A reciprocating cutter is ideal for this purpose, but you can do just fine without it.
A metal ruler and a clerical knife are what you need. In order for the knife to cut rather than tear the paper on the vinyl, keep the angle of the knife as close to the surface as possible.

Update the knife blade by breaking off the dull part. I usually do this after cutting the next A4 sheet.
Here are the first nine magnets ready.
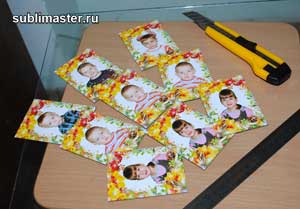
I put each magnet in a separate bag. I have them 75 x 120 mm. This bag costs a penny, and parents really like the individual packaging.

That's the whole process. As you can see, nothing complicated. Now let's do some math.
I bought magnetic vinyl without glue 0.75 mm thick at 310 rubles per linear meter (width 0.61 cm), which is 504 rubles per square meter or 30.3 rubles per A4 sheet (round up to 31 rubles).
I bought a self-adhesive for 100 rubles for 20 A4 sheets. So one sheet costs 5 rubles.
31 + 5 = 36 rubles.
36 rubles: 9 magnets = 4 rubles apiece!
Let me remind you that I sell them for 120 rubles. I know that some people sell similar magnets for 150 rubles.
Now a few words about quality. Water-based inks have a serious drawback - they fade rather quickly. Especially compatible inks. If your customers' refrigerator is located by the window, then the magnet on its door may fade in a year. In this case, I would advise you to print the photos in a photo lab and glue them onto vinyl with an adhesive layer. In this scenario, the cost of your magnet will increase by 2 - 3 rubles, but it will not fade over many years.
Alternatively, the magnet can be covered with a thin cold laminate (laminating film). This complicates the process a little, but the magnet looks just great!
You can also purchase an inexpensive corner cutter and trim the corners of your magnets nicely.
In a word, I gave you an idea. How you put it into practice is entirely up to you. Now you know how to make a photo magnet. Take my word for it, such magnets are in constant demand in kindergartens and schools!
Neodymium magnets in our time have tightly replaced simple ones. They are made of NdFeB metal alloy, which has high magnetic properties. Result: the device is better magnetized and much more resistant to demagnetization, unlike the usual one.
What can be done from a neodymium magnet will be considered in the material.
The first thing that comes to mind is the production of toys and puzzles from this alloy. As a rule, not the strongest magnet, which is produced in the form of balls, is used for these purposes. Crafts from a magnet can be made into various shapes, and complex sculptural forms in miniature can be formed from neodymium. But it is important to remember that it is forbidden to give such a toy to children under 6 years old.
A pair of magnets in the stomach or intestines can catch the walls of the esophagus, which in turn will lead to perforation, and the victim will inevitably end up in the hospital.
With your own hands, you can make various clamps from a magnet. Pair of magnets medium size can be used as a vice. The use of an alloy, in this case, is much more practical, unlike a vice made of ordinary metal. Details of non-standard shapes will be fixed more reliably.
For motorists, this alloy is generally indispensable and can be used in a very diverse way. For example, not everyone knew that a magnet can be used to filter oil in an oil filter. If you install it on the drain plug in the engine crankcase, then all metal debris will accumulate at the installation site, which will subsequently facilitate its removal.
With the help of magnets, it is convenient to search for small metal objects: for example, needles or pins on a fleecy carpet. Neodymium can be used to search for metals in the ground or various communications in the walls.
The device is suitable for magnetizing various steel objects such as screwdrivers, needles and more. With its help, a tool or other steel inventory is fixed. Correctly installed magnetic holders will help to correctly distribute the tool in the workshop or even in the kitchen. In addition, even an old demagnetized magnet can be magnetized with an alloy of such power. 
Often it is used to format information on electronic media. Information from video and audio cassettes, as well as from hard drive and with credit cards with the help of a powerful magnetic field is removed irrevocably.
Options for using magnets in everyday life
Neodymium magnet is widely used in everyday life. The main thing is to be able to show imagination. There are also standard methods, and very interesting ways applications.
Amazing spice rack
So that spices are always at hand and do not take up much space, you can design a special shelf using neodymium. For this you will need:
- Metal jars with transparent lids.
- Neodymium magnet with a diameter of 1.5x6 mm.
- Epoxy resin.
- 100 grit sandpaper.
We process the bottom of the jars with sandpaper from the outside and stick magnets with the help of resin. After that, they will hold securely on any metal surface.
Life hack: you can create a metal surface yourself. Just attach a metal plate to a regular cover. If it is missing, use what is. For example, a refrigerator door. At the same time, we recommend that you familiarize yourself with the master class on creating without dust and worries.
It turns out nice and neat. 
Scissors and household tools at hand
Knives, scissors and other household utensils can also be attached to neodymium clips. To do this, just choose a suitable place, create a strip of magnet and install. And then the kitchen utensils will always be at hand.
By the way, for this you can use magnets from the speakers, the main thing is to decorate them beautifully. 
How to store beer
So that the packaging of beer does not take up extra space in your refrigerator, the bottles can simply be hung from the ceiling of the refrigerator compartment. Just get a tape with magnets https://mirmagnitov.ru/catalog/gibkie-magnity/magnitnaya-lenta/ and attach it.
The power of the magnet will be enough to hold the bottles securely. 
Greenhouse with magnets
To surround yourself with houseplants, it is not necessary to purchase large pots and put them on the shelves. It is enough to create small containers, for example, from corks and plant your favorite plants.
Then arrange around you in the way you like best. 
Opener for bachelors
Such a device will be appreciated by any man whose house is not ruled by a woman. A decorative plate with a beer opener is installed on the wall, on which a magnet is fixed on the reverse side.
Now you do not have to collect corks throughout the apartment - they will remain on the opener. By the way, this will allow you to create some collection of drinks.

Tool Carrying Solution for Craftsmen
So that the tool and accessories are always at hand, you can make magnetic bracelets and belts in which the alloy will be inside. This will allow you to attach a not very heavy tool to the belt, and sculpt accessories on the bracelets.
And since the magnet has healing properties, you get an additional bonus. 
Place for pins
Any beauty has a huge number of hairpins, but, as a rule, they are often lost. Therefore, you can attach a magnetic tape inside the wardrobe or on the wall of a cosmetic bag, and then all the hairpins will always be in one place. 
Shelf for cosmetics and women's accessories
Such a device is also created according to the principle of a shelf for spices.
You will need a steel surface and magnets glued to the bottom of the cosmetic cases. A similar surface is installed nearby, on which hooks are attached using neodymium. You can hang your own decorations on them. 
Housekeeper
Near the exit (in the hallway), a magnetic panel and key fobs are installed on the wall. Keys will never be lost again.
You can also attach lighters and other little things that you may need outside the home on these panels. 
Don't forget anything
With the help of magnetic holders, you can leave notes or write a to-do list for tomorrow, and then attach it in the most visible place. This will allow you not to forget the little things and always remember what needs to be done. 
Order in the nursery
Toys with magnets installed in them are easier to store on metal surfaces. Thus, the child will become more interested in cleaning the room, which will help achieve the long-awaited order in the nursery. 
Study without leaving home
Every child needs to learn, but the time has passed when children wrote on their desks. Now you can make a marker board for the child, on which there will be a magnetic panel. You can attach all the necessary devices for studying to it. 
DIY Lego
You can make or order small parts of various shapes and sizes, stick magnets to them and create a wide variety of designs on a large metal surface.

These figures can be designed with each other, which will allow the little creator to develop in a creative way.
Healthy sleep on a magnetic pillow
Orthopedic magnetic pillow will allow you to fully relax during sleep. But before using it, you should consult a doctor, as there are contraindications. For example, the presence of a pacemaker in a patient. 
The magnet can be used for various things, its scope is almost endless and the properties of this alloy are of great importance when used. In skillful hands, you can make a huge number of necessary and useful things and accessories from it.
Video: cool life hacks with magnets
Magnets make life a lot easier. Watch in the video how and immediately apply the knowledge gained in practice!
Magnetic needle beds, ties for curtains, all kinds of holders and organizers - and other ways to use magnets in needlework and everyday life.
1. Pincushion from a saucer and magnets

To make such a pincushion, you will need a small ceramic, porcelain, plastic or metal saucer, a pair of magnets (the thicker the saucer, the larger and stronger the magnets need to be taken) and hot glue (superglue option). Glue the magnets to the bottom of the saucer on the back side. With the help of such a needle case, it is convenient to store needles and pins, plus - you can easily collect crumbled metal trifles from the floor.
2. Magnetic needle-bracelet

A pincushion bracelet with a magnet will operate on the same principle as the previous version. Take a flat round magnet (you can remove some boring one from the refrigerator door), wrap it with a cloth, as shown in the photo, make a bracelet of the desired size from an elastic band and sew a magnet needle bar to the bracelet.
3. Hidden magnet closure


Instead of a special magnetic fastener for a bag or cosmetic bag, you can use ordinary magnets - you will need two magnets of the same shape and size. Before work, find out which sides magnets are attracted to and mark the sides so as not to confuse. First, make a "pocket" of adhesive interlining or dublerin, hiding a magnet there. Then glue it from the inside to the right place on the part. Repeat with another magnet.
4. Fabric decorations on magnets

A paper, fabric or thin plastic lamp shade can be decorated with a removable decor on magnets - you can always remove it or change its location, achieving a new effect. Glue a magnet on the back of a fabric or paper decorative flower. The second magnet will hold the flower on the lampshade. By the way, in the same way you can fix the badge on the blouse if you do not want to pierce it with a pin.
5. Magnetic tieback for curtains

You will need a flyer or cord, two magnets and two decorative elements under which you will hide the magnets (these can be large beautiful buttons, fabric flowers, and so on). Glue a magnet to each end of the tape or cord with hot glue, and on top - decorative element. The grip is ready.
6. Magnetic holder for scissors


Magnetic holder for kitchen knives it will also help to keep in order scissors, metal rulers, stationery scalpels and other needlework accessories. Glue or stick it where your tools will be at hand, such as on the wall above the table.
7. Magnetic can organizer

In such an organizer, you can store threads in skeins, ribbons and cords, small pieces of fabric, and so on. To make it, you will need several tin cans (if the edges are uneven, they need to be processed) and twice as many magnets. Glue a magnet to the bottom of each can from the inside, glue the same magnets to the base that will hold the cans.
8. Organizer for beads and beads on magnets

As a basis for such an organizer, take a magnetic board or a sheet of iron. Glue a magnet to the bottom of each jar. Now they can be placed on the basis in the order you need.
Fridge magnets are pleasing to the eye and keep our lists, photos, postcards, business cards and coupons in plain sight. Making them with your own hands for yourself or as a gift is very interesting and easy. After all, if you think about it, then for the manufacture of magnetic crafts you can use almost everything that is at hand, just turn on your imagination, stock up on glue and mini-magnets. In this article, we presented 70 inspiring photo ideas, as well as 5 step-by-step tutorials on how to make cool fridge magnets (and more) from improvised, natural, and even junk materials.
- There are three types of fridge magnets you can use: ferrite, neodymium (super magnets), and vinyl (rubber).
- If you want your magnetic crafts to hold only light and small sheets of paper, business cards, etc., then you can use ferrite (regular graphite-colored magnets that are most often used for souvenirs) or vinyl. The latter is a flexible, adhesive-backed vinyl material that has little adhesive force but can be cut into segments of various shapes and sizes. An example of a flexible magnet application is shown below.
- If you want the magnet to hold things heavier, then for the manufacture of crafts you need to use neodymium magnets (super magnets), which have 10 times the adhesive force. So, for example, for the manufacture of a magnetic hook for a ladle or cutting board You will need one magnet the size of a 1-kopeck coin. Keep in mind that ideally, the magnet's grip strength should be 2 times the weight of the craft and the item it will hold.
By the way, a neodymium magnet, unlike a ferrite one, does not lose its magnetic properties over time. Ferrite, after 8-10 years, turns into a useless piece of iron.
- Where can I get or buy magnets for making crafts? They can be peeled off from souvenirs or bought / ordered at construction markets, art stores, as well as specialized online stores.
- When working with neodymium magnets, take precautions and do not involve children in the manufacture of crafts. Keep in mind that two magnets attached to each other can even pinch your finger.
- In most cases, superglue, Moment universal glue and its analogues, as well as a hot glue gun are suitable for gluing a magnet to a craft. If your craft is intended to hold really heavy things, then it is best to use a neodymium magnet with a countersink and a screw for fastening.
- Magnets look best on the refrigerator, made in the same style and combined by theme, color or shape.

- Magnets can be hung not only on the refrigerator, but also on any metal surfaces, for example, on a magnetic organizer board, extractor hood or geyser .

In turn, the magnetic organizer board can be installed anywhere, for example, on the cabinet door
Master Class. 1. Magnets-hooks from branches
You can hang keys, towels, ladles and other things on these hooks-twigs.

Materials and tools:
- Dry small but strong branch with a branch;
- Hand saw or jigsaw;
- Small neodymium magnets;
- Glue;
- Drill and drill, equal to the diameter of the magnets;
- Acrylic paint (optional).
Instruction:
- Using a saw, cut the branch so that it looks like a hook. Then cut the branch lengthwise so that its back side is flat as shown below in the photo on the left.

- In this flat back of the branch, drill a recessed hole to match the diameter of your magnet.
- Glue the magnet into the resulting cell.

- If desired, paint the craft and cover with a matte varnish. Ready!

Master class 2. Magnetic storage jars
If you have nice tin or glass jars, put them to work by turning the refrigerator door or magnetic board into an organizer.


Glass baby food jars are great for storing spices on the fridge or range hood.


Materials and tools:
- Small aluminum cans (cans, as in our master class, can be ordered on Aliexpress for 300 rubles / 10 pcs.). Replace tin cans with glass jars or small plastic containers;
- Paint of the desired color (it is more convenient to use spray paint) and matte varnish (not necessary, but desirable to protect the coating);
- Neodymium plate magnets (especially if you want to use large jars and store heavy small items in them) or 0.6 mm thick magnetic vinyl self-adhesive sheets;
- Superglue "Moment" (needed if you use neodymium magnets).
Instruction:
- Make sure prepared jars are clean and dry. Paint them, as well as their covers, in 2-3 layers, allowing each layer to dry thoroughly. Next, cover the jars with varnish, if any.
- If you use jars with a glass insert on the lid, then before painting it must be removed or sealed with masking tape.

- Cut out circles from the magnetic sheet, their diameter should be slightly smaller than the diameter of the cans. If you are using neodymium magnets, stick them with superglue.

- Glue the cut out circles to the bottom of the jar, removing the protective backing.

- If desired, the lids of the jars can be additionally decorated. For example, as shown in the photo below.

Master class 3. Magnets from tin lids (crown caps)
The idea of recycling soda or beer bottle caps as fridge magnets will appeal not only to ecologists, but also to decorators. After all, they cost nothing at all, but provide a lot of opportunities for decoration.
So, for example, inside the covers you can paste family photos or just pretty paper (cutting cards, clippings from magazines, etc.).

Homemade photo frame magnets


You can paint the lids, fill the inside with hot glue or cork, and then stick magnets to them.


Sometimes bottle caps may not be decorated at all.
Instead of beer caps for making fridge magnets, you can use larger caps, such as those from cans of Nutella or baby food.


Materials and tools:
- Scissors, and preferably a scrapbooking hole punch for cutting circles with a diameter of 2.5 cm (sold in craft stores and costs 200-300 rubles);
- Epoxy resin, a container for preparing a solution and a stirring stick;
- PVA glue, as well as superglue;
- Small magnets;
- Photographs suitable in size or any other pictures, for example, from a magazine;
- Beer caps (it is best to use bottles with twist-off caps rather than pop-off caps).
Instruction:
- Using a hole punch or scissors, cut round fragments with a diameter of 2.5 cm from the photos. Of course, if you use scissors, you must first make a markup using one of the caps (or a plastic cap from a plastic bottle) as a template.
- Glue the pictures to the inside of each lid with PVA glue (glue must be applied over the picture as well). Let the glue dry completely (!).

- Prepare according to the manufacturer's instructions epoxy resin in the quantity you need. To find out exactly how much resin you need, pour water into one of the caps, then multiply the resulting volume by the number of caps. Line your work surface to protect it from spills, then fill each lid to the brim. Let the crafts dry overnight.
- Glue magnets to the blanks. Ready!
Master class 4. Magnets from plastic mini-toys
The most stylish magnets are easy to make from plastic toys, namely animal figures.


Materials and tools:
- Scissors or a sharp knife;
- Hot glue gun;
- Paint and brush if necessary;
- Small magnets;
- Plastic figurines of animals.
Instruction:
- Cut the toy in half or lengthwise.
- Pour hot glue into the inside of the resulting workpiece to the very edges and leave to dry.

- When the glue hardens, start painting the craft (including the "filling") in 1-3 layers. At the end, it can be additionally varnished.
- Now just glue a magnet to the figure and enjoy the result!
Master class 5. Magnets from clothespins
Let's open a little life hack for you - clothespin magnets can not only store lists and bills, but also clamp food bags as shown in the photo below. It turns out very convenient - I removed the clothespin from the refrigerator and immediately fixed the open bag to it.

Also, wooden clothespins can hold a piece of paper on the refrigerator door and at the same time pinch something between the teeth.


Clothespins can be painted, decorated with sparkles, pasted over with colored tape or appliqués, or decorated using decoupage technique, following the following simple instructions.

