Every owner of a private house knows that appearance dwellings are just as important for the comfort of living as the interior comfort. An environmentally friendly and modern material today is imitation of timber. It is a panel that is installed according to a certain technology. If you observe accuracy during installation, you can achieve a quality finish that will delight the family for several decades.
Technology for installing imitation timber
Installation of imitation timber is carried out in several stages, among them:
- choice of material and components;
- wall preparation;
- installation of the crate;
- work on the installation of panels;
- protection of the finish with a decorating composition.
It is noteworthy that the imitation of a bar is universal material, which can be installed not only outside, but also inside the premises.
Preparation of tools and materials
In order to carry out work on the installation of imitation timber, it is necessary to prepare:
- self-tapping screws;
- dowels;
- nails;
- kleimers;
- timber or galvanized profile;
- thermal insulation;
- waterproofing;
- screwdriver;
- protective composition;
- drill.
The beam will be used for the manufacture of battens, the elements of which can be galvanized profiles. For the outer wall you will need waterproofing and insulation. The screwdriver can be replaced with a clamping gun. If the house has concrete or brick walls, then you will need a drill. For the accuracy of the location of the imitation of the beam, a building level should also be prepared.

Before you carry out the installation, you need to take care of the choice of panels. For interior cladding, grades A, AB, B, as well as extra are best suited. As for the external walls, the material is perfect for this, the width of the elements of which starts from 100 mm. If you use a less impressive width, then the finish will look like a lining. As for the interior trim, the width should be reduced to 21 mm.
Installation of imitation timber should begin with the preparation of the material. To do this, it should be brought into a dry room. The installation of the profile should be carried out vertically, the distance between the elements will be a limit of 60 to 80 cm. The beam will cost less, but it will last much less during operation, because the material has the properties of warping and rotting. Before starting work, wooden materials are treated with an antiseptic.
Even if you have to work with frame house, still need to install the crate. It will allow you to create additional air space between the panel and the walls. This will eliminate the accumulation of moisture, and an additional air pocket will save heat indoors. Among other things, communications can be hidden in the hollow space.
Installation of imitation timber involves the use of waterproofing, which will protect the insulation. If you have to work with a wooden or frame house, then fixing the material will be more convenient with self-tapping screws. The crate is attached to the surfaces of brick and aerated concrete with dowels or self-tapping screws.

Wall preparation
Before starting work, it is important to make sure that the walls are sufficiently even. They are pre-coated with plaster or sheathed with sheet materials. Walls wooden house usually they are not aligned, and when installing the crate, it is still necessary to fasten the elements, taking into account the vertical. Waterproofing should be strengthened on aligned walls with a stapler; it is installed with an overlap ranging from 30 to 40 cm.
Lathing installation
If you are attracted by the appearance of an imitation of a bar, do-it-yourself installation of this material may well be carried out. The next step is to start attaching the crate. It is necessary to start these manipulations, moving from the corner of the house. The step of the crate should be chosen taking into account not only but also the size of the insulation.

To strengthen the elements of the lathing from the timber to the brick wall, you must first attach the material by drilling a through hole. Next, the dowel is driven in and the crate is screwed on. Much easier to work with. For them, self-tapping screws are usually used, selected taking into account the thickness of the timber. However, this parameter should not be less than 30 mm.
If you are going to carry out the installation of imitation timber, the instructions presented in the article should help you with this. The next step will be the laying of insulation, which is usually foam or mineral wool. For interior spaces this step is not needed. Thermal insulation is located between the profiles or beams, and is covered with a waterproofing film from above.
Installation of imitation timber
In order to extend the life of the imitation timber, it must be treated with an antiseptic. Fasten the panels, moving from the bottom up. The first panel must be level. About 15 cm should be retreated from the bottom of the house.
Installation can be done in one of several ways, the first involves the use of self-tapping screws, while the second involves the use of nails. There is another technology that is accompanied by the installation and fastening of clamps. Using self-tapping screws, you can install them at an angle of 45°. An alternative solution is to screw self-tapping screws into the top of the panel. Nails can be installed in the groove.

Fastening the clamps will be the easiest task, but this system will not be highly reliable. You can use this method only when the material is thinner than 21 mm. Using fasteners in the form of thin nails, you cannot guarantee that the panels will not loosen over time. That is why experts advise using self-tapping screws for the outer skin.
Installation of fasteners in the front surface of the elements provides for pre-drilling holes for self-tapping screws. Their diameter should be larger than the screw head. After installing the fasteners, a wooden cork is substituted, which is pre-treated with PVA glue. After that, the surface can be sanded.
The cost of installing imitation timber
If you are not sure that you can independently carry out the installation of imitation timber, you should know the price for these services. For 1 m 2 of finishing installation outside the building, you will have to pay 750 rubles. will be more expensive - 800 r. per square meter. If you have to finish the attic, then you will pay 950 rubles for the services of an external installation of an imitation. per square meter, while the work inside will cost a little cheaper - 900 rubles.

Installing imitation timber inside the house: preparing the walls
Installation of imitation timber inside also involves preparation. To do this, the surface of the walls is cleaned of dust and dirt. On the base, it is necessary to strengthen the vapor barrier like pergalin, then you can proceed to the installation of the crate. In this case, the distance between the elements will be from 50 to 70 cm. The crate is reinforced with dowels on concrete and brick walls, while self-tapping screws can be used when working with wooden walls. The beam is treated with antiseptics, and for wet rooms, a galvanized profile should be used.
Panel installation
For some, the cost of installing imitation timber is too high, at which point they decide to do the work themselves. The installation is carried out horizontally, and the method of fastening is similar to the decoration of the facade.

It is most convenient to use kleimers for this, but when working with the ceiling, manipulations will turn out to be more complicated. In this case, it is better to use self-tapping screws or small nails. They should be installed in a spike at an angle of 45 °. It is better not to use the front method for rooms, because it will be difficult to hide a small thickness behind hats, which will spoil the appearance of the walls.
Conclusion
Installation of imitation timber inside the house will also involve decorating the corners; for this, special internal and external elements are used. They are purchased with panels. But between the walls and the ceiling, baguettes should be installed. For the bottom of the room you need to purchase a plinth. Once you have finished with the finish, it can be sanded and varnished on the surface. In some cases, tinting is carried out, but this approach is “not for everybody”. It is best to install already painted panels on the ceiling, this will save time and effort.
Houses and cottages made of wood are gaining more and more popularity every year. But there are many ordinary people who do not want to use timber as building material, however, decorate the house in style wooden structure would not refuse. In such a situation, the most the best option is an imitation of a bar.
How can I imitate a beam
The effect of imitation of timber in modern construction is achieved by using a board that has been chamfered and profiled for timber. Such wooden panels are always mounted horizontally, unlike the usual siding, and allow you to create the effect of a house built from natural wood.


Sanding also helps to remove minor defects and stains from the surface of the board and bring its surface to the desired state in which the siding will look as attractive as possible (decorative shine, rich texture, etc.).
How to do it yourself
Before attaching the false beam to the facade, it is necessary to prepare the surface of the house. First, the wall must be cleaned and a waterproofing layer applied. Next, you should fix the vapor barrier sheets, which should overlap (approximately 150 mm). It is better to start fastening sheets from the top of the wall, and all seams and joints must be glued with aluminum tape. 
After making sure that after the above work, the wall has flat surface, you need to proceed with the installation of the crate, on which the imitation under the beam will be attached. The crate must be fixed in a vertical position, since wooden lining mounted horizontally.

As a crate, it is better to use wooden bars, which have a small cross section and a thickness equal to the insulation layer (not less than 50 mm). Also, a layer of refractory coating and antiseptic will have to be applied to their surface.
In the event that the rails have to be mounted on brick wall, as fastening it is worth using frame dowels. For wooden walls, nails or self-tapping screws are suitable.
Between the bars of the crate are inserted mats of mineral wool or foam. If necessary, the insulation is attached to the wall with special dowels. A moisture-proof film is laid over the insulation, all joints of which are glued with aluminum tape.
Recommended for finished construction fix another crate, the presence of which will make ventilation possible between the layer of the board profiled under the beam and the wall surface. The thickness of the rails in this case should not exceed 50 mm.
When all of the above work is completed, you can proceed with the installation of the lining. Sheathing of a house with imitation of timber begins, as a rule, from the bottom of the facade, which allows you to direct the spike of the board upwards. This will help prevent moisture from accumulating in the grooves.

A gap of 50 mm must be left at the bottom and at the top for ventilation of the internal space under the lining. There should also be a distance of 3-5 mm between the boards themselves. This will help to avoid warping of the false beam due to changes in temperature and humidity levels due to the change of seasons.
The bottom board must be aligned with building level and only then securely fastened. This is important for the reason that it will act as a guide for other components of the cladding.

How to fix the lining
In order to securely and competently fix the profiled board, you must adhere to a few simple principles.
As mentioned above, it starts from the bottom of the wall. After the first board is fixed at the bottom with a spike up, the next one is inserted into the spike with a groove and at the same time a gap of several millimeters remains between the boards.

fastened siding by means of 3 screws on each side: one is driven into the upper part, the other into the lower part and the third at an angle of 45 ° directly into the tenon itself.
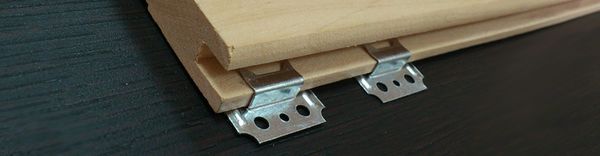
Also, kleimers are often used as fasteners to imitate timber - special metal staples. They allow you to mount the lining without drilling the board itself. That is, the integrity of the material is not violated. Moreover, the lining fixed on the kleimers can be dismantled at any time, preserving the material itself from damage, which is very convenient for finishing works indoors.
Thus, the installation process is simple enough to be done by yourself.
One of the most beautiful, aesthetic and practical materials is wood. Recently, home decoration with imitation timber has become very popular.
With its help, the building is clad both outside and inside, while flat or rounded elements can be used.
For sheathing the house inside or outside, wooden panels are used, having different thicknesses.
After finishing with such material, people get the impression that the house is completely made of timber; it can be used to clad houses made of various building materials.
The main advantages of finishing a house with imitation timber:
- this material has high thermal insulation characteristics, so you not only decorate, but also insulate the facade;
- it natural material, it is environmentally friendly and safe for human health, so it can be safely used inside the house;
- the material is relatively cheap and with its help any building can be made to look like wooden house;
- used for finishing buildings made of a variety of building materials;
- easy and simple to install;
- has a long service life;
- improves the soundproofing characteristics of the house;
- has a small weight.
Among the disadvantages of imitation timber, the following should be noted:
- as it is wooden material, then it has a high fire hazard, to reduce it, the panels are treated with flame retardants;
- if the integrity of the structure is violated, then the material may begin to rot and deform, therefore, the house must be constantly monitored and defects that have appeared immediately eliminated;
- periodically it is necessary to treat the surface with antiseptics and open it with varnish. If high-quality materials are used, then such processing should be done every 5-8 years;
- if rare wood species are used, then the price of such products will be high.
Mounting technology
Panels that imitate timber have special locking joints, so their installation is simple and quick, and any home master will be able to cope with this task.
 To perform the work, you will need the following tools and materials:
- calculated number of panels;
- timber with a section of 50x50 mm, which is used to create a crate;
- beam section 25x50 mm for the counter-lattice;
- suspensions;
- jigsaw;
- hammer;
- measuring instruments;
- self-tapping screws;
- kleimers, if the installation is carried out inside the building.
First held preparatory work during which the surface of the walls is cleaned of dirt and dust.
This is followed by installation wooden crate, for which bars with a section of 50x50 or 25x50mm can be used, it all depends on the thickness of the insulation. If the wall is flat, then the crate can be mounted directly on it, in other cases, the installation is carried out using suspensions.
On flat wooden walls the crate is fastened with self-tapping screws, in other cases, its installation is carried out using dowels.
A vapor barrier of the walls is necessarily carried out; for this, a special film is attached under the crate. They do this with an overlap, which should be 10-15 cm, and with the help of adhesive tape all joints are well glued.
Facade decoration
If the imitation of timber is mounted on the facade of the building, then heat-insulating material must be laid. For this, both rolled and matte materials are suitable.
 Depending on the purpose of the building and the climatic zone in which it is located, the thickness of the insulation may be different, but usually it is 50-100 mm. Heat-insulating material is laid between the crate on the vapor barrier.
Outside, the insulation must be protected with a wind-moisture protective membrane and all its joints are again glued with adhesive tape.
After laying the moisture-proof film, it is necessary to install a counter-lattice on it, for this, bars with a section of 25x50 mm are used, it is needed to create normal ventilation of the sheathing material.
Some masters do not make a counter-lattice due to the fact that there are ventilation recesses on the panels, but they may not be enough to ensure normal ventilation, therefore wooden elements start to rot and fall apart.
Now you can proceed to the installation of panels, work starts from the bottom and moves up. The upper edge of the panel is attached to the crate with self-tapping screws, after which the groove of the next panel is put on the spike of the previous one and it is fixed again with self-tapping screws.
If it becomes necessary to screw the panel through, then the head of the screw is slightly recessed, after which it is covered with a mixture of varnish and sawdust, and when the composition dries, this place is treated with sandpaper.
If you purchased unpainted panels, then they must be treated with an antiseptic and varnish, it is better to do this before installation, since then it will be more difficult to paint over the joints.
Ways of fastening panels and creating joints, outside
Depending on the width and thickness of the panels used, their fastening can be done in several ways:
- anodized self-tapping screws through the panel itself, but after that it will be necessary to mask their hats with wooden inserts or putty;
- at an angle of 45 degrees into the spike of the panel, so that the material does not crack, it is recommended to make a hole first;
- with nails, in this case the panel will be able to move a little, and will not crack. The length of the nail or self-tapping screw should be such that it can enter the crate for 2/3 of its length;
- using clamps, but this method is suitable for panels of small thickness, so it is usually used indoors.
There are several ways to join boards in the corners:
- by washing them down at an angle of 45 degrees;
- with a decorative wooden block, it must be purchased separately;
- with the help of boards interconnected by the letter "G".
If it became necessary to join the panels in length, then this can be done through a bar, which is equal in thickness to the skin or by washing down the edges at an angle of 45 degrees.
After doing installation work, the imitation of the timber is coated with a deep penetration antiseptic, allowed to dry, and then a decorative and protective coating of the desired shade is applied and everything is varnished, waxed or painted.
When carrying out interior decoration, two layers of paint and varnish coating are sufficient, on the outside they need three.
How to mount indoors
 The peculiarity of these works is that the use of insulation is optional, so you can take thinner bars or a galvanized profile.
If the walls of the room are even, then the imitation of a beam can be mounted without a crate, so you can save free space.
If the installation is carried out in a heated room, then the panels can be painted no earlier than a month after their installation, it takes time for them to dry, after which they will not form on the surface small cracks.
fasteners
 Since panels with a thickness of 16-21 cm are used indoors, their fastening can be done using clamps or self-tapping screws.
Reinforced climber
These are special metal elements in the form of a bracket that allow you to securely fasten the panels to the crate, while remaining invisible, the size of the kleimers (number) is selected taking into account the thickness of the rear groove of the panels.
Reinforced kleimer is suitable for fastening imitation timber both indoors and when cladding the facade.
self-tapping screws
In addition, imitation timber can be fastened with galvanized screws or self-tapping screws, as well as building, screw or finishing nails.
Conclusion
If you want to transform your home, make it beautiful and unique, while spending little money, carry out its lining.
At correct installation timber imitation, you will get an excellent result that will delight you for many years and all this will be done by hand.
Useful video
Sheathing the house with an imitation of timber in the video below:
In contact with
Installation of a false beam imitating the surface of a log wall allows you to create an attractive facade surface. Being engaged in the installation of the material, it is important to correctly perform all the steps included in the technological process, including fastening the imitation of the beam, which is performed in several ways. You can read about how to sheathe a house with a false beam without violating the established technology in the article.
Preliminaries
Proper preparation is essential for every job. It consists in the following processes preceding the main work:
- calculation and purchase of necessary materials;
- preparation of purchased materials;
- preparation of tools that will be needed in the work.
Consider what preparatory steps will help to successfully carry out the sheathing of the building with an imitation of a beam with your own hands.
We calculate the required material

To calculate the material for the upcoming work, you need to know what technology will be used. The facade is sheathed with false timber with or without preliminary insulation. In the first case, in addition to facing panels, you will need:
- windproof film;
- vapor barrier membrane;
- basalt insulation in mats (mineral wool);
- timber for the base crate (50x50);
- timber (rail) for the counter-lattice (50x30);
- fasteners for the main crate (U-shaped hangers for plasterboard profiles are suitable);
- wood screws.
If insulation is not included in the plans, we exclude wind protection and vapor barrier, insulation and a rail for the counter-lattice from the list.
The materials from the first three items on the list are calculated as follows: the total area of \u200b\u200bthe walls, minus windows and doors, plus 10%. Lumber for the base crate is calculated taking into account the guide step of 60 cm (corresponding to the width of the insulation mats). For a counter-lattice, the optimal step of the racks is 50 cm, taking into account additional rails in order to “bypass” door and window openings. Fasteners for the main guides are installed after 70-80 cm, from which it is worth proceeding when calculating their required number.
The calculation of the false beam depends on whether it is made to order (in this case there is less waste) or bought in plates of a certain length. In the second situation, you need to take about 5% of the total area of \u200b\u200bthe walls without openings into reserve.
If untreated panels are purchased, it is necessary to provide for the purchase of primers and targeted impregnations for wood (antifungal, antibacterial, reducing the ability to burn, etc.).
Pre-assembly preparation of false beam

Imitation of timber is made from solid wood and varies in terms of the degree of surface treatment and the quality of raw materials, so it is often necessary to additionally grind the front surface. To avoid this on the wall, it is much more convenient to modify the panels before installation. Given the considerable surface area, it is better to use an electric grinder for these purposes, since grinding by hand will take a lot of time and effort, but will not give the desired quality.
Also, before installation, the panels are treated with various impregnations and a primer. Firstly, it is possible to process the false beam strips from all sides. Secondly, again, it's much more convenient. As a result, after installing the imitation timber, all that remains is to open the finished surface with a stain or varnish.
Cooking tool

To carry out the whole range of works on the installation of a ventilated facade using a false beam as a finishing cladding, you will need the following tools:
- electric jigsaw (for sawing wood panels);
- water (laser) level for marking the starting horizontal;
- screwdriver;
- perforator (if the base wall is made of brick or concrete);
- yardstick;
- square;
- a small hammer (if planks are supposed to be fastened with galvanized nails).
Having prepared the necessary tools, you can proceed with the installation of the crate and thermal insulation.
Assembly of the base frame and wall insulation

In order to make the installation of a beam on the facade of the house, or rather its imitation, it is not necessary to insulate the walls. However, it is better and more expedient to take care of thermal insulation right away, even if the walls do not seem too cold. As practice shows, insulation is never superfluous, and thermal insulation made from the inside is less effective and occupies useful living space, so we will consider how to sheathe a building with a false beam with preliminary insulation.
Beam imitation panels are always installed only horizontally. Therefore, the laths of the counter-lattice must have a vertical direction, and the bars of the base crate must have a horizontal direction.
On a note. The counter-lattice is needed so that there is sufficient space between the insulation and the skin for ventilation, which prevents the accumulation of condensate. This is the essence of the definition of "ventilated facade".
Let's move on to practice and consider the sequence of work operations using the example of one of the walls of the building.
- We close the surface of the base wall with a vapor barrier membrane. It is needed in order to protect the basalt insulation from steam penetrating from inside the house.
- We install pins at the corners of the wall, between which, along a plumb line or level, we stretch vertically the threads corresponding to the outer surface of the main bars.
- According to the threads, we install the bars with a step corresponding to the width of the insulation mats (usually 60 cm).
- We lay basalt thermal insulation, make sure that there are as few holes as possible between the mats, which are cold bridges.
- The next step is the windscreen. We roll the canvas from top to bottom, attach it with a stapler to the bars. The next canvas overlaps the previous one by at least 15 cm.
- On top of the basic horizontal bars, we install the slats of the counter-lattice, attracting them to the guides with hardened (black) self-tapping wood screws. The length of the self-tapping screws is 55-60 mm with a rail thickness of 30 mm.
We create the same design on the remaining walls, if possible, tying (fixing with screws) between the bars of the base crate, after which we proceed to the main stage - the installation of the imitation of the bar.
Do-it-yourself installation of a false beam

Before proceeding with the installation of wooden cladding panels, let's figure out the best way to fix the planks. There are three options:
- wood screws;
- special nails;
- kleimers.
Which option to choose? Let's look at each of them.
Fastening with self-tapping screws is the fastest, but in order for the wood not to crack, it is advisable to drill a hole for each screw, corresponding in diameter to the thickness of the self-tapping screw. The disadvantage of this method is the rigid attraction of the plank to the crate, which prevents slight displacement of the material when the temperature changes. This leads to tension in the wood, which can cause premature damage (cracking).
Nails (you need special ones with anti-corrosion galvanization) allow displacements, as they have a smooth surface. But to work with them, you need a skill, without which not everyone will be able to correctly hammer small nails at the right angle, without damaging the face of the panel.
Advice. If you nevertheless chose nails as a panel fixer, in order to “finish them off” when the hat is almost in, use a test as a guide. The tip of the punch should be slightly larger than the diameter of the nail head.

Kleimers are special brackets that grab the panel with one side, while the other is attracted by self-tapping screws to the guide rail. This is the most convenient way fasten the imitation of the beam. Installation in this way involves the purchase of kleimers, which incurs additional costs - this is a minus.
Having decided on the appropriate method of fixing the panels, you can proceed to their direct installation, which occurs in this sequence.
- With the help of a laser (water level), a horizontal line is beaten off along the perimeter of the building at the level of the top of the basement. This line will match the bottom edge of the first panel from the bottom.
- The first wooden imitation timber plate is installed with the spike down and fixed on both sides (top and bottom).
- The second and subsequent panels are inserted with a spike into the groove of the previous bar and are fixed only from above (to each vertical rail).
- The topmost panel in most cases does not fully fit across the entire width. To close the top of the wall, you have to cut the bar along according to the width of the open space, for which you need a jigsaw.
- In the corners of the building, in order for the joining to be inconspicuous and not conspicuous, it is better to cut the mutually adjoining strips of adjacent walls at an angle of 45˚. It is possible to impose evenly cut edges on the ends of the planks installed on the adjacent wall.
- If the length of the panel is not enough for the width of the wall, you need to connect the joining strips on a vertical rail, fixing the edge of each of them. To make the junction inconspicuous, it is better to cut the joining ends at an angle.
The corner joints of the timber imitation panels, the edge sections near the openings can be closed with special trim, which are attached over the wooden cladding with the same self-tapping screws or nails.
False timber, originally intended for facade cladding, has now become widely used for interior decoration. The technology of its installation inside the building does not differ much from the facade installation, but still has a number of nuances that you can find out by watching this video.
Do-it-yourself installation of imitation timber is completed. It remains to decorate the surface to your liking and enjoy the result of the work done.
Sheathing a house with imitation timber can be used for cladding walls from the most different materials, both external and internal, including for winter caracas houses.
The building, lined with imitation timber from the outside, looks like a solid wooden house built from real solid timber with a flat surface and rounded edges.
What is imitation timber
Imitation timber (false timber) is a facing material in the form of wooden panels similar to lining, but wider and thicker. To fasten adjacent boards during the installation process, a groove-thorn system is used. The thickness of the panels is most often from 1.6 to 3.6 cm with a width of 10-20 cm and a length of 200 to 600 cm in increments of half a meter. But there may be other dimensions.
 This material can be sheathed walls from:
- tree
- brick
- Brus
- Foam blocks
- Gas blocks
- cinder blocks
- Monolithic concrete
Installation
Having the skills to repair and construction works, you can mount the imitation yourself, provided that all technologies for sheathing the house with imitation timber are observed. It is recommended that the facing material be kept for about a week in the atmospheric environment where it will be installed. This is necessary so that the humidity of the panels becomes equal to the humidity of the local environment.
 Installation steps for exterior wall cladding:
- Vapor barrier fastening
- Lathing installation
- Insulation laying
- Wind and moisture protection mount
- Installing the counter grille
- Cladding installation
- Cladding processing
vapor barrier
For vapor barrier, you can use glassine, waterproofing or other similar material. Sheets are laid with an overlap of 10-15 cm. Rolls are attached to the top of the wall. To do this, you can use aluminum tape or another acceptable method.
It is not scary if the material does not fit snugly against the walls - subsequently it will be pressed against the crate structure. To ensure the integrity of the insulation, breaks and joints are glued with adhesive tape.
crate
The crate is made from a dry bar. It is previously recommended to treat the bars with bioprotective and flame retardant compounds. The thickness of the bar is selected according to the thickness of the insulating material, but not less than 3 cm. Any material can be taken for insulation. Read in advance, polystyrene foam, etc.
 The beams of the crate are fixed at a distance of no more than one meter from one another, so that the slats of the false beam lie flat. The size of the gap between the bars is selected depending on the width of the heat-insulating sheets. The elements of the crate are installed strictly vertically in level.
The bars are attached:
- Or frame dowels - to concrete, foam concrete, brick
- Either with screws, nails - to a tree
insulation
 Insulation is installed between the elements of the crate. It can be fixed in the following ways:
- Special dowels-nails for thermal insulation
- knitting wire
- Nylon twine
Waterproof membrane
The wind and moisture protective membrane protects thermal insulation from street moisture. You can use isospan or other material with similar properties. Sheets are glued together double sided tape and are attached to the crate with staples using a furniture stapler. Joints are glued with aluminum tape.
And if you are still dreaming of your big and cozy home, then we suggest that you familiarize yourself with the houses of the chalet from a bar. Find out all the benefits of such facilities.
Imitation of timber - interior decoration
 At interior decoration heater may not be installed.
Bars for crates can be used with a small thickness. They are installed at a distance of 60-70 cm. You can also use a galvanized profile, which is used for the installation of drywall.
Imitation of timber can be mounted on the ceiling. To do this, you need to use thin strips. At the same time, it is recommended to paint them before installation in place - this will reduce the complexity of the work.
In principle, indoors, if the base is even, you can do without crates and save inner space. But with the help of the crate, you can:
- Hide communication wires
- To achieve some warming of the room due to the air layer between the wall and the cladding
It is impossible to paint a false beam in a heated room immediately after installation. You have to wait 3-4 weeks. After drying the panels, small cracks may form in them, which will damage the varnish or paint.
If the timber imitation is mounted in compliance with all the requirements of the technology, it will provide a beautiful appearance of the lined surface and will last for many years.
Video on how to make house cladding with imitation timber
