Since ancient times, the bath has been a place where you can relax and unwind. These ancient buildings bypass even outdoor recreation in popularity.
How to build a bath yourself?
Building a bath with your own hands is a difficult task and its implementation will require a certain amount of knowledge, which you will soon learn about.

To build a bath with your own hands, you will need to familiarize yourself with the action plan:
- Design a bath
- Understand the stages of construction;
- Acquire building materials;
- Connect communications;
- Equip the bath from the inside.
After familiarizing yourself with the stages of construction, you need to decide on the place where the bath will be located, since a lot also depends on the location.

The best option would be if:
- the bath will be located on a hill, this will greatly simplify the installation of a water drain;
- next to the bath there will be a river or a reservoir;
- the window in the bath will be located opposite the house, which will allow you to observe its firebox.


For garden house the distance will be no more than 3 meters, and for buildings such as a bathhouse, this distance should not exceed 1 meter.


The design and drawings of the bath are best ordered from local designers, it will cost about 5,000 rubles. You can also search for ready-made sketches and photos of a bath on the Internet that best suit your preferences.

Bath made of brick, stone or blocks
Brick, stone or blocks can be used directly as materials for a brick bath.

To build a bath, it is necessary to dig a pit and fill it with 20 cm of sand, then it must be filled with water for compaction.

The second step will be laying rubble on top of sand 10 cm thick, which then needs to be covered with sand again.

The last step is to install a system for drainage and drainage of the building.

Bath from a bar
The first layer for the base of the bath will be laying sand at 20 cm, crushed stone is applied in the second layer, and concrete pouring is laid in the third layer. The key step will be the reinforcement of the building.

Metal rods must be inserted into the layers for more solid construction and as additional stability in the middle, you need to lay metal plates that are tied with wire.

Note!

The next stage of work is the blind area, which is needed so that the foundation of the bath is not washed with water.

It is best to make a blind area from clay, it is much stronger than concrete, and also does not form cold seams in the process. A layer of rubble must be poured over the blind area.

Next, you need to install a drain in the bath. First you need to dig a hole and bring its groove to the edge of the foundation of the building, cover the walls of the hole wooden planks with reinforced wire, and then pour everything with concrete.

Frame bath
The foundation for such a structure of the bath is made according to a simplified technology, which is the advantage frame bath. It is necessary to make a foundation of asbestos-cement pillars, which, after installation, are poured with a concrete mixture.

The next step is to mark the walls. Then you need to start connecting the boards using nails. From the boards, the upper and lower trim is assembled. The walls for such a bath are made in a lattice structure.
Note!


The materials that are needed for the walls are bars, insulation, and materials for the outside, such as OSB boards or a block house, and inside you can use the clapboard.

Materials for insulation and vapor barrier
It is worth warming the bath from the outside only with the condition of heating in the building.

For a wooden bath, it is necessary to make a grate that will be inserted into the insulation. The work will need mineral wool, the layer width of which will be 50 mm.
Floor in the bath
In the case of a frame bath, when it remains to insulate the floors, as well as install the floor boards, in addition, it is necessary to install logs, a subfloor, and fix the structure to remove steam, then lay the insulation and check the waterproofing.

It is best to make the floor of concrete, as this will allow the bath to dry faster and it will last much longer. Shields made of wood are laid on the concrete floor; they can later be taken out to dry and calmly leave on their own business.

Note!

DIY bath photo


Not everyone has the desire and ability to invest a lot of money in the construction of a bath. And in most of our country, warming up at times is simply necessary. The only way out is to build a bath inexpensively, with your own hands. There are enough building materials and technologies that can be called budget.
If we talk about the construction of full-fledged, albeit small, but free-standing baths, then the frame and monolithic are considered the most budgetary technologies. Cheap baths are often made on a wooden frame, sheathed with plywood, OSB, boards - whoever has what. Inside, between the two skins, a heater is laid.
One of the options for the frame structure - with board sheathing
In monolithic construction, arbolite is the most popular for the construction of baths - a mixture of cement with sawdust. Sawdust can be generally free or cost very little. Little cement is required in wood concrete, so this type of construction is unlikely to hit hard. Along the perimeter of the building is placed removable formwork, the mixture is loaded into it, rammed. The next batch is being mixed. It's that simple. Flammability is considered a disadvantage of this material, but wooden and frame baths are also combustible. So this is not an argument.
 Sawdust concrete or wood concrete - warm, natural material, which consists of sawdust, sand, cement and water
 Polystyrene concrete (granular foam mixed with cement and water) is not much more expensive, but not everyone likes the use of “chemistry” - foam plastic - in the construction of a bath. However, by itself, this material allows you to get a cheap and light building, which, when correct finish will only please the owners.
All three technologies give a combination of low price and good thermal performance, that is, heating such buildings requires little fuel, which in baths is the main indicator of efficiency.

There are regions where timber is still the cheapest material. They may be the cheapest to put chopped bath. From round timber or from a bar - this is already optional. The advantage of this solution is a natural material (although it must be impregnated with chemicals in order to maintain its appearance and protect against diseases and insects). But chopped baths have their drawbacks - you can start steaming no earlier than a year after the walls are erected and the roof is installed. We must wait until the main shrinkage has passed and only then begin warming and Finishing work. The second disadvantage is that it is necessary to regularly update the protective coating, otherwise the building will become gray and unsightly. But on their own wooden baths very good special atmosphere.
Inexpensive foundations
Inexpensive walling technology is far from everything. Sometimes the construction of the foundation takes almost half of the funds required for the construction of the building as a whole. The technologies listed above are good because you can make lightweight foundations for them. Somewhere it is enough columnar, somewhere pile or pile-grillage. Any of the walls listed above can coexist quite normally with them, leveling their shortcomings (possible uneven shrinkage of different support points).

The foundations listed above may not be implemented on all soils. Sometimes it may be necessary strip foundation shallow or normal laying, and on especially heaving or unstable soils, a monolithic slab may be required. On such grounds, in addition to the walling technologies listed above, you can add more building blocks- foam concrete, cinder block, expanded clay concrete. All of them have their own characteristics (basically, thorough protection from high humidity is required), but the construction technology is also inexpensive, although the foundations are required to be more solid.
Compact or temporary
If in the country you want to build a mini-bath, a very small booth, then you need to take a closer look at the construction technology or. If there is a desire, even an ordinary construction trailer, a barn or a change house can be turned into a more or less normal steam room. It is only important to insulate well and put the right stove. Everything else is not so important.
Cheap frame bath in stages - photo report
The initial data are as follows: a bath in terms of no more than 4 * 5 meters, a small budget - no more than $ 200-300 per month. From the initial data - clay heaving soil, 4 meters from the fence - a cliff. Bringing it all together, it was decided to build frame bath on a columnar foundation.

The bath itself turned out to be 5 * 3 m, plus a terrace 1 meter wide along the long side. Under the bath, it was decided to make pillars from asbestos-cement pipes 34 cm in diameter, under a terrace of 15 cm. In the center of the plan, 4 additional pillars are marked - this is the foundation for a brick oven.

We dig in below the freezing depth - for this region it is 140 cm. By the way, we cut pipes by 20 cm more - the total length is 160 cm, so that the bath is 20 cm above the ground.


Inside each column, a frame of reinforcement 12 mm in diameter is installed. 4 rods are connected, the release from the post is 10-15 cm, so that you can safely weld then the strapping.

Concrete was ordered ready, brand M250. A formwork was put up along the perimeter between the pillars and a boat was immediately poured, which will close the gap between the bath floor and the ground.
A week later, the concrete gained enough strength, work continued. A harness was welded from a corner 70 * 70 mm with a wall thickness of 6 mm (the corner was on the farm). To connect the pillars and metal, we weld the reinforcement outlets to the shelves of the corner.

It must be said right away that bearing capacity this foundation is redundant. On it you can build a two-story heavy building, and not a light one-story frame. But, since they did it “for themselves”, and there is also a clay cliff nearby, it was decided to play it safe.
It was decided to make warm floors in the washing and rest room - sometimes you just need to wash yourself, without soaring, and doing it on a warm floor is much more pleasant.

Therefore, a heater (polystyrene foam) was laid on the draft floor, waterproofing, a reinforcing mesh were laid on top, pipes were tied to it, and all this economy was filled with concrete. Under the stove, of course, the warm floor was not poured.

A week later, when the concrete gained enough strength (they didn’t cover it, but watered it regularly), work began on the construction of the frame. For the racks, a beam of 150 * 150 mm was used, spacers - a board of 50 * 150 mm (again, a solid margin of safety, but this is from the desire to build a good bath).

The bathhouse was built mostly alone, therefore a consistent installation method was chosen - the racks are placed first in the corners, then - in those places where door-windows will be installed or piers will adjoin. If, as a result, somewhere there are gaps greater than 1 meter, additional racks are placed. But in this case, since all the racks were made of a very powerful beam, they did not install intermediate ones, and the structure was given rigidity by slopes.
Further, so that when laying the floor it would not drip on the head, they began to manufacture the roof of the bath. It is made the most budgetary - single-sided, with a minimum rise - 15 °. To ensure this slope, the timber for the racks was pre-made in different lengths.
A board of the upper trim is nailed to the racks at the same level, ceiling beams are attached to it. Rafters with the required slope are attached to the same racks. From above, a continuous crate is stuffed under the roofing material.
 truss system pitched roof very easy to make
 After the roof was ready, the OSB walls were sheathed, and then the floor was laid on the rest of the bath.

The next step is laying the oven. This is a long process - it took a whole month. The stove is stacked with a closed heater. In the zone of formation of the chimney, a cast-iron box is built into which stones are placed. A door leads to the heater, which opens into the steam room.
The stove also has a built-in register that heats water for underfloor heating (outlets on the side of the stove). It is not always necessary to heat the floor, because there are two modes of operation - summer without floor heating, and winter, with the “turning on” of the register heating. Transfer from one mode to another - with the help of a valve.

This is followed by finishing work, and they will be different in different cases. The only thing that will be more or less common is insulation. Mineral wool was used to insulate the walls and ceiling. The thickness of the layer on the walls in "cold rooms" is 100 mm, in the steam room and on the ceiling - 150 mm. The steam room on top of the insulation is also sheathed with foil on kraft paper.

After the insulation, a vapor barrier is attached. In the rest room, the walls are sheathed with OSB, cork is glued on top. In the shower room, tiles are glued on the OSB, the “dry” part is upholstered with clapboard (horizontally).
 Washroom - dry area and shower room
 In the steam room, first, a crate for lining with a clapboard is stuffed, then a wide clapboard. The steam room turned out to be quite small, and the stove also takes up a lot of space. Two are accommodated comfortably, three are already more difficult, but also quite convenient. To regulate the number of seats in the steam room, the shelves were made retractable.

The entire construction process took two years, the work was carried out mainly "in one hand". Assistants were only at the stage of pouring the foundation, and then at the stage of installing the frame - to set up the racks (they should be 100% vertical).

Video example of the construction of a bath from a monolithic wood concrete
Inexpensive do-it-yourself bath 3 * 6 - step by step photos
The log for the future bath was prepared and sanded in advance, covered from the rains, it dried for about 5 months. The building will consist of two halves: a steam room and a sink made of logs, and a rest room on a wooden frame. It turns out two rooms 3 * 3 m. Construction began with a markup: in terms of 6 * 3.

The soil is sandy, so we make it shallow. We dig a trench 60 cm deep, expose the formwork. The width of the tape is taken with a good margin - 35 cm.


We make doors - from a frame, on which OSB is stuffed on one side, and lining on the other. About how to do

In this form, we leave to winter - the log house should “sit down”. In the spring, we insulate the frame part of the building, we cover the insulation with a vapor barrier membrane.

Let's start finishing the ceiling. It was decided to make a budget filing of the ceiling - to fill short boards between the rafters. They can be bought quite cheaply. We process, cut the desired length. We stuff on the rafters support bars, to which we knock down the boards cut to size from below.


Outside, the yuan was sheathed with siding - both the frame part and the log cabin. It turned out to be far from ideal. And between the siding and the wall there is a ventilation gap, so there are no problems with removing moisture.
 Budget bath do-it-yourself - another inexpensive solution - siding
 Started upholstery interior spaces. We stuff the crate, lining on it.
 Inside the rest room sheathed clapboard
 We turn to the finishing of the steam room. First, cover everything with foil. The room itself will consist of a steam room area, separated glass door, and washing zones. In the washing wall, we will sheathe it with moisture-resistant drywall, on which we will then glue the tiles, and in the steam room - with clapboard.


 We sheathe the steam room area with clapboard and
 We cut an opening in the wall for the installation of the furnace. She will be heated from the rest room, and her “body” will be in the steam room. We lay a brick base under the oven, install it. We cover the fuel outlet with fireclay bricks.


We tile the sink.


Everything about the main work, the decor and all sorts of things remained - buckets, ladles, thermometers and the rest of the “stuffing.
Almost every land owner, sooner or later, thinks about building a bath. After all, the bath is not just a room for washing, but also important element holiday vacation. The construction of a turnkey bath can be ordered from professionals for a tidy sum, or you can try to build a bath with your own hands.
After reading this article, you will be able to choose a project, find out the sequence of the construction process, get acquainted with the models of boilers and find best option baths for your dacha.
Before starting construction, it is necessary to develop a bath project. To do this, it is not necessary to contact an architect, you can develop a simple project yourself, especially since now there are many computer programs for designing.
Think about what size bath will be optimal for your family. What rooms will be located inside the bath. From what materials to make the foundation, walls and roof, do not forget also about the decoration of the bath. An important point in design, is the location of the boiler and the method of its combustion.
Below you can see the popular projects of baths:

- Bath project size - 4x4 meters.

- Bath project - 4x6 meters.

- Bath project - 5x6 meters.

- Bath project - 6x3 meters.

- Bath project - 3x3 meters.
After you have decided on the size and materials for the bath, you need to draw up a cost estimate.
Foundation
For the construction of a bath, several types of foundation are used. Depending on the weight of the walls and the characteristics of the soil, the following types of foundations are made:

- Slab foundation.
- Column foundation for light walls.
- Pile foundation.
- Concrete strip foundation.
As practice has shown, the most reliable foundation for almost all types of soil is a concrete strip foundation reinforced with reinforcement.
To make a strip reinforced foundation for a bath, you will need:
- Cement.
- Sand.
- Gravel.
- Fittings.
- Formwork.
- Ruberoid.
- Wire.
- Shovels.
- Concrete mixer.
- Harness.
- Stakes.
- Tools (pliers, hammer, tape measure and others).

In the place chosen for the construction of the bath, mark the trench for the future foundation. For marking, use a tourniquet stretched between the pegs. The width of the trenches is made based on the weight of the material for the walls. For a one-story bath made of wood or brick, it is enough to make a trench 30-40 centimeters wide. After installing the markup, do the following:
- Based on the markings, dig a trench 50-80 centimeters deep.
- Tamp the bottom of the trench and fill it with water to shrink the soil.
- Cover the bottom of the trenches with roofing paper for waterproofing.
- Fill the trench with gravel to a third of its depth.
- Install the formwork along the edges of the trench.
- Make a frame reinforcing the foundation, from reinforcement rods interconnected by wire.
- Install the reinforcement cage into the formwork.
- Using a concrete mixer, make a cement mortar in the proportion of one part cement to one part sand and two parts gravel.
- Pour the cement into the formwork, being careful not to allow air pockets.
- After the concrete has dried, remove the formwork.

The foundation for the bath is ready!
Walls
For the construction of walls use the following materials:
- Wooden beam.
- Logs.
- Boards.
- Brick.
- Blocks from various building mixtures (cinder block, aerated concrete, wood concrete, and so on).
Since the construction of a bath from logs or bricks has already been quite widely described on the Internet, let's consider the option of building a frame bath from a bar of 15x15 and 5x10 centimeters and boards with a section of 2x15 centimeters:

- Make the lower trim, for this, take bars with a section of 15x15 cm and install them on the foundation, connecting them with special metal plates and corners. There is another way to connect the bars, by cutting spikes, grooves at their ends and then fastening them with screws or nails. When tying, do not forget to put waterproofing under the bars.
- Install vertical racks from a 5x10 cm beam. The distance between the racks is usually 50-60 centimeters. First of all, determine the position of the window and doorways and install the racks framing them.
- In the process of work, fix the already installed racks with temporary strips so that they do not warp.
- Make the top harness by attaching it to the ends of the uprights.
- When making the final fastening of the upper trim, carefully monitor the position of the vertical racks, checking their evenness with a level.
- Be sure to strengthen everything corner connections diagonal racks, this will help to avoid warping the frame.
- Make a ceiling sheathing.
- After making the frame, make the outer cladding of the walls of the bath with a board with a section of 2x15 centimeters. If you do not want gaps between the boards, then make the sheathing - "overlap", laying the bottom edge of the board on the nailed board. By appearance, this method resembles the decoration of walls with siding.

- Having sheathed the bath from the outside, proceed to the installation of insulation. Styrofoam sheets or mineral wool installed along the vertical racks of the frame.
- On top of the insulation, it is necessary to install a layer of vapor barrier, which is attached to vertical racks using thin rails.
- After installing the vapor barrier, make the inner lining of the bath with clapboard or slats.
- Insulate the ceiling by laying vapor barrier sheets on the inner lining, then insulation. Sheathe the ceiling from the outside with plywood sheets.
Please note that the manufacture and insulation of the ceiling can also be done after the installation of the roof.
Roof
The roof for the bath is of three types:
- Shed.
- Gable.
- Complex - consisting of four or more slopes.
Usually, the first two options are used for a bath. Let's look at the option gable roof covered with metal tiles: 
The manufacture of the roof begins with the installation - Mauerlat. In case of frame walls, the role of the Mauerlat is performed by the upper stroke.
- Install the uprights on the bench.
- Connect the racks with girders and puffs.
- Install the rafter legs by attaching them to the Mauerlat, run and connecting the upper ends to each other. The distance between the rafters should be 50-60 centimeters.
- Install sheets of metal.
- Sheathe the gables with wooden slats or sheet iron.
For a more visual acquaintance with the roof fastening, the following figure is shown: 
All sizes of roof elements are listed: 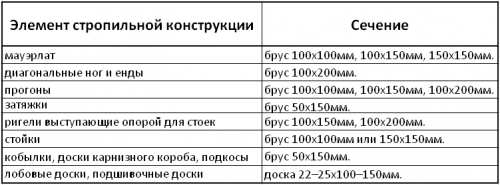
Keep in mind that the smaller you make the slope of the roof, the more snow load will fall on it in winter. Also, a small slope of the roof can lead to poor drainage and leaks.
floors
The design of the floor depends on the type of room. In the rest room, ordinary wooden floors are made. In the washing and steam rooms, the floors are made of two levels:
- The first level is made of concrete, has a slope towards the drain hole.
- The second level is a finished floor made of boards with gaps for draining water.
If you want to make a porcelain stoneware floor or tiles, then they simply fit on the first level at a slope to the drain hole. 
In order to make a concrete floor and drain in the bath you need:
- In the center of the steam room and washroom, install plastic pipes with a diameter of 5-10 centimeters with a bell at the end. Pipes must go through the foundation to the street and connect to the sewerage system.
- Lay down a layer of waterproofing material.
- Spread a layer of gravel 10-15 centimeters thick over the entire area of \u200b\u200bthe rooms.
- Make a cement mortar and pour the floor with a slope to the hole installed on the drain socket pipe.
- Install a grate on the drain hole to prevent debris from entering the sewer.

At the second stage, wooden floors are made:
- Install baths in all rooms wooden logs. Make the distance between the lags 30-40 centimeters. As a log, you can use bars with a section of 3x5 cm or 4x6 cm.
- Nail boards with a section of 2x15 cm or 5x20 cm onto the logs.
- In rooms where water is supposed to be drained, leave gaps of 0.5-1 cm between the boards.
Don't forget before starting the installation wooden floors, treat all parts with impregnation for wood. When making floors, keep in mind that they should be above, or at the level of the top edge of the foundation.
Boiler
The model of the boiler for the bath will largely depend on your financial capabilities and the fuel that you will use for heating. If you know how to use welding, then you can make a simple boiler yourself, from thick sheet iron. If you prefer more advanced colas on gas or electricity, then they can be purchased from specialized companies.
The boiler in the steam room is installed in such a way that the combustion chamber is loaded with fuel either from the street or from the rest room (dressing room). The boiler itself, in order to fire safety, is located 10-15 centimeters from the nearest walls. Walls to the height of the boiler, covered with sheets of iron. A good solution would be to overlay the boiler with bricks, thereby reducing its cooling time and protecting the walls from fire.
When arranging a chimney for a boiler, pay special attention to the place where the pipe is in contact with the ceiling. The hole for the chimney should be insulated with a refractory material. Also, pay attention to the place where the chimney pipe exits through the roof. Usually, this place is prone to leakage, so it should be carefully sealed. Below are the options for boilers for the bath:

- Homemade boiler from sheets of metal.

- Gas boiler.

- Electric boiler.

- Solid fuel boiler.
Bath arrangement
After the bath is built, it is necessary to equip it:

- Bring to the bath all the communications available on the site - electricity, sewerage, water supply.

- Place inside the sink, shower, light sources, furniture for relaxation.

- Decorate the walls of the steam room with curly slats and make stepped shelves.

- Buy wooden tubs, buckets, buckets and brooms.
After the arrangement, you can safely invite guests to take a steam bath in your personal bath!
You can also see the instructions for assembling a mini-bath for giving without a foundation in the video:
Variants of beautiful and unusual baths
In addition to traditional materials and design for a bath, there are many alternative solutions. Below we give photos of the most unusual baths:

- A mobile bath from a "lining", built on a car trailer.

- Sauna in a huge wine barrel.

- Bath from plastic bottles.

- Bath dugout, built right in the ground.

- Bath housed in an iron container.

- Forest bath from raw logs.
![]()
- A beautiful bath from a gun carriage.

- Bath from unedged boards.
At the end of the article, I would like to remind you that heating the bath is associated with fire and high temperatures. Therefore, when building a bath from bricks, logs, cinder blocks or boards, pay great attention to fire safety. This warning also applies to the electrical wiring device, since the rooms inside the bath have high air humidity and the risk of a power outage due to condensate is very high. 
We hope that reading our article will encourage you to build a bath yourself!
Bath - how much in this word! The smell of birch brooms, fertile steam, a tub cold water on steamed shoulders, renewal of the body and spirit in the pleasant coolness of the waiting room ... It's time with pure thoughts to start building the Russian bathhouse, which came to us from time immemorial. The traditional "soap" will not be replaced by any newfangled jacuzzi bath or shower.

The foundation for the bath is chosen based on its size and the type of soil on which it will stand. As a rule, the owner is faced with a choice between columnar and tape foundation.
The wooden bath has light weight and can be safely erected on shallow basis.

On the columnar the foundations of wooden baths in the country are set more often. Such bases are simpler, they are erected from support pillars that are installed separately. Supports are built of reinforced concrete, brick, concrete or rubble stone. Pillars made of natural material or brick (size 51-51 cm) erected at the corners and walls of the building at a distance of about 2 m from each other.
Optimal cross section supports - 60-60 cm. Often a pillow of gravel and sand is arranged under them.
The columnar foundation is built to a height 20-30 centimeters from the ground level, the top is leveled with mortar and covered 2-3 layers of roofing material - waterproofing:

Let's move on to the second type of foundation.

Tape the foundation will cost more, because it will pass around the perimeter the buildings. Pre-dug a trench deep 40-60 see. A sand cushion is compacted to the bottom, the task of which is to protect the base from seasonal soil displacements:

The foundation is fastened with mortar, and filled with rubble, concrete or reinforced concrete blocks, red brick. Rubble bases are made in different widths, depending on the size of the building and interior design of the bath.

Reliable and rubble concrete foundations. As a filler for them are used: crushed stone, gravel, brick breakage. If the foundation depth is up to 1 meters, at the bottom of the trench, you first need to pour a layer of concrete. After that, put the filler in a layer 15-25 cm, pour the solution and tamp.
After leveling the base, install on top of it waterproofing from two layers of roofing material and poured with bitumen:

We suggest that you familiarize yourself with our article, which indicates the main errors that occur when arranging the foundation - what you need to know before you start pouring the foundation.

Tree- this is a traditional material for the construction of a bath, therefore, we do not consider options for building walls from cinder blocks, bricks, foam blocks and other materials within the framework of the article. To build the perfect wooden bath, you need to pick up special log- after harvesting, the wood is “aged” for about 2 -s years.
Dried the forest does not contain "extra" moisture, and therefore does not deform, is resistant to cracking.
A wooden substrate is laid on the waterproofing 50-60 mm thick and not less 150 mm wide, filled with tar or bitumen.
Before installation crown crown(its lower surface is impregnated with antiseptic compounds) is spread evenly on the lining tow, dry moss or stripes mineral felt. And between the logs are placed interventional sealant.

Logs for exterior walls cut off on one side for internal and partition walls- from two sides to the depth 2-3 see. The felling begins with the first (cold) crown, it is made from a log hewn from two sides at an angle 90 °. The lower surface of the forest is laid on the foundation, and its side becomes the beginning of the inner wall.

Avoiding the use of conifers to decorate the interior of the bath, use wood alder, aspens, lindens, less often larches and cedar.
Aspen- this is an almost perfect answer to the question about the choice of material for interior decoration.
Ceiling in a log, in a brick and in a panel bath it is done the same way. A distinctive feature of the ceiling for chopped "soap" - it can be made of boards. This will give the structure a natural look. It turns out the interior is "antique", but there is practical sense: natural roof provides intensive air circulation with good thermal protection.
Can be arranged additional thermal insulation:

To perform installation ceiling for a bath, you need wood that has low thermal conductivity well tolerates changes in humidity and temperature. With low resin content.
Temperature under the ceiling of the bath is the highest and if the boards contain a lot of resin, then it, heating up, will drip down. Therefore, for arranging the ceiling and interior decoration of the steam room, wood should be used. exclusively hardwood.

Plank floors lay in this way: first, install on the concrete layer brick pillars section 25-25 see, logs are laid on top of them. Boards are laid on the lags 20-30 mm thick:

Material moisture should not exceed 12 %, otherwise the boards will begin to deform after laying.
stone floors Baths last much longer. Concrete mortar must be poured over a gravel pillow. Such floors are durable and reliable, however, they have one, but a large flaw: they are cold. Therefore, wooden ladders or boards must be laid on top of the concrete floor.

Can be done and warm floor. For its manufacture, any heat insulator: glass wool, mineral wool, basalt wool, expanded clay, perlite, expanded polystyrene.

Roof and roof

The rafter roof consists of the following elements:
roof truss. A rigid bundle of beams, which serves to distribute and dampen the loads that have arisen in the system. Rafters are the main massive parts of the structure, on which the weight of the entire roof is distributed. Stiffeners enhance the stability of the beams.
crate. A horizontal base made of timber, stuffed over the rafters for tight fastening of roofing materials.
Mauerlat. A wooden beam, located on top of the finished walls, and used to connect the rafters to the walls of the building.
Below are the main, time-tested construction schemes roofs:


Wood-burning stoves are 2 types: metal and brick. Let's talk about them in more detail and not ignore electrical ovens.
Metal ovens

metal a batch oven without a water heating tank is very compact. In an iron casing with doors, grates with a stove are placed on metal shelves, which make up the bottom of the combustion chamber.
Inside the case there are cavities where they put stones. There are heaters open and closed types. During the operation of the furnace, gases enter the chimney pipe, passing through the channels. The firebox is usually lined with bricks:

The oven is equipped chimneys consisting of sinkholes and prefabricated pipes. The rock chamber has two doors, but chimneys are often provided to let flue gases into the bottom of the rock chamber from the space around the duct.
brick heaters

construction brick heater begins with the construction of its foundation. So that the stove does not sag or tilt due to freezing of the soil or moisture, the base must be deepened to 0,5 meters. The transverse dimensions of the support must be more than the oven, one brick.
Foundation for the oven does not need to be combined with wall. The distance between them is no less 5 centimeters.
Most the best base - concrete or concrete. In dry soil, it can be built with bricks using cement, lime or lime-cement mortar.
The surface of the foundation must be poured with a cement-sand mortar, leveled with a rail and covered with waterproofing. Usually it is roofing felt or roofing material, which are laid in 2 layer (item 4 in the diagram below):

Notation on the diagram are:
Sole.
underground part.
Upper ledge.
Waterproofing.
Furnace masonry.
Building material for the construction of the furnace- ordinary solid brick. In no case silicate or hollow bricks cannot be used for masonry.
Electric heaters

V modern baths air up 100 °C is most often heated electric heater with built-in automatic control device. The control unit turns off heating element when the casing temperature exceeds the permissible norm, as well as when a towel gets on the stove, for example.
Electric heater in the bath must be equipped with a temperature limiter, turning off TEN, and a time relay that stops the supply of current to the heating element after a certain operating time (up to 5 hours). Today the market is full of various modifications.

Let's give several useful tips that will come in handy when going to the bath:
Dry birch firewood ideal for heating the stove in the bath. Do not arrange unnecessary experiments.
For the beginner attendant time spent in the steam room should not exceed 5 minutes. Experienced people can stay in the steam room more: from 25 before 30 minutes.
The musty spirit in the bath can be eliminated, if you add a few drops of ammonia to the ladle and splash it on the stones. Do not forget to air the steam room after.
Do not go to the bath on a full stomach. But a couple of cloves of garlic, on the contrary, should be eaten. This vegetable well removes toxins through sweat.
Contrary to popular belief, you should not take beer and, especially, strong alcohol with you to the bath. Please the body with tea or a decoction of rose hips, raspberries.
Choose a picturesque place for a bath. The courage of decisions is rewarded with a double pleasure from the process.
Lastly, let's take a look video, on which the issue of building a bath is analyzed in detail:
Washing in a country bath is a pleasure available to everyone. Its construction does not require large financial investments. In the minimum layout, such a structure is being built in a few days.
In this article we will consider the topic of how to build the simplest bath in the country quickly and inexpensively.
Let's start by studying ready-made options, we will discuss the designs of walls, floors, stoves and sewers that are popular among masters.
Design features
The main conditions for the comfort of any bath are:
- Walls, floor and ceiling well protected from heat loss.
- Reliable isolation of structures from water and steam.
- Compact fast heating oven.
- Efficient sewerage and ventilation.
Examples of country baths
In photo No. 1 we see the simplest bath, reminiscent of a barrel of Diogenes. You can only steam in it. It will not be possible to wash here, because there is no sewerage in the building. However, if desired, it is easy to do. To do this, you need to install a standard shower tray in the corner of the bath and remove drain pipe into a septic tank.

Photo No. 1 Build such a “barrel bath” in the country and take a steam bath
An important advantage of this design is its low weight, which allows it to be placed on a wooden terrace.
The device of the simplest bath from the container category is shown in photo No. 2.
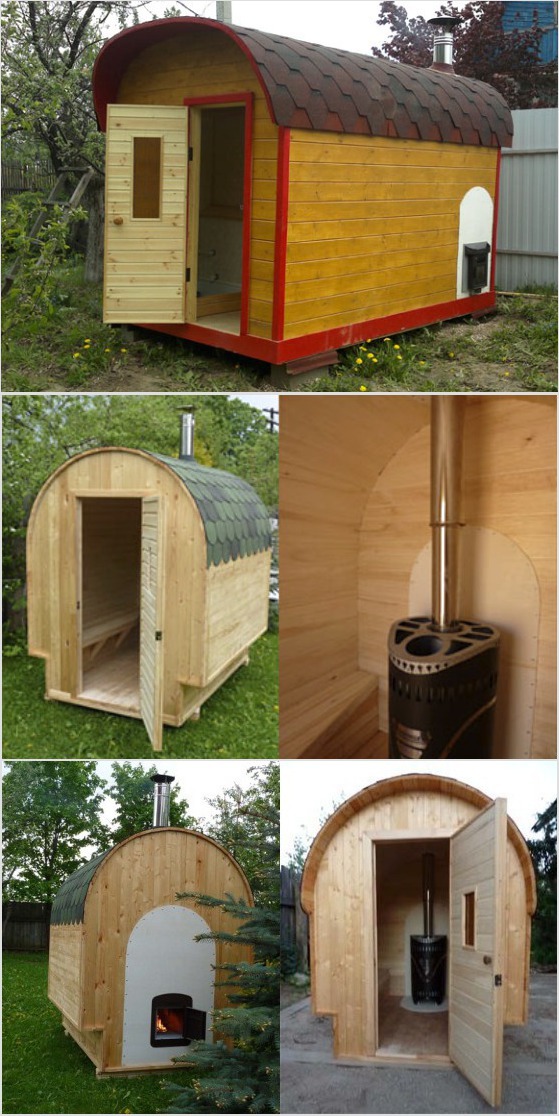
Photo No. 2 Option container country bath
It consists of one steam room. For washing, the owner needs to attach a canopy with outdoor shower or supplement the room with sewerage, and the stove with a tank for heating water.

Improvising on the theme of a barrel-shaped bath, let's pay attention to cellular polycarbonate. It can be quickly and easily assembled original design. In order for it to keep heat well, you will need two large sheets of this material and a frame made of metal or wooden blocks. Between them, a mineral wool insulation, 10 cm thick, is laid.

The ends of the structure can be made of boards by stuffing them onto a wooden insulated frame. Put such a bath anywhere: in the country, on a polar ice floe or on the top of Everest, and you will always be comfortable in her steam room (photo No. 5).

Photo No. 5 A simple barrel-shaped bath
A small Russian bathhouse made from timber scraps can be installed on oak posts. We see an example of such a structure in photo No. 6.

Photo No. 6 Oak posts - an excellent support for a small wooden bath
Larger structures need their own foundation. There are three options here:
- Concrete tape.
- Brick pillars.
- Piles from asbestos-cement pipes.
Do not forget that the type of foundation affects the choice of material and the design of the walls. Pile and column foundations are used for installation wooden frame, as well as for baths made of timber or logs (photos No. 7 and No. 8).

Photo No. 7 Sauna from SIP panels on screw piles

Photo No. 8 Brick columns - the best option for timber, log and frame structure
The "tape" of rubble concrete is suitable for any walls (from gas silicate blocks, logs and frame).

A cheap, reliable and simple version of the bath is obtained by technology. For such a structure, you will need a little: a firewood truck, a cart of straw and a clay dump truck (photo No. 10).

The best shape of a wood-burning structure is round. It eliminates the need to reinforce the masonry corners, looks aesthetically pleasing and original.
Borrowing from birds the technology of building nests from branches and clay, you can build just such a simple and warm bathhouse (photo No. 11).

Photo No. 11 Wicker frame coated with clay - "know-how" of an inexpensive bath design
Recommendations for the choice of finishes, insulation, sewerage, floor, roof and stove
For exterior finish frame baths, you can recommend the following materials:
- Wooden blockhouse.
- Metal tile or profiled sheet.
- plastic siding.
- Cement particle board (DSP).
- OSB board.
- Flat slate.

Photo No. 12 A simple, but at the same time very nice version of the exterior of the bath with the help of unedged boards
As a heater, it is best to use ecowool. It does not accumulate moisture, does not rot and does not burn. If there is no ecowool in your area, then you can buy a regular mineral insulation in the form of a semi-rigid plate. It is easily and simply placed in the gaps between the racks of the frame.
To protect the mineral wool from water vapor and reduce heat loss, the walls are lined with sheets of foil polyethylene. After that, a frame of slats is attached to them and trimmed with wood: alder, linden or pine clapboard (photo No. 13).

Photo No. 13 Steam and heat insulation of the walls of a country bath built from any material
We do not recommend installing OSB board indoors. This material releases toxic gases when exposed to high temperatures.
Variants of steam and heat insulation of the walls of the frame structure, as well as a bath built from blocks or logs, are shown in Figure No. 1.

Building a simple do-it-yourself bath includes a sewer. It can be made from standard plastic pipes, derived in cesspool or drainage well.
The water intake funnel is placed in the center or in the corner of the room, and the floor is made in the form expanded clay concrete screed with a slope towards the drain. Before concreting, it is necessary to compact the soil and cover it with several layers of waterproofing. Wood flooring is a great option, but in a bath it rots quickly and needs to be replaced. Instead, we recommend making gratings from wooden slats and laying them on concrete screed. After washing, they can be removed, taken outside and dried.

The design of the bath ceiling is standard. First, a vapor barrier film is “shooted” to the rafters and counter-rails (3x4 cm) are stuffed. They fix the lining of the lining. The gaps between the rafters are filled with insulation and covered with a roofing film. It protects it from weathering and atmospheric moisture (Fig. No. 2).

Fig No. 2 Design of the ceiling of a country bath
A counter-lattice is stuffed onto the film, creating a ventilated gap between the roof and the insulation. The work on the installation of the ceiling and roof is being completed by installing the main crate and laying roofing material(slate or metal tiles).
The main "detail" of any country bath is a stove. She must provide fast warm-up air and maintain a high temperature. The metal stove heats up the fastest.
To accumulate heat and create steam, it must be equipped with a compartment for stones. There are a lot of options for stoves for simple baths, so we will not dwell on them in detail. Let's just say that the simplest heat generator can be made from steel pipe large diameter, an old gas cylinder or barrel (photo No. 15). Another easy-to-use material is a steel sheet 3-5 mm thick (photo No. 16).
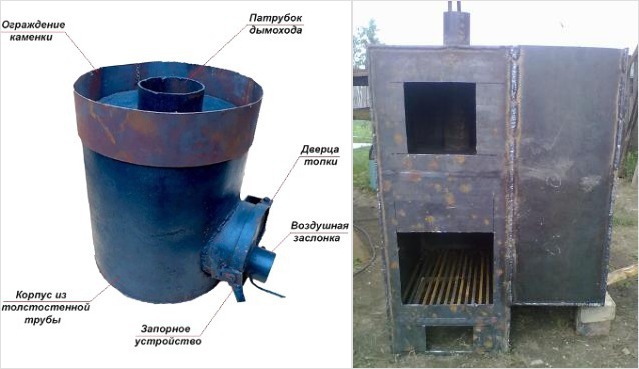
Photo No. 15-16 A simple pipe stove and a ferrous metal stove
Knowing the simplest welding techniques, you can assemble such a structure without outside help.
