Children's suspended swing for the street from the point of view of design does not differ in variety: several frame options, suspension on a chain or rope, plus a seat.
So the craftsmen are making up for lost time, coming up with the most unusual swing seats, most of which can be made with your own hands from improvised means (remnants of lumber after the construction of the swing: boards, slats, beams, logs).
Baby seat for a swing with your own hands - a set of ideas
In this article, we will look at how to make a swing seat so that it is comfortable, beautiful, inexpensive and reliable.
1. The choice of material for the seat device
What can be used to make a balance swing seat?
- from hard materials - plywood, board, timber, log, plastic;
- from soft materials - foam rubber, felt laid in a cover;
- leave without a seat altogether, because it is quite convenient to sit on the very balancer made of wood (rocker).
What to make a outdoor swing seat?
Made of plastic
The plastic swing seat is the most affordable. A plastic seat is purchased ready-made and installed on a swing. The disadvantage is fragility and low strength. If several children sit on the seat (and they manage to fit together, three or four), then the plastic will not withstand and break. In addition, any plastic deteriorates under the influence of ultraviolet radiation and low temperatures... It is rarely bought for the street, because under these conditions, his life span is very short;
Made of metal
The metal seat is suitable for metal swings that are installed in public playgrounds. However, a swing with a metal seat does not attract children at all when it is hot (the seat is very hot) or cold (in winter). Therefore, this option is not acceptable for a home swing;
From rubber
The rubber seat is suitable for intensive use. It is not quite comfortable to sit on it, and it is simply dangerous to ride while standing, therefore, only a few parents give it preference;
From fabric
A cover with a filler (pillow, mattress) cannot act as a seat on its own, but they are placed on top of the main structure so that a child, especially a toddler, is comfortable. The padded seat ensures that the little one does not harm themselves while on the swing. However, the fabric is afraid of water, therefore, it must not be forgotten to bring it into the house;
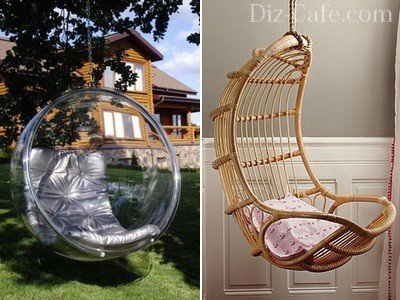
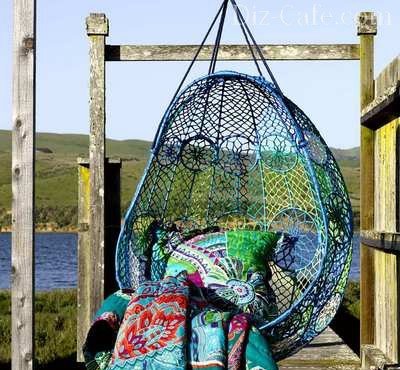
From a hoop, rope and elastic
You can make a nest swing (web) from the hoop. For manufacturing, a hoop 120 cm in diameter is used and twisted with a rope using macrame technology. The round spider web seat looks very stylish. Usually this material is used to make hanging garden swing;
From a car tire
Old tires can be tied up as a ready-made element or you can form different shapes from them. It should be noted that the strength of a figured seat made of a tire is much lower than that of a whole one;
Made of wood
The simplest and most convenient material for arranging seating, since it is accessible on one side and easy to process. On the other hand, it provides unlimited scope for imagination. After all, a carved seat for a children's swing made of wood can become a work of art;
Plywood, OBS, chipboard
A more budget-friendly option for wood-based seating. Their common disadvantage is that they are multi-layered. As a binder, formaldehyde is used, which is a dangerous carcinogen, and they also swell from moisture, therefore they are not suitable for outdoor swings.
2. The choice of the material of the suspension for the swing
The suspension is what keeps the seat on the swing frame. For the device of suspensions, the following materials are used:
For flexible hangers:
- chain. Choose a chain with solid links, not bent links. Otherwise, the links can untwist (unfold) and the seat will break off;
- rope (cord). It is better to use a climbing rope as it is the strongest;
- metal cable;
- belts of sufficient strength.
For rigid suspensions:
- tree;
- metal.
3. Calculation of the number of suspensions for the swing
The mounting method depends on how many hangers will be used:
- one suspension. Such a suspended swing requires a well-developed vestibular apparatus to maintain balance and swing;
- two suspensions. The most convenient option for a child, because suspensions located on both sides of the seat are comfortable to hold and swing.
- three suspensions. It requires the ability to keep balance while riding on such a swing. Used when arranging a round seat.
- four suspensions. Good for attaching a wide garden swing seat or when installing a swing seat with a backrest.
How to make a seat for a swing with your own hands
Wooden seat
The easiest way to make a swing seat is to saw off a piece of board and sand it. The size can be taken with a margin or taking into account the parameters of the child.
Sitting-beam
Two well-polished logs are bonded together. This convenient way make the seat quickly and at the same time fix it on the suspension.
Plank seat
Wooden planks of a certain size (of the same length and width) are cut, longitudinal holes are drilled through which the rope is passed.
Swing seat from an old chair
A chair with a back without legs is used, suspended on ropes. If the design allows, the chair can be suspended by drilling holes in the seat, if not, you need to add two crossbars at the bottom. Fasten a chair on them and hang.
Unusual wooden swing seat
Such a purely functional product as a seat can be a place for the realization of the creative imagination of parents. A carved or original plane seat, or a ship - all this will only delight the kids. For those who have doubts, users are advised to cut out a test seat template from cardboard, and then transfer the drawings to a tree (or make a stencil from cardboard elements).
Car tire swing seat
An old tire can be hung in its original (whole) form or an animal figure (horse, swan) can be cut out of it. The tire cutting scheme is shown below. This is a simple and affordable way to make a swing seat from a tire on chains for a summer cottage.
Round seat made of mesh and hoop (swing-socket)
The first way is to weave a web of rope using the macrame technique. In order to make a swing in the form of a round wicker nest (mesh), you need to prepare a strong hoop (or two different diameters, 120 and 60 cm, if a backrest is planned), foam rubber (so that the rim is soft) and a roll of rope. The technique of making a swing "nest" with your own hands is shown in the diagram.


The second way is to use fabric instead of spider webs.
 Diagram of a hanging swing "nest" from a hoop and fabric
 Suspended swing mount "nest"
 Workshop on making a hanging swing "nest"
 How to make a swing "nest"
Pallet swing seat
A seat made of a wooden pallet can become a full-fledged berth, provided that the suspensions are properly attached.
Metal seat
Metal seats for summer cottages are usually not made. First, they are hot in summer and cold in winter. Secondly, manufacturing is laborious. Third, exploitation is more dangerous. Therefore, most often they make a metal swing frame and a wooden seat.
Baby seat for toddlers
A seat for children under 3 years old must be made with a back. As a rule, the seat backs of a swing are made of fabric or planks. Fabric seats are designed for the smallest, but a swing with a wooden seat is designed for those who are confident in the saddle. And if you put the board in front of the swing, you can combine the seat and feeding table.
Advice. So that the child does not slip out of the swing, you need to provide a stop bar in front. In addition, for the convenience of the child, the handles (armrests) should be rigid.
How to fix (hang) a child swing seat
- cut corners in a wooden seat from opposite sides and "put" the seat on a rope suspension. In this case, the seat is not attached to anything and is held on a suspension under the weight of the child. You can make a double wash, this will avoid the seat tipping over;
- drill four holes in the prepared wooden seat and pull the ropes through them. So that the rope enters one hole and exits the other. To avoid cracking the seat to the edge of the drilling site, you can reinforce the knot with an additional bar or wooden lining (then it needs to be drilled out). This mounting method is also suitable for a seat with a backrest. The hangers can be wound from above and tightened into a knot from below;
- attach two lugs to the prepared seat and insert the suspensions into them. The method is universal, it allows you to attach both a wooden and any other seat. The only possible way to secure the seat with chains is as a suspension. Well proven for fastening tires;
- drill a hole in the seat and tie a knot from the bottom.
Conclusion
As you can see, there are many options to make seats for children's swings, from the simplest to the original. But, when working, you need to remember that the appearance of the structure is a task of secondary importance, in the foreground is the safety and comfort of the child when riding.
Remember the childhood sensations of a swing? This is not only pleasant, but also useful - monotonous swinging trains the vestibular apparatus, and also calms the nervous system. The second property is very useful in our time. Such a pleasant relaxation treatment after a busy day. Moreover, any person with "straight" hands can make a swing with their own hands. There are, of course, complex models, but there are many more simple ones.
About constructions
Like most outbuildings, swings are most often made of wood. Racks and a crossbar - from a bar, logs, seats - from planks and even from parts of home furniture.
A little about the designs. There are three main types of hanging swings, or as they are also called - boat swing, sofa, bench, etc. The main difference is in the type of support structure: there is an A-shaped and a U-shaped. You see an example with racks folded into a triangular structure above, and in the photo below an example with a U-shaped rack. This is more likely with a suspended bench and it is built according to the same type, only taking into account the swinging loads.
There is a third type - this is already a complex structure that requires certain skills - it is based on articulated joints and they swing from resting their feet on the floor. Immediately we will give you a photo and a diagram for those who wish (you can expand it to full screen if you click on the arrows in the upper right corner of the picture).
We make a swing with our own hands from a tree
Most often, they make a design in the form of the letter "A" on their own. It is simpler and requires less material. Let's take a closer look at the nodes, fasteners, talk about materials, protection against destruction and stability.
Materials (edit)
Immediately about what to make a wooden swing. The choice of lumber section depends on the planned load. If it is assumed that there will be one adult person, the racks and the upper crossbar are at least 50 * 70 mm. If a larger number of "seats" is expected - two or three, then the cross-section of the bar is at least 100 * 100 mm, in better case - 100 * 150 mm. It has been experimentally established that such a structure, when using a 100 * 100 bar, normally withstands a total load of about 200 kg. If you need more - take a larger section, or put logs))
About what the bench / sofa is made of. A bar of 70 * 40 mm will go to the frame, the backrest height is at least 600 mm, the seat depth is at least 480 mm. You can experiment with the depth of the seat and the angle of the backrest: there are options for the "recumbent" position. Accordingly, both the length of the sofa and the dimensions of the structure vary greatly from this. For fastening, use 200 nails or hairpins at least 10 mm in diameter.
How to position the racks
A diagram with dimensions and a list of the required material in the photo below. To be honest, very few people make from such materials, as indicated in the specification. More often they put a bar.
There are varieties of this design: with or without a bottom frame. If the swing is installed on a rigid platform and the fasteners are made rigid, on the studs, without the possibility of backlash, then such a structure will stand without problems. If in doubt, you can make a screed from a bar along the bottom, nail it with pins to the coating, or drive the staples into the ground.
A crossbar has been added here, there is nothing to disperse. simple construction, but "legs" can part
For those who are afraid of lateral loads - the structure in this axis is not the most reliable - we can offer the racks to be installed with a slope. The area will be large, but the stability will be high.

If it is intended to be installed in the ground, parts of the racks that will be buried must be treated with bio-protection. As a cheap option, put it in a container with used oil for several hours. Dry, then bury. They are buried to a depth of at least 50 cm, a little rubble is poured at the bottom, racks are set up and concreted. If you are afraid that this is not enough, attach several strips of metal crosswise at the bottom. The hole will have to be digged with a larger size, but the retention area will be larger.

Crossbar fastening methods
In all swings of this type - with the racks sawn at the top - the problem is the attachment point of the crossbeam, to which the bench is then attached. In the photo above, it is solved reliably, although not entirely aesthetically pleasing. The trouble is that aesthetic methods are difficult to execute. And, if you are not for sale, it is faster to do something inelegant, but reliable. So, in order to secure the cross-member, an overhead bar is attached below the intersection, pulled to the racks with pins. The crossbar rests on it, which is held from lateral shifts by racks and fasteners - nails and studs.
Another way to install the cross member is to attach the side posts in an “X” shape. With this option, the support beam fits perfectly. It is additionally fastened with nails, and the racks are pulled together with hairpins. See this option in the next photo.

Everything is fine, but the length of the sofa is not enough ...
By the same principle, do-it-yourself swings are assembled from logs: the side ones are fastened crosswise, and a support log is laid on top. If the timber is sometimes assembled on nails, then in the case of logs, studs are mainly used.

For those who are familiar with carpentry, there are more options: in a half-tree. Such a project in the photo gallery below with a close-up of some of the key nodes.
How the racks are fastened together - inside view
Photo gallery homemade swing on chains
And several photos of different swings made on the basis of the A-shaped structure.
Made of thin logs under a reed roof - looks great Chic option - 3-seater, and maybe more, swing Another option, in which all the "finishing touches" were formed - racks in the form of the letter "X" and under a slope One of the modifications - more difficult in making It - a whole house - a swing ... funnily Immediately and the stairs ...
Attaching the swing to the bar
The attachment for the swing also requires clarification, that is, it is not obvious to everyone how to hang a bench-sofa on the crossbar. First, the crossbar is drilled from bottom to top through and through. A bolt is passed through the hole, to which an eye nut is attached. One or two wide washers are placed under the nut head so that it does not squeeze under the weight.

It turns out that the ring of the eye nut is located at the bottom. You can attach a carabiner to it, throw a rope or cable, etc. Just pay attention that the carabiner should normally hang freely on the ring of the eye nut. And in the carabiner, two chain links should fit freely. Therefore, it is advisable to buy everything together in one store: you can try on the entire unit at once.

By the way, in a rigging store, you can stumble upon other devices that can be adapted to attach chains or ropes from the swing seat. For example, such as in the photo below.

They are designed to lift loads from 0.5 tons, so there is no point in using them for children, but on a swing for adults - quite.
This mount has a significant drawback - a squeak is heard when rocking. For a while, you can get rid of it by lubricating the unit, but this operation will have to be repeated periodically. The way out is to make a knot on bearings, but welding is indispensable.
DIY metal swing
Their design is exactly the same. The material is different, and the method of its attachment. This is welding. For those who are familiar with, it will not be difficult to cook something like this. And for inspiration, a photo report.
Below is a drawing of this swing with dimensions. Some clarification is required. The figure shows a pipe welded around the perimeter (this plane is shaded). It is buried and therefore is not visible in the photo. It was made in order to increase stability: the masses of friends are considerable. For the same reason, metal plates are welded onto the ends of the posts. The installation was complicated, but the swing is still standing.

It took 22 meters to make shaped pipe 50 * 50 mm, for a seat 25 * 25 mm - 10 mm, boards 2000 * 120 * 18 - 7 pieces and the rest - fasteners, paint, anti-rust.
There is another way to attach the swing to the bar. He is in the photo.

A way to attach a metal swing to a crossbar
The original form of a swing from a profile pipe - the posts are non-linear, but curved. If it is possible to do this with a tree, then only a master.
Baby swing
For children, you can make the same design, but smaller.

There are several other models for as well. Here are the first ones - a swing-scale or a balancer.

Swing for children - balancer or scales
Everything is clear, there may be questions only about the attachment point. Below is a drawing showing dimensions. To decorate the upper part, steel plates are fixed inside. To make them swing, a hole is drilled into which a pin is threaded. It is possible to improve "rolling" by inserting bearings.

Quickly and simply, you can make a nest swing from a tire ( car tire). Bolts with eye-nuts are installed in it in four corners, but of a smaller diameter (do not forget about washers), ropes or chains cling to them, and you can even throw them on a corresponding branch on a tree, or hang them on a horizontal bar.

Do not mistakenly believe that swings in the country are made exclusively for children for fun. In addition to a swing designed for a child's weight, there are a lot of quite interesting options that will become wonderful element landscape design and a place of relaxation.
What to make a swing out of?
Traditionally, swings are made from wood, metal and a combination of these materials. However, the swing seat can be made of plastic, metal pipes, beams, sturdy rope, old chair or chair without legs. Tires and other waste materials are often used.
The main thing is that it is comfortable and safe to sit on the swing, and the racks withstand the loads exerted on them.
Often a country swing is equipped with awnings made of fabric, polycarbonate, wood, roofing materials... Such a "roof" protects against bright sun rays, you can sit on the swing without the risk of burns.
What kind of swing are there?
 Upholstered swing chair
 Before building a swing, you should think about its purpose (for children or adults to ride), location (oversized models are inappropriate in small areas), seasonality (it is not appropriate to leave a swing outdoors for the winter at all summer cottages). It is also important to choose a model that fits well into the overall picture of the summer cottage landscape.

The swing can be mobile (collapsible) and stationary.
In turn, the mobile swing can be suspended or equipped with a prefabricated frame that is installed on the ground.
Do you want to make a children's swing in the country for a child?
A children's swing is a great idea of how to entertain a child in the country, and the portal site also offers you to familiarize yourself with information on. If you already have a sandbox, then read the article about building a playground with your own hands -.
You can independently make a swing-balancer, swing-hammock, swing-sofa. Particularly noteworthy are designs that are far from the classical presentation of the swing design. Unusual swings can be:

And more recently, a swing for disabled children has appeared. The wheelchair platform design allows even those who, unfortunately, cannot move on their own, can ride.


Garden swing prices
Garden swing
Do-it-yourself hanging swing

A frame is not provided for such a swing. We will only make a seat, which we will later attach with chains or ropes to ceiling beams or thick branches.
Have you decided on the choice of swing design?
Option 1. The simplest swing is old tire tied with a rope and suspended from a tree. Alternatively, you can use a chain and secure it with a screw and nut.


Option 2. Place the tire horizontally. We cut 3 or 4 holes, insert metal hooks into them, which we fix with washers and nuts. We put ropes or chains into the loops of the hooks.


Option 3. This is the most difficult option, which will require skill in using a grinder. The tire should be cut according to a certain pattern, bent and fixed with long hairpins so that it looks like an animal or a bird. One of the ways to make a country swing can be found below.


A swing made from a board (saw cut of a log, a wooden lattice, etc.) and ropes is a classic. It is enough to make 4 holes at the corners of the wide board and insert the ropes.
Instead of a board, you can use the old high chair by sawing off the legs and tying it with ropes.


A metal (steel or aluminum) hoop must be equipped with rope weaving so that a spider web-seat forms in the center. It is advisable to wrap the edges of the hoop with foam rubber and sheathe it with a dense fabric. And in order to hang the swing, you will need several strong ropes, metal rings or other fasteners, which must be fixed at at least four points around the circumference.


As one of the options, you can consider a swing-hoop, inside which a metal basin is inserted. The edges of the pelvis should be firmly attached to the hoop. Subsequently, the structure is easy to disassemble and retrain into a flower garden.


To make such a swing, you will need two wide metal triangles, rivets and the material itself - a tarpaulin. We fold it in several layers, stitch it around the perimeter, insert triangles and fasten it with rivets. It remains only to hang the swing on a branch or beam.


To assemble a wooden swing on racks, we prepare the following:

We use galvanized bolts as fasteners for such a swing. We refrain from simple screws and nails.

For additional protection of the material from damage and preservation of its natural appearance, we use glazing. We pre-cover everything with them wooden elements constructions.
The ready-made swing is suspended on a strong branch or fixed on racks with laid on top of them crossbeam... Use wooden beams to assemble the support structure.
Bottom ends wooden posts we process with bitumen. To fix the racks, it is enough to dig a couple of holes about 1 m deep, install racks in them, fill 20-30 cm of the height of the hole with a mixture of sand and gravel, and then pour concrete.
If you wish, you can make separate concrete pillars and attach a wooden beam to them with anchor bolts. Do as you like. When using the second method, be sure to lay a moisture-proof material between metal and wood. To give the frame more stability, we support the racks with braces.
 Swing seat mounting options
 The swing itself is made in accordance with the following step-by-step instructions.

First step. We make support arcs-clubs. For this we use boards 22 mm thick (best of all from pine) and plywood 12 mm thick. In accordance with the diagram, we draw a template and cut out 6 clubs.

Second step. On the plywood blanks, outline the outlines of the core. The layer in the middle is made of glued board. In the outer layers of the outermost clubs, create cutouts for the ends of the rope.

Step three. We fasten the parts of the support with waterproof glue. We tighten the support with clamps. We remove them only after the glue has completely dried.

Fourth step. We process the edges of the supports with a grinder, giving them a rounded shape.

Fifth step. We cut out round pieces from a pine board for rope holders. This is easiest to do with the appropriate drill bit.

Sixth step. We process supports and finished rounds with a primer or weather-resistant paint.

Seventh step. Screw metal rope holders into the supports through the rounds, and then cover the wooden elements

Eighth step. Moving on to creating a seat for a homemade wooden swing. First of all, we align the picket fence.

Ninth step. Next, we drill holes for the screws in each strip. To make the holes as accurate as possible, we put on the edges of the picket a corner (can be made of plywood) according to the size of the strips with pre-made holes in the right places.

Tenth step. We screw the pickets to the supports. To ensure an even step, place planks between the planks.

Eleventh step. We fix the armrests to the supports. We also make them from picket fences. We screw metal bolts into the end of the strips. We put a wooden round between the support and the armrest.


Twelfth step. We pass the rope through the holes of the holders fixed in the swing support. We tie the rope to a sea knot, after that we wind a wire, a strong thread or a cord around it.

Thirteenth step. Cut off the free edge of the rope with a knife.
Fourteenth step. We pass the rope through the oval hole in the armrests. We rest the armrest on the pads installed on a pair of half rings tightened with bolts.
Fifteenth step. We wrap the rope around the rope thimble and tie it with a rope.
In conclusion, it remains to hang the ring to an alpine carabiner fixed to the support bar or a thick tree branch. Your swing is ready!


The metal swing is also easy to make by hand.


First step. We cut blanks from pipes. You need to make 2 two-meter side racks, a 1.5-2-meter crossbar, as well as 4 pipes of any size for the base (2 pipes will go on each side).

Second step. We clean pipes from burrs using a metal sandpaper or a file.
Step three. blanks for the base at right angles.
Fourth step. We weld it to the finished base of the rack, and then weld the crossbar to the racks.
 How to install a bar on a metal swing
 Fifth step. Let's get down to earthworks... You need to dig 4 holes with a depth of 80 cm.
Sixth step. We insert metal beams into the finished pits slightly longer than the depth of the pits.
Seventh step. Fill the recesses with the beams with concrete mortar. Concrete can be made by yourself from part of cement, part of rubble and two parts of sand. Add water to the dry mixture and mix thoroughly until a homogeneous mass is obtained.
Eighth step. We leave the concrete to gain strength for about a week.
Ninth step. We weld the hooks to the bar. Anchors can be used to make hooks.
Tenth step. We weld the swing frame to the metal beams.
Eleventh step. We attach the seat.

This completes the homemade metal swing. You can test and take into constant operation.
Video - Swing for a summer residence with your own hands
Video - DIY children's swing
It is hardly possible to meet a person who would not feel the desire to settle in comfortable chair and feel the smooth swinging movements of the suspension structure. Comfortable swing and at all times enjoyed great popularity. Today, the range of hanging seats has been significantly expanded: hanging sofas and armchairs adorn many suburban areas, easily fitting into the landscape design.
The hanging seats are based on conventional rocking chairs. Wicker rattan or wicker structures have become the most promising for furniture experiments, because they weigh quite a bit, but at the same time have excellent strength.

As a result of such furniture experiments, designers have created pendant chairs that resemble half a ball.
Semicircular designs are attractive in that they allow you to evenly distribute the entire load. In addition, they are conveniently suspended by placing the device at the highest point.
The frame of the hanging chairs can have several options.
Wicker chairs made of wicker, rattan, clear acrylic or plastic have a rigid body. For convenience, they are complemented by decorative pillows and soft mattresses.

The hammock chair is a softer version of the suspended structure. On soft swinging pillows you can always pamper yourself in moments of relaxation
Closed on three sides with wicker walls, a cocoon armchair is ideal to retire and abstract from the outside fuss
Instead of traditional rattan or vines, synthetic materials are increasingly used in the design of hanging chairs, thanks to which the structures become lighter, more flexible and quiet.
As you can see, there are many options. We will specifically analyze 2 examples.
Building such a chair is not difficult. You just need to master the basic technique of weaving macrame.

Such a hanging chair will allow you to create a special atmosphere on the site, conducive to peace and tranquility.
To make a chair, we need:
- Two metal hoops of different diameters (for the seat D = 70 cm, for the back D = 110 cm);
- 900 meters of braiding cord;
- 12 meters of sling;
- 2 thick cords for connecting rings;
- 2 wooden rods;
- Scissors, tape measure;
- Work gloves.
To equip the chair, it is better to use hoops made of metal-plastic pipes with a cross section of 35 mm. Reinforced-plastic pipes of this thickness have a metal braid inside and are capable of providing sufficient strength to the suspended structure.
To make a hoop from a pipe, first determine the length of the segment using the formula S = 3.14xD, where S is the length of the pipe, D is the required diameter of the hoop. For example: to make a hoop D = 110 cm, you need to measure 110x3.14 = 345 cm of the pipe.

For connecting the ends of pipes, wooden or plastic inner inserts of the appropriate diameter are perfect, which can be fixed with ordinary screws.
For weaving, a polyamide cord with a 4 mm thick polypropylene core, which can be purchased at a hardware store, is ideal. It is good because it has a soft surface, but unlike cotton fibers, when knitted, it is capable of creating denser knots that will not "creep" during operation. So that there is no discrepancy in the color and texture of the material, it is advisable to purchase the entire volume of the cord at once.
Stage # 1 - creating a winding for the hoops
Our task is to completely cover metal surface hoops. To decorate 1 meter of the hoop with tight turns, about 40 meters of cord are needed. We make the turns slowly with a good tension, applying the cord evenly and neatly.
To make the winding tighter, tighten it every 20 turns, tightening them with force in the direction of the winding until it stops. As a result, we should get an even and dense braid surface. And yes, to protect your hands from calluses, this work is best done with gloves.
Stage # 2 - weaving the mesh
When creating a mesh, you can use any vending pattern of the macrame technique. The easiest way is to take a "checkerboard" with flat knots as a basis.

Weave the net with a double polyamide cord, attaching it to the braided hoop with double knots
Pay attention to the tension on the cord while weaving. The elasticity of the finished mesh will depend on this. The free ends of the knots should not be cut off yet. Fringe can be formed from them.
Stage # 3 - assembly of the structure
We assemble the braided hoops into a single structure. To do this, we fasten them from one edge, wrapping them together with one cord.

From the opposite edge of the unwinding, we place two wooden rods vertically, which will serve as a support for the back of the structure
The length of the support rods can be any and is determined only by the selected back height. To prevent the hoops from slipping, we make shallow cuts at the four ends of the wooden rods.
Stage # 4 - chair back design
The weaving pattern of the back can also be any. Weaving starts from the top of the back. Gradually sinking to the seat.

We tighten the free ends of the cords on the lower ring, collecting their hanging edges into loose brushes
When the pattern is braided, we fix the ends of the threads in the lower part of the back and decorate them with a fringe. The structure will be strengthened by two thick cords that connect the backrest to the seat. The graceful hanging chair is ready. All that remains is to attach the slings and hang the chair at the chosen place.
Hanging chair with cover
If you do not want to do weaving, or for some other reason the first option did not suit you, then this may be suitable.

A cozy, gently swaying nest is the perfect place to relax, forget about your problems, or just take a nap
To make such a hanging chair, we need:
- Hoop D = 90 cm;
- Cut durable fabric 3-1.5 m;
- Non-woven, dublerin or trouser tape;
- Metal buckles - 4 pcs .;
- Lanyard - 8 m;
- Metal ring (for hanging the chair);
- A sewing machine and the most necessary tailor's supplies.
You can make a hoop from metal-plastic pipe, which is sold as a coiled coil, or bent timber. But when using wood, you should be prepared for the fact that under the influence of a temperature drop, the hoop can quickly dry out and deform.
Stage # 1 - cover cutting
From a three-meter cut we cut two equal squares, each measuring 1.5x1.5 meters. We fold each of the squares separately four times. To make a circle out of it, draw a circle from a central corner with a radius of 65 cm and cut it out. By the same principle, we make and cut out a circle from another square. On each of the resulting circles, departing from the edges by 4 cm, outline the inner contour with a dashed line.
We outline the holes for the lines: we fold the circle in four and iron it so that the folds are landmarks. The first pair of lines will be located relative to the bend at an angle of 45 0, the second - 30 0. Having marked the corners for the slits for the lines, we again lay out both circles and iron them.

Along the outlined four axes, we make rectangular slots 15x10 cm in size. The slots are made along the contour of the Y-shaped marking made inside the rectangles
To make the same cuts on both circles, connect the fabric cuts and pin them. Along the contour of the finished cuts of the first circle, we make cuts in the second piece of fabric.

Bend the petals of the slots inside out, gluing the edges with non-woven fabric. Only after that we make a full cut, stitching it along the edge, stepping back 3 cm
Stage # 2 - connecting elements
Sew both circles together along the previously marked dashed line, leaving a hole for inserting the hoop. Cut the free allowance with teeth. We turn out the finished cover and iron it.

Cut out strips 6-8 cm wide from the filling material, with which we trim the hoop. We insert the sheathed frame into the cover
Having retreated 5-7 cm from the edge, we sweep both sides together. Turn the edges of the hole left for the hoop insert inside out.

We cut off the unstitched allowances from the front side with pins, and sew the edges, stepping back from the edge by 2-3 cm.Using the same technology, we process the entire edge of the cover
We fill the cover with padding polyester, stretching the strips of filler and fixing their edges with a blind seam. To strengthen the cover on the hoop, we quilt the fabric in several places.
Lanyard mode for four cuts 2 meters long. To prevent thread unraveling, we melt the edges of the lines.

We stretch the melted ends of the lines through the slots, form loops from them and sew them 2-3 times
To be able to adjust the height and angle of inclination of the hanging chair, we put buckles on the free ends of the lines. We assemble all the slings into one suspension, fixing them on a metal ring.
Methods for arranging the suspension system
Such a chair can be placed in the garden by hanging it from a thick branch. spreading tree... If you plan to make a suspended chair a functional decoration of a veranda or gazebo, you will need to build a suspended structure.
The harness must support not only the weight of the chair itself, but also the weight of the person sitting on it.

To fix a simple hanging chair, the weight of which, together with the person sitting in it, is no more than 100 kilograms, it is enough to install a simple anchor bolt
With this method of fastening, the maximum load on the ceiling ceiling should be taken into account, which is measured in kg / m 2, because the entire suspension system will act on this area. If the permissible load is less than the calculated weight, it is necessary to distribute the load along the ceiling by constructing a power frame that combines several anchor bolts.
Make such a chair, and you will get a great opportunity to relax at any moment, enjoying pleasant swaying movements, while gaining peace and a philosophical attitude to all troubles.
So.
We take a metal hoop with a diameter of 90 cm. Tests have shown that my weight of 50 kg can withstand perfectly. For more and more weight solid construction you can purchase 2 hoops and firmly fasten them together with electrical tape.
We strengthen the place of the hoop soldering just in case. We wrapped it with thin metal plates with electrical tape, so that if the seam suddenly burst, the hoop would not immediately crumble.
Divide the circle into 8 equal parts, mark. In these places the "web" will be attached.
Rope. I bought a polypropylene household cord without a core with a diameter of 5 mm, 1 package of 25 meters was enough for me.
Why polypropylene? Somewhere I read that it is more resistant to the destructive effect of ultraviolet radiation than polyethylene and even more natural cords, so it suits us perfectly.
We measure out a piece of rope equal to 2 diameters, plus a small margin for the tie and sagging (very, very small, since the rope stretches due to the splendor of the weaving). We fasten one end with a loop, the other with a knot.

We tie it tightly, conscientiously.

Here is the sagging, about 5-7 centimeters. Do not do it again, because the rope is stretched under the weight due to the splendor of the weaving, it is made, as it were, thinner and longer. I did it by eye, in operation it turned out to be perfect.

We intertwine the middle crosswise, then we will fasten this place so that they do not crawl over each other, the rope is slippery.

We screwed everything down, evenly straightened it, "flatten" the middle, trying to make the ropes in one plane, we don't need a knot in place of the back-priests.

Like this

Now we take a thread with a needle and sew all-all points of attachments and intersections tightly, so that later the rope does not go astray and the middle knot does not wander from place to place

We also sew the middle knot

For greater confidence, we attach all fasteners with electrical tape

Now we get it like this

Next, you need carbines.
Carabiner with a lock 7x70 - 4 pieces, and 2 more pieces with a diameter of 8 mm. Better to purchase all 6 pieces bigger diameter since my carabiners did not fit on the hoop, as the diameter of the hoop did not fit, albeit thin. Had to invent with a chain. About her further.

This is how I solved an unexpected problem with the fastening of the carbine.
Chains of different shapes and diameters are sold in building stores footage, I needed 0.5 meters.
The chains are strong now, sealed. Separation will require male help. Or immediately in the store ask to cut the necessary pieces with wire cutters. You need 4 pieces of about 10-12 cm, depending on which chain you choose. Do not take thick, take medium in thickness.

Determine the attachment points of the carabiners so that the swing is stable and does not overturn. I just divided the circle into 4 parts.

We take a synthetic winterizer or other soft material for the winding of the circle and fabric. The fabric is preferably easy to clean, such as a raincoat fabric. Suddenly, a jacket that was no longer worn and was planned to be thrown out helped me out. In order not to bother, you can buy insulation for pipes like Vilatherm, it costs a penny at all. Only you will need to think over the attachment to the hoop, you can use the same insulating tape so that it does not spin around the axis.

Next, the most tedious thing is to weave a web. Turn on your favorite movie for the background (you won't be able to watch it) and start from the center to the end in a circle, overlapping the rope. I did not tie knots, tk. I didn’t count on the massage effect :) it will be unpleasant to sit on the knots. made flat overlaps. each overlap was stitched 10 times in different planes to fix the rope. The distance between the cobwebs is about 3-4 cm.

These are the flat overlaps, sewn tightly for fixing
