Neither a cottage nor a private home can be comfortable without a beautiful gazebo. A summer gazebo allows you to have a pleasant time and enjoy the coolness on a hot summer day. The sizes and shapes of the gazebo can be very different. The most important thing is that it fits into the interior of your territory and is similar in size and design. summer gazebos can be decorated in different styles; it can be a classic gazebo or in the modern style. The shape can also be different, hexagonal, round or quadrangular.
The idea of building a gazebo in our dacha belongs to my wife Svetlana. After some brief consultation, a decision was made. Let's build it ourselves! They entrusted me with the financing, the project, and the design... The project!? It turned out that not everything is so simple, even with such an unlimited source of information as the Internet. I thought that on the World Wide Web I would easily find a bunch of detailed drawings, drawings, photographs and instructions, but alas... Either I was looking poorly, or... The result: I didn’t find what I wanted. Although I learned a lot of interesting things. Ready-made gazebos in the Moscow region are sold for 250-300 thousand rubles. per piece (albeit with on-site installation). At first I even doubted whether we could afford this idea. I did some math and it turned out that I could do it in 5 thousand.
Selection and preparation of a site.
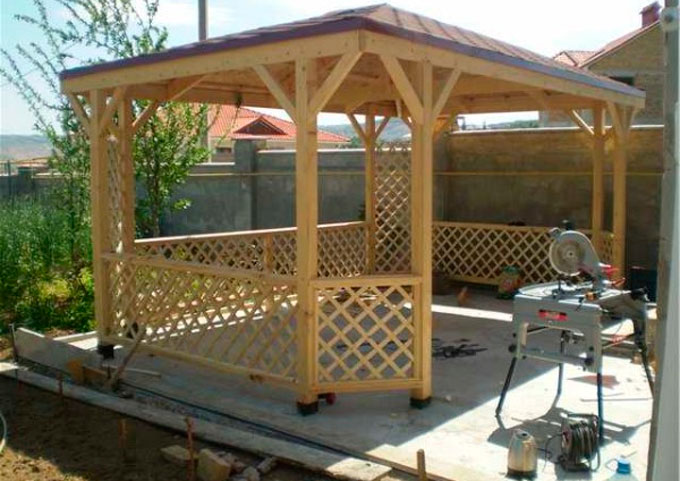
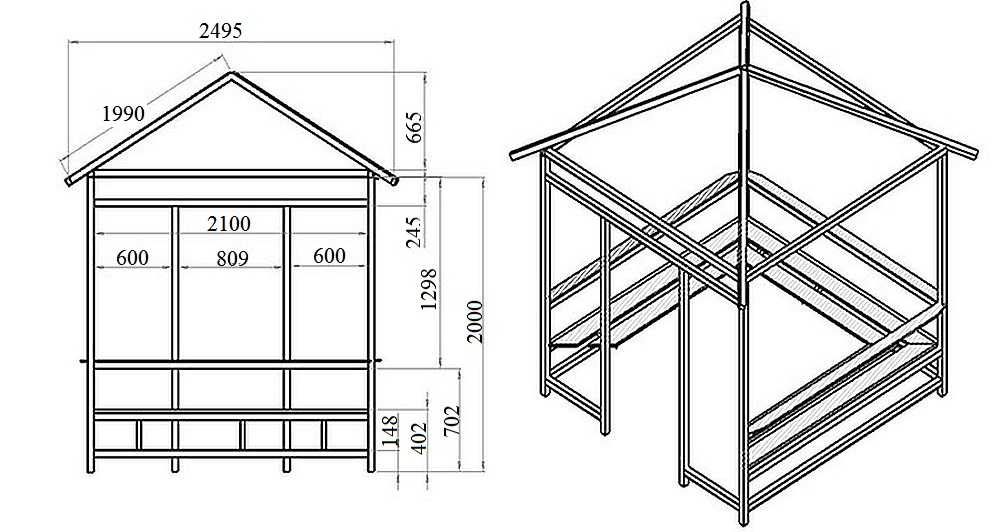
It was decided to make the gazebo hexagonal... which means we make a compass and draw a circle. Dimensions of the gazebo: diameter 3 meters, height 2 m. In the center there is a round table on a leg (we will make it at the very end, from the rest of the material), a roof - that’s the question for now? I would like some kind of natural tiles.... I haven't found anything yet.
When making initial calculations, we use all our knowledge of geometry and a specially brought calculator.
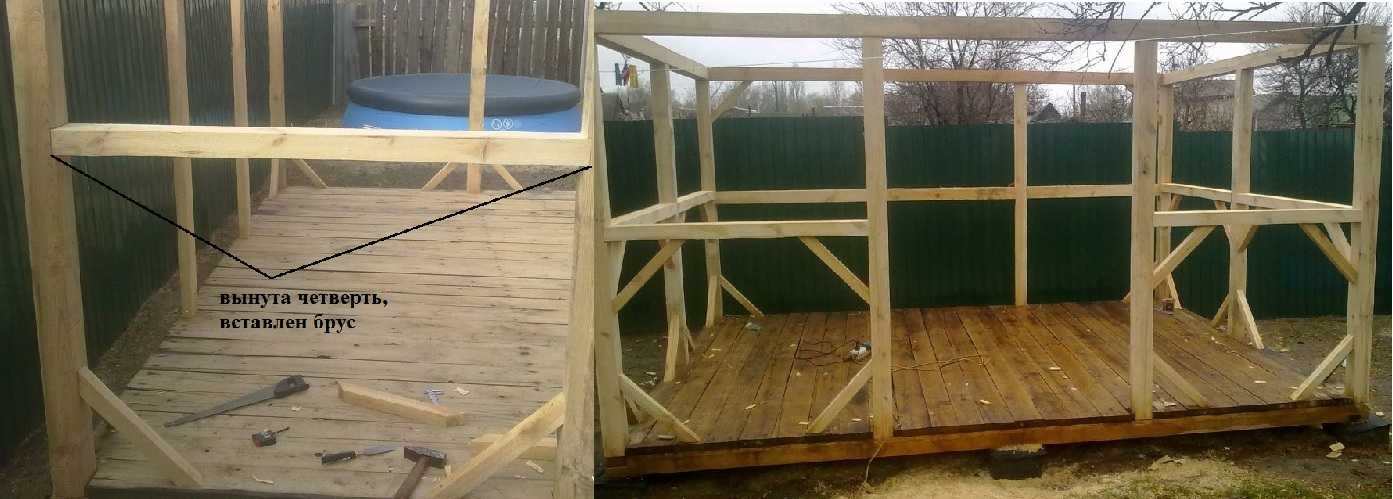
They decided to make the foundation from half-meter oak columns... You can already see how the gazebo will be located. We tried to dig the pillars exactly to the level.
The assistant must be well fed...
There was a break at the construction site. The children were in camps, and my wife and I were engaged in the selection and delivery of building materials. For construction, the following items were specially purchased: an electric planer (950 rubles), a jigsaw (630 rubles), a saw (100 rubles), various nails (about 300 rubles), a hammer (120 rubles), a tape measure (75 rubles) . In the absence of my son, my wife and I built the carpentry workbench that would be necessary in the future (I won’t describe how to do this, but it’s already clear that we can’t do without it - all the building materials need to be planed, sawed, hollowed out...).
The process has begun... first processing six pillars...
We thought for a long time about how to secure the pillars and cross bars to the “foundation”... We decided so (see photo), we’ll build it and see whether it’s correct or not. (I note that none of us have a construction education and did not turn to the help of consultant-neighbor Dmitrich).
Friday. We continued to prepare the pillars; on each one it was necessary to make grooves for the bench and railings (photo below.
To install six pillars, it was decided to temporarily dig a pillar in the center and tie it to it. Each pillar is set strictly according to level.
Hooray! We finished the skeleton of the gazebo. They removed the temporary structure - it's standing, but not quite strong. I hope the roof rafters and floor will finally “tie” the structure together.
We started preparing the mounts for the benches. This standard design (photo below) holds the bench very securely. Using one template, six “jibs” were immediately prepared.
It was decided to cover the bench with a “gap” so that the structure would not look heavy and the material consumption would be less. We attach the prepared (planed board, length - 39 cm, width - 10 cm, chamfer - 1.5 mm) to the bench. We will align and chamfer when everything is nailed down.
The weekend plan has been completed.
Friday evening... We finished installing the benches.
The homemade workbench was modified... with such “clamps” it became more convenient to work with material of different widths...
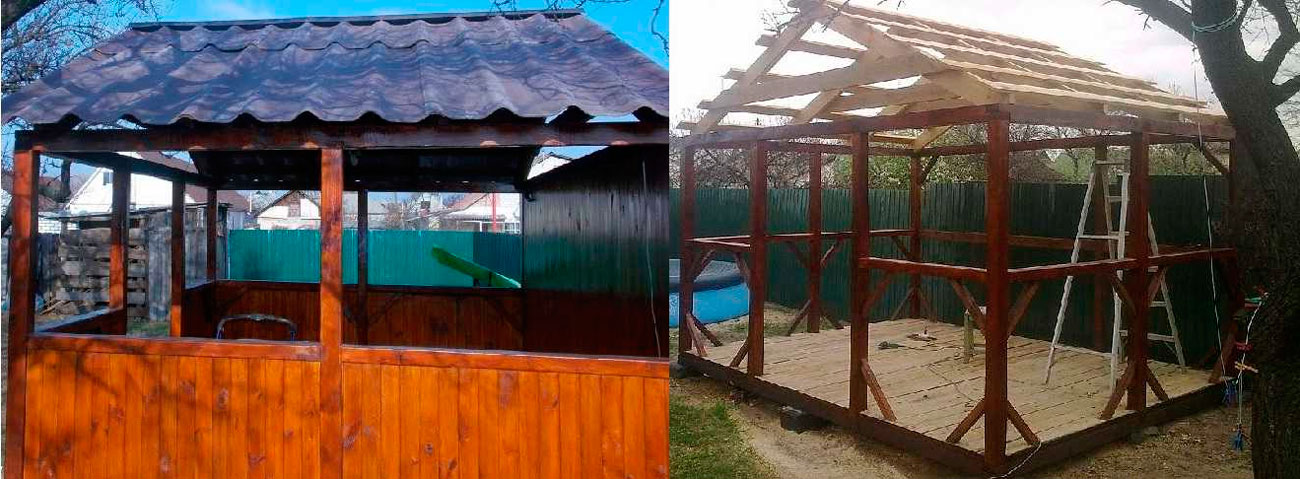
Saturday. Roof structure: 6 bars (100x50 mm) attached to the central hexagon (diameter - 150 mm). Until recently, I did not believe in the reliability of this design.
The roof was first assembled on the ground, and then the whole family lifted it up (and that’s the only reason why there are no photos of this moment).
We make cuts on the rafters, which will not allow them to move apart... We nail them on top to the post.
Friday. Purchased lining (26 boards, length - 2.5 m, width - 80 mm, for 1350 rubles). It turned out to be very convenient with the clapboard: they brought it all at once on their “ten” and the length of 2.5 m after cutting into 80 cm pieces gave a minimum of waste.
A strip was previously nailed under the armrest to secure the lining.
Roof. The rafters are ready...
We make lathing for flexible tiles from unedged boards. Friends advise covering it with "Catepal" material.
I decided to first make a table and then cover the roof... I really wanted to sit in the gazebo and have a barbecue. Here is a rough sketch of the round table. The round one in the center of the sketch is a fresh oak pillar (no need to buy, it was left over from the old owner), then everything is clear - the skeleton is made of a 100x50 block and cut with a planed board. In conclusion, we draw a circle and cut it with a jigsaw... How easy it is in my words... I’ll try it in practice on Friday.
We bought the material: 12 meters of timber (50x70) and 12 meters of 25-piece board - for only 400 rubles. The oak table was dug in more than a meter deep - so you could dance on the table...
We are making the table octagonal, not round as planned. There is a lot more fuss with the round one... The diameter of the table is 1.4 meters.
This is how the skeleton of the table turned out...
The gazebo has already been coated with the first layer of colorless varnish... One 3-liter jar was used (450 rubles). Will buy another one for the second layer and table.
The first evening was spent in the gazebo having a barbecue... My wife's rating was 5+. All we have to do is cover the roof. And the floors. Here it is definitely not yet decided what to do. If at first you thought it was a floorboard, now different options are offered: from sand (grandmother’s option) to paving slabs... We’re thinking! If you recommend anything, I will be grateful.
Yes, that one-year-old grass that is in the photo on the right has nevertheless outgrown the gazebo, but we started with it together.
Preface
Relaxing in an open wooden gazebo will be especially pleasant if it is built independently. It is pleasant to relax in such a building both during the day and in the evening.
Preparatory stage
Such a building allows you to take a break from worries and enjoy a pleasant atmosphere in the shade, in the fresh air with friends. Affordable price and ease of processing have made wood the most popular material for building gazebos. Having some skills in wood processing and a minimal set of tools, each person will be able to build a wooden gazebo with their own hands, based on their own preferences and tastes. Let's consider the option of building a semi-open simple gazebo made of timber.
For construction you will need the following tools and materials:
- chainsaw or hacksaw,
- axe,
- electric planer and chisel,
- tape measure, building level, hammer and screwdriver,
- shovel,
- beam for the racks of the upper and lower trim with a section of 150 x 150 mm,
- timber for elements of the roof rafter system of a smaller section,
- sheathing boards or timber (depending on the roofing material chosen to cover the roof),
- roofing covering (slate, corrugated sheeting, metal tiles and much more),
- lining for wall cladding,
- timber or board for railings,
- floorboard and timber for logs,
- concrete, reinforcing mesh or rods (in the case of a monolithic foundation), nails and screws.
The list is incomplete, since everything is determined by the type of building and the chosen finish. For those who are making such a structure with their own hands for the first time, it is advisable to get advice from more experienced craftsmen.
Before you start building a gazebo of this type, you should find out in advance how to choose the right wood for the job. The lumber must be dried to 22% moisture content. The timber and boards must have the correct geometric shape, without twists or large knots that may fall out during processing. There should be no mold, blue or other colored stains on the outside of the wood, which indicate that the material is beginning to rot and therefore will not last long. There should also be no traces of wood-boring beetles.

Do not forget that all wooden elements of the gazebo must be treated with an antiseptic solution to protect against rotting and fire retardants to prevent fire in the event of a nearby fire.
You can apply the antiseptic solution with a regular paint brush, roller, and if possible, it is better to organize the impregnation of the lumber with a fire retardant by immersion in any suitable container. This way the material will be better saturated with the solution (to a greater depth).
Where to place the gazebo
Before you start building a simple wooden gazebo with your own hands, you need to choose a place - not far from a residential building and away from outbuildings (especially if there are pets there, so that the “aromas” of their vital activity do not interfere with enjoying your vacation).

The ideal option is to place a gazebo in the garden or on the shore of a reservoir, even an artificial one, so that vacationers can admire the beauty of the surrounding landscape. If you plan to build a barbecue, fireplace or barbecue with your own hands, you need to take into account the direction of the prevailing winds so that smoke does not enter residential buildings.

Having chosen the location of the building and prepared the necessary material and tools, you should draw up a design for the gazebo. This is necessary for an accurate idea of the appearance of the building and all structural components - from the foundation and frame to the finishing. Drawing up a plan or project will help you accurately calculate the required amount of materials, determine their cost, correctly distribute the number of foundation supports depending on the size of the gazebo base, calculate the roof truss system, distribute the location of roofing material and solve other problems of building a gazebo with your own hands.
Foundation structure
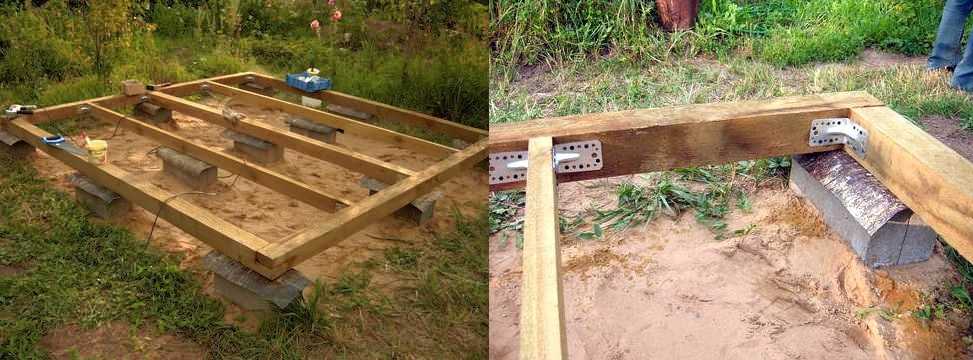
First, in the selected area, it is necessary to remove the fertile layer of soil and move it to the desired place - to the vegetable garden or garden, then remove all the roots of trees or shrubs in the soil. The finished construction site must be leveled and compacted. Building a gazebo with your own hands begins with marking the foundation. On the site we mark the places where vertical wooden racks made of timber will be fixed. To do this, pegs are driven into the ground and the perimeter of the building is determined using a cord stretched along them.
Then we dig holes to a depth that will be equal to one-fourth the height of the rack. The number of pits and their pitch are selected based on the size of the future gazebo in plan. After this, you need to pour crushed stone on the bottom, pour in a little water and compact it well. We install the formwork and reinforcement cage, fill it with prepared concrete and leave it for two to three weeks to completely harden.

Complete readiness of poured concrete occurs no earlier than after 28 days, at positive ambient temperatures. It is during this period of time that concrete gains maximum strength. Considering that the weight of a wooden gazebo is insignificant and the load on the foundation base will be minimal, the supports under the posts can be laid out using fired red clay bricks or concrete blocks.
If you plan to place a barbecue or fireplace inside, then it is recommended to make a monolithic foundation for it, which in size will be larger than the hearth by 15–20 cm along the contour. In addition to monolithic concrete, another material can be used to construct the base of a fireplace, barbecue or barbecue - concrete blocks, the same burnt red brick or natural stone. But it is better to use concrete, since it fits better and has greater strength.

To do this, in the intended location of the hearth, you need to dig a pit with your own hands according to the dimensions of the future barbecue, the depth of which should be in the range from 0.6 to 0.8 m, install formwork from boards into it and mount a reinforcement frame. For the frame, given the significant weight of the future building, it is better to take periodic profile reinforcement with a diameter of 8 mm, which is welded together or tied with wire. After all the preparatory stages, concrete is poured into the pit to the level of the future clean floor.
Assembling the frame of the gazebo
Next, we are engaged in the construction of the lower trim and floor. The lower piping is carried out by laying a wooden beam on the foundation with a preliminary laying of a waterproofing layer of roofing material. The bars of the lower trim are connected to each other using notches made. The frame is attached to the foundation with bolts, for which purpose it is necessary to install special metal embedded parts in the base when pouring the foundation.
The next stage is laying logs from timber with a cross section of 100x100 mm, which must be fixed to the mounted lower trim. It is recommended to use galvanized fasteners that are not exposed to moisture and will not corrode over time. We install vertical posts in the corners of the lower trim using metal corners and aligning their verticality with a building level or plumb line. To prevent the racks from sagging, they need to be reinforced with temporary braces or supports.

The next steps are to assemble the upper frame on the racks, that is, a structure made of timber, the cross-section of which is smaller than that used for the lower structure. You can see how to do it with your own hands correctly in the photos and videos in the article. After all the vertical elements of the frame have been inserted, you can make a subfloor from a 4 cm thick board. The board can be used unplaned if you plan to install a clean floor from a different finishing material in the future.
Next, it’s time to form the gable roof of the wooden gazebo. To do this, we install rafters from boards 4–5 mm thick, placed on edge. Next, a sheathing of bars with a cross-section of 2.5 x 2.5 cm is laid, the pitch of which is maintained within 0.5–0.6 m (if slate or corrugated sheets are used). A continuous flooring is made from edged boards, the thickness of which cannot be less than 2–2.5 cm if the roofing material is soft tiles.

Between the vertical posts we fix the railings along the entire contour of the building, the height of which from the floor can be within 1–1.2 m, except for the entrance. After this, between the base and the railing, we begin to sheathe the lower part of the gazebo with our own hands. This can be done either with continuous sheets of lining, or with infrequent lathing.
Decorating the gazebo
The final stage is the design of the gazebo. You can cover the space between the roof and railings with decorative sheathing with your own hands; some prefer to cover everything with mesh in order to create shade inside during hot weather. A fine mesh made of steel or plastic can be used. It must be secured to the outside of the gazebo, pressing the edges around the perimeter with thin wooden slats.

If desired, the ceiling can be hemmed with multi-layer waterproof plywood, but it can also be left unlined, but in this case all elements of the roof truss system that will be visible must be carefully planed in advance. Then they can simply be coated with paint or wood varnish.
It’s good if you can find a wood carving craftsman to give the building a special touch by decorating it with various crafts and wooden lace. Also, a wooden gazebo can be coated with waterproof varnish or paint for external use. It is better to use yacht varnish that can withstand all the vicissitudes of the weather.

Climbing perennial plants that can be planted along the entire contour of the building look quite stylish and attractive. They will become not only a natural shade, but also a decoration for a wooden gazebo. Climbing roses, honeysuckle honeysuckle, clematis or other garden vines will look good here. You can also use special ones, which will need to be removed for the winter to extend their service life and maintain an attractive appearance longer.
Almost all owners of dachas or private houses set up a wooden gazebo in their yard, where they can sit and relax in the summer. If you make a permanent gazebo of medium size, then you can actually install a barbecue inside it. Then here you can not just relax, but organize any celebration with your family or friends. If it is also closed on all sides, then you can spend time here in winter, especially since the grill will serve as an additional source of heat.
The decision on which gazebo is best to build is made by the owner of a summer house or private house based on his financial capabilities. In this regard, most often you can see fairly simple designs made by yourself.
The article is aimed at helping owners of summer cottages and private farms build some kind of gazebo, depending on the available capabilities.

There are summer, open-type gazebos and closed, all-season gazebos. In addition, there are combined options when the gazebo is opened in the summer, and with the arrival of cold weather it is insulated. But these are intermediate options that deserve attention. As a rule, such options are somewhat cheaper than completely closed ones, but they take away some of the precious time for manipulation.
Gazebos with and without floors
There are gazebos with a floor, as well as gazebos mounted on an open area or area where a concrete screed is made or paving slabs are laid. If you just build a gazebo on the ground, especially a wooden one, then you need to take measures to protect wooden structures, especially in places that are in contact with the ground. If the gazebo is made of metal, you will have to protect it from rust.
 A wooden gazebo without a floor, made of wood. It has one feature: the roof is quadrangular, and the gazebo itself has beveled corners.
 Building a gazebo with a floor involves installing a foundation. Basically, they are limited to a columnar foundation, which is made of brick or rubble, poured with concrete, or mounted on foundation blocks. Alternatively, you can use large stones (boulders) and support the entire structure on them, if available. This foundation is suitable for light frame buildings made of wood or metal. If the building is capital, made of brick, then it is unlikely to be limited to a columnar foundation: you will have to pour a concrete strip foundation, albeit in a simplified version. It is enough to deepen the foundation by 20-30 cm.
 A gazebo made of wood, but with a wooden floor, mounted on supports.
 To lay tiles in the gazebo, you will have to pour the floor with concrete, but first insulate the floor with foam plastic, for example, and also lay a layer of waterproofing. After this, you can lay tiles, and frost-resistant floor tiles. At the same time, you should make sure that the floor extends 50 centimeters beyond the gazebo and these 50 cm should be laid out at a slope so that moisture does not remain on the tiles. If the gazebo is not closed, then all the tiles should have a slope. If moisture does not linger on the tiles, the tiles will last quite a long time.
Materials used

The following materials are suitable for frame buildings of this type:
- A wooden beam or round timber of small diameter.
- Steel profile pipes.
- PVC pipes.
Of these three materials, only the last does not require additional protection. Polymer materials do not rot and are not afraid of both high and low temperatures. Therefore, such structures can withstand winter quite easily. The only thing that is accompanied by a certain complexity is the selection of PVC pipes for making the frame, since they do not have such high strength as wooden beams or metal pipes. In this case, you will have to decide on the design of the gazebo so that the installed furniture does not load the PVC structure, and the barbecue will have to be installed away from PVC pipes.
 PVC pipes can serve not only as a frame, but also act as a decorative finish.
 In order for a wooden gazebo to delight others with its appearance for a long time, you will have to treat the wood with a protective compound more than once.
As an option, you can use impregnations such as SENEZH or ESTATE. Reviews about these protective compounds are not bad. In addition, this manufacturer supplies the market with coloring compounds.
If the frame of the gazebo is made of metal, it should also be protected from atmospheric influences. To begin with, the pipes are primed, and then the welding areas are treated with a primer. Although this option is not optimal: it is not at all difficult to coat an already welded structure with a primer. If rust is found on metal elements, it is better to clean it off with sandpaper. This approach will allow you to maintain the acceptable appearance of the gazebo frame for a long time, which means that it will last a long time.
 Gazebo made of plastic. Nothing to do with the environment, but there is no need for additional treatment against fungi or rust.
 You can cover the gazebo with any material, but wood is considered the most popular: after all, it is a natural material. The materials used for cladding are processed boards, blockhouses, clapboards (wooden), thin round timber, as well as pallets, which are disassembled, the boards are processed (sanded) and the lower part of the gazebo is sewn up. It takes a lot of time, but it's very economical. In addition, such wood is quite dry and after additional protection can last a long time.
Gazebos of any design can be sheathed with the following materials:
- Polycarbonate, but this will be quite expensive.
- Corrugated sheeting, somewhat cheaper, but not very comfortable.
- Tempered glass is, well, very expensive.
- Ordinary fabric, which is very economical, but not very modern.
- Transparent PVC film.
- Bamboo, expensive, but stylish.
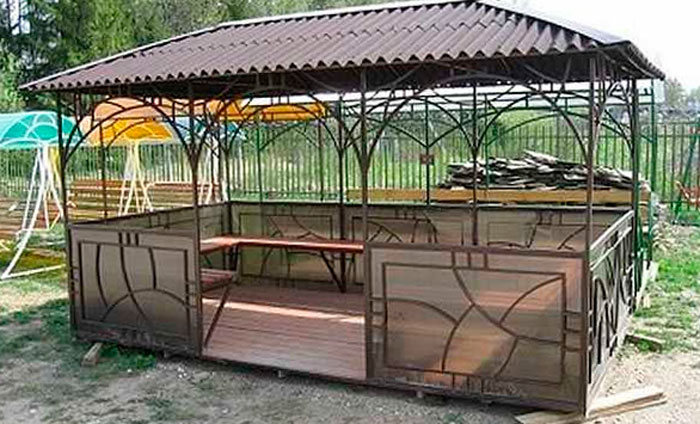 A gazebo made of metal combined with translucent polycarbonate cladding.
Frameless gazebo options
Frameless gazebos are permanent buildings on a strip foundation, laid out of brick or foam block, lined on the outside with decorative tiles or artificial stone. Moreover, building options can have all the walls up to the ceiling, or several main walls (for example, two), while the rest of the gap(s) remains open. Such designs require large capital investments. To build them, it is better to hire craftsmen or seek help from a construction company. If you do it yourself, the construction of the gazebo may take an indefinite period of time.
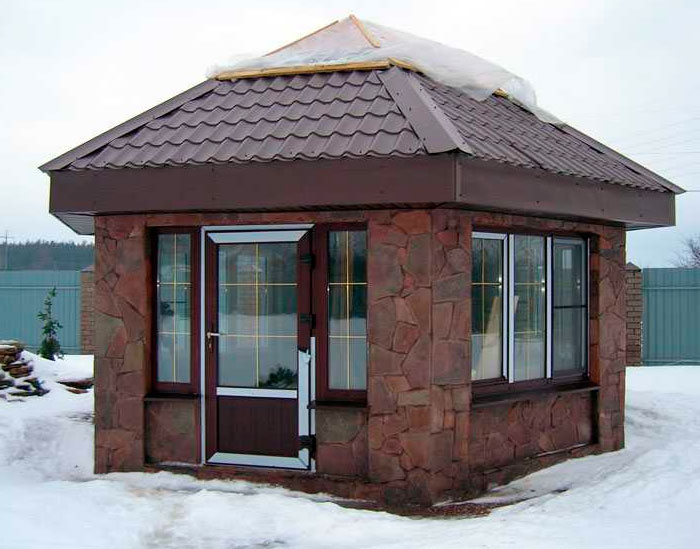 A capital gazebo, trimmed with wild stone, in combination with glazing. Both brick and other modern materials can be used as the main building material.
 If you plan to build a gazebo made of brick, then it is better to hire good masons to lay out the frame of the gazebo with high quality. Then, you may not have to spend additional money on finishing the outside of the building. Building a gazebo from foam blocks will require exterior finishing. There are many finishing options. In this case, you will first have to level the walls and only then start finishing. Since capital buildings are intended for use in winter, they must be warm. Alternatively, you can build a wooden frame on the outside, insulate it with ursa and cover it with siding.
Roof structure
The design of the roof depends entirely on how complex the shape of the gazebo is. If the gazebo is rectangular, then the roof design will be quite simple: a single-slope, gable or hipped version. Such forms of gazebos are also considered one of the simplest, requiring a minimum of time and money. The process of constructing a single-pitch, gable or hip-pitch roof is almost the same in technical terms.
 A rectangular gazebo made of round wood, equipped with a gable roof.
 With more complex forms of gazebos, the process of building a roof becomes more complicated. If the gazebo is pentagonal, hexagonal or octagonal, then the most suitable roof option is a tent-shaped roof (tent roof). In technical terms, these are the most complex structures, since you have to think about how to connect all the rafters at one central point.
 A dome-shaped roof is technically difficult to implement. If you have no experience working with wood, it is better to refuse this option.
 The availability of modern building materials, including roofing, makes it possible to make the roof completely round, without edges. In this case, you need to be able to work with metal pipes and welding. The pipes are bent according to a certain pattern and the sheathing is attached to them. It is desirable that the sheathing be continuous. Flexible roofing material is installed on top of the sheathing.
 The simplest version of a garden gazebo: two curved pipes to which polycarbonate is attached.
 Simple designs of gazebos, especially recently, are very popular. Some summer residents set up gazebos under the same roof as their house. They are usually called verandas. In fact, this is also a simple and affordable option, with a minimum of costs.
There are a huge variety of gazebo designs, so it’s simply unrealistic to talk about them all. Moreover, each of them is the result of hard work and broad imagination.
How to make a gazebo with your own hands
It just so happens that most often they build gazebos with their own hands from wood. This is due to the fact that working with wood does not require special tools. The second place is occupied by metal gazebos, but their construction requires skills in working with metal. It is very rare to see gazebos made from other materials. This is associated with some difficulties, as well as increased costs, which the family budget cannot support.
If a gazebo is built from wood, first of all it will have to be treated with preparations that protect the wood from bacteria and fire. Work can begin after the impregnation has completely dried. Firstly, this is necessary for quality, and secondly, it is problematic (inconvenient) to work with wood that has not yet dried.
Availability of drawing
The presence of a drawing with dimensions significantly simplifies the process of building any structure, and a garden gazebo is no exception, despite its small size. Without a drawing, it is very easy to get confused in the parts being manufactured, although there are not many of them at all.
The figure below shows two options for gazebos: one with a gable roof, and the other with a 4-pitched roof, although both gazebos are 4-corner.
Step-by-step instructions with the presented photo
All work begins with preparing the site for the gazebo. As a rule, a certain ball of soil is removed along with the fertile layer. This is necessary so that in the future this organic matter does not rot under the floor of the gazebo. If the soil is sandy or sandy loam, then construction waste, crushed stone, broken brick, etc. are poured into the dug pit, after which everything is thoroughly compacted. After this, a layer of sand is poured on top. If the soil is clayey and there are problems with water drainage, then it is better to pour a layer of clay into the pit and compact it. If the hole is filled with something else, then moisture will accumulate in it. Under the influence of heat, the water will begin to emit an unpleasant odor, which is not at all necessary.
Arrangement of the foundation and lower trim
The easiest way is to install concrete blocks on the prepared cushion so as not to delay the construction of the gazebo. If you lay out brick columns, it will take a lot of time (not only work is taken into account here, but also the time to strengthen them). The distance between blocks is selected from 1.5 to 2 meters. If the gazebo is built from wooden beams 100x100 mm, then the distance is chosen to be 1.5 meters, and if from a profile pipe 60x60 mm, then 2 meters is enough.
The supports must be aligned in the same plane. To check this, you will have to use a level and a long, straight rod. After this, waterproofing is laid on top of the columns (2 layers of roofing material or bitumen mastic). And only after this the lower trim bars are mounted. The beams are connected to each other using nails 150 mm long. To strengthen the frame, each connection is duplicated with powerful metal corners. Despite the fact that this is a summer gazebo, extra strength will never hurt, since the structure will quickly become loose under the influence of wind.
 The lower harness is assembled.
 Installation of racks
The next stage is attaching the racks. Racks are provided at the corners of the gazebo, in the center, on both sides of the entrance, and also where the supports (foundation) are installed. The racks on top have the same strapping as on the bottom.
Installation of racks is carried out strictly vertically, with control of this process at the building level. Many argue that building levels have a large error. This may be true, but for the construction of a garden gazebo the error does not matter much. In addition, when purchasing a level, it is advisable to check it. Alternatively, you can use a regular plumb line, but it is very difficult to use alone. One person should use the plumb bob and the other person should attach the posts. Using a building level, you can do without outside help.
Fix the position of the racks with jibs. In the future, having fixed and secured everything thoroughly, the jibs can be removed if they interfere. If the lower part of the gazebo is not transparent, then the jibs can be left. They can simply be permanently and reliably secured using metal corners. At the same time, it is advisable to check the racks for verticality each time.
 Two options for attaching racks with bevels. On the left are temporary jibs that are planned to be removed, and on the right are permanent ones that will be used in the future.
 Installation of the top trim and floor boards
After the racks are finally secured, they are also secured from above, installing the upper trim. Technically, it looks the same as when installing the lower trim. For reliability, metal corners should be used. This is especially important if the structure does not have permanent jibs.
After the frame is almost assembled, begin laying the floor boards. They, like all wooden structures, are treated with antibacterial impregnation. For such purposes, Senezh or Senezh-Ultra impregnation is suitable. They differ from each other in that “Ultra” does not color the wood, but gives it a greenish tint. If the entire structure is covered with a dark stain, the greenish tint will disappear and remain unnoticeable.
 Means for impregnating wood that may come into contact with the ground.
 After the boards are secured with nails, it is better to paint the wooden floor, otherwise the wood will become dirty before construction is completed. It is better to paint outdoor wood with varnish or oil-based tinting paints. Moreover, these are not classic oil paints, but special compositions to protect wood from atmospheric precipitation. The basis of these compositions is oil, to which protective elements and color pigments are added. As a result, the wood takes on a completely different shade, while maintaining its texture.
Strapping the structure in the middle of the frame
The middle frame binding, in most cases, is simply necessary, since the frame is divided into an upper and lower part, which is always (almost always) sewn up. It is better to secure the beams that should be installed using metal corners or make recesses for them in the racks, up to 25 mm in size, if the thickness of the beam is 100x100 mm.
 Option for attaching the middle harness.
 After this, you can begin the final painting of the frame of the garden gazebo.
Roof arrangement
The next stage is the assembly of the rafter system, as shown in the photo below. The rafters are similar in appearance to triangles.
 Rafters (triangles) for arranging the roof.
 These elements are attached to the frame of the gazebo. Since there is no roof overhang, they are attached directly to the beam of the top trim. The triangles are installed vertically and secured with nails. To fix them in this position, you can use bevels.
If the structure of the gazebo has an overhang, then it is necessary to cut out seats in the rafters. The attachment points look like triangles.
 Options for correct fastening of rafters.
 Of these two options, the first one is more suitable, since the roof is not large. In order not to adjust each rafter leg individually, it is better to use a template. To do this, you need to take a piece of regular board and cut an opening of the required size. This will not only simplify the task, but also provide the necessary accuracy. To make the work less of a burden, you can use a power tool, for example, a jigsaw.
Before final fastening of the rafters, be sure to check the correctness of their installation, both vertically and horizontally.
After the final and reliable fastening of the triangles, the sheathing is filled. The nature of the lathing depends on the nature of the roofing material. Soft types of roofing materials require continuous sheathing. If it is slate or corrugated sheeting, then regular sheathing will do.
Decorative finishing
After arranging the roof, when the entire structure is closed from rain, they begin finishing the lower part.
 The gazebo with your own hands is ready.
 This design falls into the “simple, fast and cheap” category. Taking it as an example, you can experiment by doing something of your own with your own finishing elements. In the following example you can see how the gazebo, made according to the same design, has changed: the lower part is covered with a blockhouse painted in a light tone. And the rest of the frame has a dark tone.
 This is another version of the same project.
  In the next photo, there is another option. Using this project as a basis, you can get many options.
 Below in the article are drawings with all dimensions. Below are interesting photos, but without drawings. There is hope that someone will use them.
Sketches of gazebos with drawings and dimensions
All dimensions indicated on the drawings can be increased or decreased to obtain a structure of the required dimensions. With a significant increase in size, the size of the wooden elements (section) should also be increased for the required strength. If everything is done correctly and in the right sequence, then you can count on a positive result.
Classic wooden gazebo
The project is almost the same, but some dimensions have been changed: the top point of the roof has been raised, making it seem lighter. The gazebo is quadrangular with a hip roof.
 An ordinary square gazebo for a garden or cottage made of wood.
 The roof installation has problematic attachment points, indicated in the figure by circles. The picture below shows how to do this correctly.
 Options for fastening problem units when arranging a hip roof.
  Option for distributing space in height and option for attaching the sheathing to the roof.
 Chinese style gazebo
All dimensions are indicated on the drawing, and the project includes marking for the foundation, installation of the rafter system, etc. The project is arranged in the form of a photo gallery.
Volumetric gazebo on the foundation
The construction of this gazebo involves pouring a strip foundation. The characteristics of the foundation depend on the nature of the soil, as well as the mass of the gazebo itself. For such a structure, a foundation up to 20 cm wide and no more than 50 cm deep is suitable. If the soils are heaving, then it is better to use a pile foundation.
 Massive glazed gazebo
 Swing gazebo with all sizes
A gazebo-swing is rather an exclusive option that requires great responsibility when arranging it. The frame must be strong, otherwise the structure will easily become loose and fall apart. The most important thing is to securely fasten the legs of the gazebo. They must be metal, as the entire fastening process is simplified; all you need to do is dig your feet into the ground and fill them with concrete.
Other mounting options are possible, but in any case it must be reliable. The deeper the legs are dug into the ground, the more reliable the structure will be. For greater reliability, the legs can be connected to each other below ground level and filled with concrete.
 You can take this drawing as a basis and build a gazebo-swing with your own hands.
A cozy gazebo in the garden is the dream of many homeowners. Wooden and metal, polycarbonate or forged, square, round and hexagonal, these structures are found in almost every garden. To make garden gazebos with your own hands, it is not at all necessary to hire specialists or be an experienced builder; it is enough to have minimal skills in working with tools.
How to choose a gazebo design
Construction of a garden gazebo will cost less if you carefully think through everything down to the smallest detail. The main parameters are the size of the gazebo, its shape, the type of foundation and roof, materials for building walls. The size of the building depends on the number of residents of the house and planned guests. There is no point in building a large structure for 2-3 people; in this case, it is better to choose a 2x2 m structure.
The level of complexity of its installation depends on the shape of the gazebo. – rectangular, but round or hexagonal ones require more skill and time to build. If you have no experience at all, you should not immediately take on the construction of such a structure.

The foundation for the gazebo can be columnar, strip or slab. The cheapest option is, and it’s also the easiest to install. Strip foundations are widely used for both small and large buildings, but are practically not used for round arbors. A monolithic slab base is ideal for any gazebo, but the larger the area, the more expensive a slab foundation is.

Roofs on garden gazebos can be single-pitched, gable, pyramidal, or in the form of a tent. The most affordable and easiest to install is a pitched roof. It is suitable for rectangular buildings, like a gable one. Cone-shaped and pyramidal roofs are installed on hexagonal and round arbors.

A variety of materials are used for construction: brick, stone, timber, logs, polycarbonate sheets, metal pipes, forged gratings, and some craftsmen even assemble gazebos from bottles. The easiest way to build is from timber and metal posts; The frame assembly is completed in a matter of hours, and the cladding also does not take much time. Working with logs is a little more difficult, because you need to cut and join them correctly. To lay walls of stone and brick, it is advisable to have the appropriate skills, otherwise the masonry will turn out sloppy and unattractive.

Prices for garden tents
Garden tents
To avoid serious mistakes and minimize construction costs, you need to start with the simplest. As an example, we take a rectangular gazebo with a pitched roof and on a slab foundation.

Necessary materials:
- large stone or crushed stone;
- sand;
- boards for formwork;
- timber 100x100 mm and 50x50 mm;
- boards with a section of 30x150 mm;
- wood primer;
- dye;
- slate or corrugated roofing;
- screws and bolts;
- reinforcing bars.
You will also need tools:

Marking the base of the gazebo


Select a flat, open area of the garden and mark it. To do this, determine the location of one of the corners of the gazebo and mark it with a peg. Measure the distance to the remaining corners, place beacons, and stretch a string between them. The diagonals are measured in the resulting rectangle: if they are the same length, the markings are made correctly.
Pit preparation

Using a shovel, select soil to a depth of approximately 25-30 cm, level the bottom, and compact it thoroughly. The walls of the pit must be strictly vertical. Next, pour coarse sand in a layer of 10 cm, level it well and moisten it abundantly to compact it. Formwork made of boards up to 10 cm high is placed around the perimeter and reinforced with timber.
Pouring the foundation
Read more about the foundation of the gazebo
The pit is laid out with large flat stones or filled almost to the top with large crushed stone. At the corners of the perimeter, sections of reinforcing bars are driven between the stones; the rods should rise at least 10 cm above the finished foundation. Prepare a concrete solution and fill the foundation pit. The surface is leveled with a rule or smoothed with a trowel.

Frame installation
For the frame, take 4 beams 100x100 mm and cut to the height of the gazebo. The front beams are left 15-20 cm longer than the rear ones to create a roof slope. After this, the supports are well treated with a primer and dried. At the lower end of each support, a small hole is drilled along the diameter of the reinforcing bars that protrude from the concrete at the corners of the base. Place the beams on the rods, align them vertically using a level and further strengthen them with metal plates and anchor bolts.

After installation, the side supports are connected to each other with 50x150 mm boards, and then braces for the rafters are installed. At a height of 10 cm and 0.5 m from the floor, the racks are connected by horizontal jumpers made of 50x50 mm timber. Vertical bars are attached between the lintels at intervals of 40 cm. The doorway is left free. All fastenings are carried out using bolts and steel angles, which are screwed to the wood with self-tapping screws.


Prices for various types of timber


Logs are placed on the boards connecting the support beams in increments of 30 cm. The top of the logs is sheathed with 30x150 mm edged boards. Gaps ranging from 5 to 15 cm wide are left between the boards. Of course, all roof elements must be treated with a primer and well dried. You can cover the top of the board with glassine and secure it with staples. Thin slats are placed on top of the film so that there is a ventilation gap between the roofing and the film. Slate is laid on the slats and secured with 120 mm nails with galvanized heads.
Arrangement of the gazebo

After installing the frame and roof, all wooden surfaces must be painted. When the paint has dried, place a wooden table inside the gazebo and benches along the walls. Electricity is carried out from the house to the gazebo, a light bulb or lamp is hung. To give the room a cozy feel, you can cover the walls with thick, light-colored fabric. The interior decoration completely depends on the taste and capabilities of the home owners.
This version of the gazebo is basic. If desired, you can improve the design: install wooden gratings between the load-bearing beams, cover the walls with clapboard or waterproof plywood, lay logs on a concrete base and make a wooden floor. Instead of beams for the frame, you can take metal pipes, and replace the slate with polycarbonate or soft tiles.

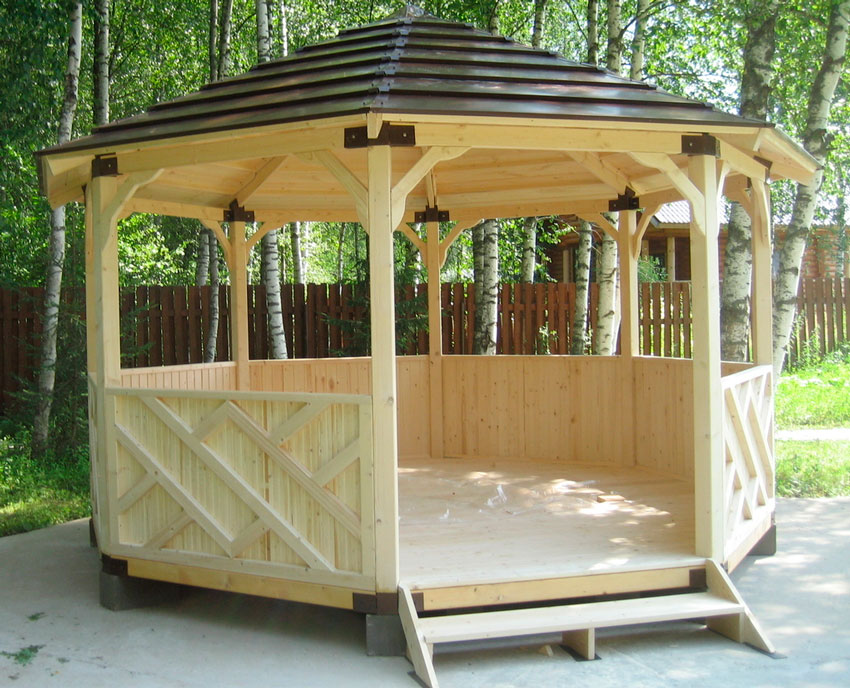
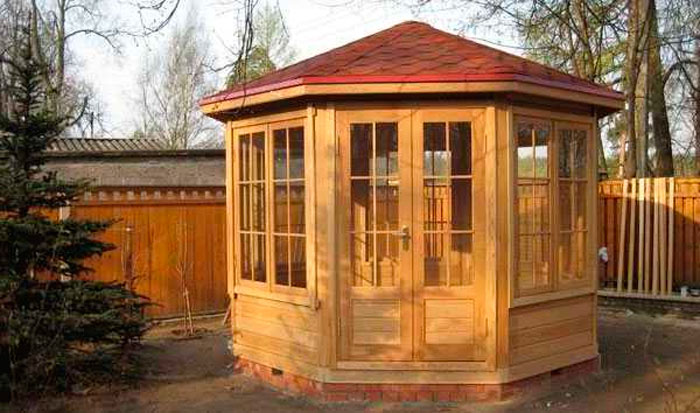
A hexagonal garden gazebo always looks very elegant and is a decoration for any site. During its construction, the accuracy of calculations is very important, because errors at any stage will significantly affect the final result. You need to start with a drawing of the future building, which will allow you to correctly mark the site and calculate the amount of materials.

For construction you will need:

Step 1. Marking
To mark the area you will need two wooden slats and a rope about 2 meters long. The selected area is leveled, freed from vegetation and stones, a strip is driven into the ground in the middle and tied with a rope. The second end of the rope is tied to another strip and, using such a homemade compass, a circle with a radius of 1.75 m is drawn. The resulting circle is divided into 6 equal parts and beacons are placed on the marking line. This is where the support posts for the gazebo will be located.
Step 2. Making a columnar foundation
In place of the beacons, holes are dug 0.5 m deep and rectangular in shape. River sand is poured onto the bottom in a layer of 10-15 cm, then a layer of coarse crushed stone of the same thickness. A steel rod 70 cm long is driven into the middle of the hole, after which everything is filled with cement mortar. Bricks are laid on top in 3-4 rows with obligatory bandaging. The reinforcing rod should be in the center of the masonry. Lay out the remaining 5 supports in the same way and allow the solution to dry well.
Step 3. Installation of the gazebo base

Measure the distance between adjacent pillars and cut the beams according to the measurements. You should get 6 beams of equal length and thickness. To reliably connect the supports to each other, cuts are made at the ends half the thickness of the tree. After this, the lumber is primed and dried, and then laid on poles in the form of a hexagon. Pieces must be laid between the beams and foundation pillars.

When the beams of the lower frame are secured, the logs are fastened inside the hexagon. The central joist is placed exactly in the center of the structure, aligned horizontally and fixed to the beams using metal plates and bolts. Next, 2 logs are mounted perpendicular to the central one, and all the rest are inserted at an angle, for which small cuts are made at the ends of the boards on both sides. Finally, the logs are reinforced with timber lintels and sheathed with boards.
Step 4. Construction of walls

The frame of the gazebo is made of 6 beams 100x100 mm of the same length. Each beam is installed on one of the corners of the base and fixed with anchor bolts. Be sure to check the verticality of the support posts so that the structure is not skewed. A frame made of thick boards is mounted along the upper edge, and at a height of 70-90 cm from the floor, the racks are connected with horizontal beams made of timber, leaving the entrance free.
Walls can be made in several versions, depending on the available materials. You can cover the gazebo halfway with sheets of waterproof plywood, sheathe it with boards, and attach wooden shaped grilles to the lintels between the posts. You can make two or three walls blank, and decorate the rest with forged elements.
Step 5. Roof installation


When the walls are ready, we begin to install the rafters for the roof. 50x100 mm boards are used as rafters; For convenience, assembly is carried out on the ground. Since there is no central post in the gazebo, it is quite difficult to connect the rafters neatly. To simplify this process, a hexagon cut out of timber will help, each side of which will correspond to the thickness of the rafters. The ends of the boards are cut at an angle and fastened with nails to the hexagon; and on the inside of the trim, grooves are cut out for installing the rafters. After this, the structure is sheathed with boards in a circle, leaving small gaps, lifted upward and secured with bolts. Now all that remains is to lay it down.

Prices for various types of fasteners for rafters
Rafter fasteners
Video - DIY garden gazebos
Video - How to build a gazebo
What could be more comfortable than a warm family circle, when after a working day everyone has dinner at the same table or has tea on a day off, and even in the fresh air? What could be more carefree than a friendly party with wine and barbecue in the depths of the dacha, under the dense crowns of trees? Where can you be alone with yourself, relax in solitude and enjoy the silence? Nothing will create such a variety of scenarios for relaxation as a garden gazebo, the very name of which contains the most joyful moments of life - conversations - communication with family and friends, unity with nature. It will be especially pleasant to spend time in a place lovingly built with your own hands.
Stage #3 – roof installation and roofing work
The easiest way is to cover the gazebo with bitumen shingles, as shown in this video example:
The technologies for constructing a pitched roof - and a gable roof - are also very well described.
Extraordinary design ideas for garden gazebos
You may be interested in how to build a gazebo from the simplest materials that are literally lying under your feet. Take a closer look at ordinary plastic bottles, which, it would seem, cannot be used anywhere, but it’s a pity to throw them away - it always seems that they will come in handy somewhere. You can easily use plastic bottles as a building material, and you can build the structure yourself without much difficulty.
Here, of course, one cannot do without the mandatory stages of arranging the foundation, frame and roof, which will require both financial and labor costs. The walls of such a gazebo, made from plastic bottles, will not only cost free, but will also serve as a good option for protection from the sun and precipitation.

The contrasting combination of transparent and brown plastic bottles emphasizes the unusualness of the colorful country-style gazebo
The construction task will be simplified by creating a foundation from ready-made metal screw piles, which can be screwed into the ground on your own, arranging the foundation for the gazebo literally within one day. The easiest way to make a frame is from a metal profile - an angle, a square or a pipe, by welding the structural elements using a welding machine.
Plastic bottles are strung on metal rods, which are then placed between the lower and upper frame frames. An important condition for the formation of a harmonious structure is the selection of bottles of the same shape and size, but the color can be varied - this will give the gazebo a unique flavor.
The material on creating decorations and crafts for the garden from plastic bottles will also be useful:
Option #2 – gazebo made of glass bottles
In addition to plastic bottles, another unconventional material for construction can be glass containers, which can be purchased for almost nothing at recycling collection points.

An Art Nouveau style garden gazebo with fluid forms and an abundance of glass, vividly echoes the famous Gaudí gardens
So, let's build a gazebo out of glass bottles. The principle of constructing a building is the same as that of brick - bottles are laid in rows, which are fastened together with cement mortar.

Having splashed out your imagination, combining glass bottles of different shapes and colors, you can build an unusual gazebo both outside and inside
The bottles are placed with their bottoms facing outwards and their necks facing towards the inside of the structure. Considering that bottles are difficult to join at the corners of a building, they can be used to lay out individual fragments of walls, giving the structure an unusual sound - iridescent glass surfaces will sparkle in the sun like a crystal.
Option #3 – construction from old tree trunks
An interesting and quite economical option for a gazebo for a summer house would be to build it using the trunks and branches of old trees.
There are always old trees in the garden that have stopped bearing fruit and require sawing. Removing logs can often be difficult and costly, but don't rush to get rid of fruit wood - it has beautiful curves and texture that make it an excellent building material.
The trunk and branches can be cleared of bark, which, when crushed, is also useful on the farm - it can be used to sprinkle bushes of plants prone to freezing in winter. The tree trunk will be used to create column supports, and large branches will be used for fencing, railings and balusters. Most likely, one tree will not be enough; two, or maybe three trunks will be needed to form four columns with a height of 2.5 m.

The twisted trunks of old trees with knots and untreated surfaces, used to build the gazebo, give it the appearance of a forest hut

To build this colorful gazebo, not only the tree trunk was used, but also the stumps used to create a columnar foundation
Wooden columns are fixed at the corner points of the columnar foundation and are fixed with the help of lower and upper timber frames. It is advisable to treat old wood with moisture-resistant primers, and also to open it with varnish to give the desired color and protect it from further drying out. A logical continuation of the style solution of a forest “hut on chicken legs” will be a roof made of plant materials – shingles or reed mats.
Option #4 – from cement mortar
An unusual solution for a garden can be the construction of a gazebo using ordinary cement mortar. The most difficult thing in this arrangement is the creation of a rigid frame from reinforcement, chain-link mesh or ready-made reinforcement structures that need to be bent and welded. At the stage of preparing the frame, you can turn to specialized specialists, and then give free rein to your imagination.

An unusual tented gazebo made of stone and cement mortar resembles a bizarre piece of rock, organically blending into the forest landscape
Having prepared the solution closer to thick, you need to gradually, in small portions, throw it onto the reinforcement structure, and after drying, form fancy shapes of the columns and walls of the gazebo. Using the solution, you can imitate the trunks of intertwined trees, vines, and fantastic plant forms, creating the image of an exotic plant, as if invented by nature itself.

On hot summer days, a gazebo in the depths of the garden near a murmuring waterfall will give you long-awaited coolness and privacy.
Such a design can also take on fantastic, unearthly forms, reminiscent of a spaceship, if metal parts are used or the reinforcement frame is exposed in fragments. In this case, the roof should be made of metal or plastic - corrugated sheeting or transparent polycarbonate will do.
Option #5 – made of reed mats and wicker
Garden structures made of reeds, reeds, and vines will be a wonderful decoration for a pond, lake or artificial swamp on your site.

An excellent solution for a gazebo is the use of natural materials such as reeds and vines
These plant materials can be used to make both walls in the form of wickerwork and a roof, which is a plane made of ready-made reed or reed mats. Such a building will naturally merge with the natural environment, especially with water, because reeds and reeds are the traditional inhabitants of this environment.

A gazebo on the shore of a pond with a reed roof is an example of a harmonious combination of landscape design with the environment
The use of such plants with a hollow stem for construction is the key to a comfortable microclimate in the gazebo - balanced humidity, protection from heat and effective ventilation.
Option #6 – “living” gazebo for the garden
Looking around your garden plot, you may ask yourself how to make a gazebo without introducing any other elements into the garden landscape other than plants. The most affordable, but at the same time, the most labor-intensive solution would be to create a structure only with the help of plants - trees or shrubs.

Specially shaped and trimmed tree crowns create original roofs for garden gazebos
Such an interesting design does not require complex construction preparation in the form of a foundation, frame and roof, since it consists only of specially grown species of dwarf, low-growing or weeping tree-like plants. Various types of willow, rowan, and pussy willow are planted, most often, in a circle. The trunks and crowns of such plants are formed and directed, as they grow, in the right direction - towards the center, creating a vegetable roof for the gazebo.

Openwork frames of gazebos in combination with climbing plants give garden landscapes completeness and harmony
Such a gazebo will naturally fit into the landscape design of the site and will be a shady place to relax on the sunny open lawn in front of the house. The only thing is that creating such a plant composition will require a lot of patience and time. A simpler option for a “living” structure would be to plant grapes, ivy, roses along the outer perimeter of its frame, formed from wooden beams, metal profiles or trusses. In this case, it is important to achieve complete concealment of the structure in the thickets so that the impression of its absence is created.

A bright accent that decorates a garden gazebo on a special day can be “clusters” of balloons imitating grapes
Option #7 – from wooden pallets
An extraordinary solution is to use euro-pallets made of wood for arranging walls. Such wooden pallets, painted in bright colors, will not only create a unique flavor, but will also be a good solution for walls - environmentally friendly, facilitating good air access to the interior space of the gazebo.
If you buy ready-made, how not to make a mistake?
An analysis of 10 popular mistakes when choosing a ready-made gazebo can be seen in the video above.
