After a long procedure of choosing a suitable model, the crucial moment comes to install the water heater and connect it to the mains. If you do not know how to install a storage electric boiler, then it is better to contact a specialist. The service will cost around $100. If an old electrical appliance is installed in the house and needs to be replaced, you will have to pay extra for dismantling. Those who want to save their home budget can use the instructions on how to install and connect a water heater without outside help in a couple of hours.
If you decide to install a boiler with your own hands, then you need to clearly know how to do it. Mistakes made during installation will lead to burnout of the wiring, flooding of housing, as well as failure of the device. Consider the basic rules for installing a water heater:
- First you need to choose the optimal location of the device. The boiler is usually installed in the bathroom, toilet or kitchen. The electrical appliance is freely accessible.
- The wall or any other support under the boiler must withstand double the weight, for example, with a capacity of 80 liters, the load indicator is 160 kg.
- Old wiring must be replaced, otherwise it simply will not withstand the load.
- The layout of metal pipes ten years ago will have to be changed in the same way.
Other rules and installation nuances will be specified in the installation instructions.
Necessary tools and materials for installation
When it is planned to install a water heater with your own hands, tools are indispensable. It doesn't matter what brand the boiler is. Let it be "Termex", "Electrolux" or "Ariston". The principle of installation of storage water heaters is the same.
You will need the following tool:
- adjustable and a set of wrenches;
- impact drill or hammer drill;
- straight, as well as curly screwdriver;
- pliers;
- roulette;
- level.
You will need the following materials:
- flax or fum tape for packing threaded connections;
- Ball Valves;
- connecting tees;
- two flexible hoses or a plastic pipe for connecting to the water heater nozzles.
If the installation of the boiler cannot be done without replacing the wiring, you will need a cable, an RCD, a socket, a 16 A machine.
Choosing a place where it is better to install a water heater
The choice of installation location for the water heater depends on the type of appliance. Storage boilers are floor, wall and built-in models. By the name it is already clear where to install them:
- Storage-type floor water heaters are designed for a large volume of water and are most often used in large country houses. Floor type boilers are installed on a stand.
- The volume of the built-in type device is small. Such water heaters are placed under the sink or in a specially designated niche.
- For an apartment, the installation of a vertical or horizontal wall-mounted water heater is optimal. The device does not occupy a useful floor area, and the volume of hot water is enough for a kitchen sink and a bath.
A water heater of any type is located as close as possible to the draw-off points. The air temperature in the room must be positive, otherwise the water will quickly cool down, and when the power is turned off, the liquid will turn into ice.
The installation height of the boiler on the wall does not play a special role if it is connected to the central water supply. Choose a convenient place that is easily accessible for maintenance. In the case of autonomous water supply, the height of the water heater mounting on the wall depends on the location of the water storage tank.
Wall Mount Features
Wall-mounted water heaters are the most common and their installation should be considered in more detail. Fix devices to the wall with metal brackets. For vertical models, two fasteners are used, and a horizontal boiler is fixed with four elements. The manufacturer's instructions are attached to the device, where all the nuances of installation are specified.
When installing a horizontal water heater, fasteners with loops are used. Storage heaters cannot be installed in the reverse order, that is, horizontal models in a vertical position and vice versa. Incorrect location will lead to damage to the device, as well as flooding of the room.
Mounting brackets are screwed into the drilled holes, having hammered plastic dowels before that. The water boiler is heavy and only a solid wall made of concrete, brick, cinder block or wood can withstand it. Mounting on plasterboard partitions is prohibited. The exception is a plasterboard wall, behind which the supporting structure is located. For fastening, elongated brackets are used that can pass through the gypsum and sink into a durable material.
Connecting the boiler to the water supply system
When the fixing of the boiler to the wall is completed, the important process of connecting to the water supply begins. It is important to consider the type of water supply here. There is a scheme for connecting the water heater to the central water supply and an autonomous system. To obtain hot water from the tap immediately after it is opened, recirculation is provided. In this embodiment, the boiler piping is performed according to a special scheme.
Water connection
First, let's look at how to connect a storage water heater to a centralized water supply, since this option is most common for apartments. The system constantly has a water pressure of at least two atmospheres, which allows the owner to fix the device to the wall at any height and this will not affect the performance of the boiler.

The boiler is connected to the water supply with flexible hoses or a plastic pipe, but first a security group is assembled. The assembly consists of a set of tees, valves, taps and fittings. The cold water and hot water pipes of the appliance protrude from the bottom of the housing. From here they begin to connect the water heater to the centralized water supply:

- A detachable adapter of two nuts is screwed onto the thread of the cold water inlet pipe. Plumbing fitting is called "American".
- A tee is screwed onto the thread of the adapter. A non-return valve is mounted to the lower outlet. It has an arrow on its body indicating the direction of the water, and it should be pointing up. The valve allows liquid to enter the tank, but does not allow water to drain back into the pipeline.
- Another tee is connected to the side outlet of the tee. The side hole of this element is directed down and the compression fitting is screwed on, and a piece of plastic pipe is attached to it, which is diverted into the sewer. Excess water will be drained through the pipe at excess pressure.
- They put on the free exit of the second tee.
- A cold water supply tap is connected to the inlet of the check valve.
To simplify the circuit, the safety assembly can be replaced with one element that has a non-return and safety valve inside the body, as well as a spout for draining water. The part is immediately wound onto an American, and a cold water tap is placed behind it.
On the second branch pipe of the water heater, designed to exit hot water, they wind the "American" and put a tap. Between these two elements it is reasonable to put a tee and screw another tap to the side outlet. Shut-off valves are useful for supplying air to the tank when draining water from the boiler. If the manufacturer has provided an air supply plug, an additional valve is not needed.
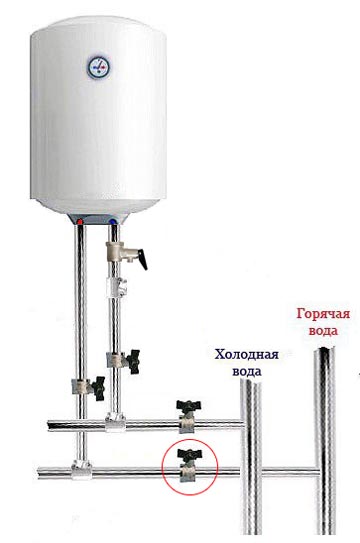
After the installation of the security group, as well as the shut-off valves, they begin to deal with pipelines of cold and hot water. To connect to the system, it is optimal to choose plastic pipes. Pieces of the desired length are connected to the taps on the water heater using compression fittings. The second end of the pipes is connected to tees embedded in the plumbing system.
The correct boiler piping scheme provides for the insertion of two more taps that disconnect the cold water and hot water apartment pipeline from the common risers of a residential building. During operation of the water heater, the cold water tap will be constantly open. Shut-off valves near the DHW riser are transferred to the closed position. If this tap is not closed, hot water from the boiler will go through the riser to neighboring apartments.
Connection to the autonomous water supply system
In an autonomous water supply system, the boiler connection scheme is of two types, depending on the location of the storage tank. The tank in a private house is located in the attic or inside one of the rooms on the second floor.

To know which scheme to choose, measure the distance between the bottom of the storage tank and the water heater hung on the wall. If the indicator is less than 2 m, then the tee for connecting the branching of the cold water pipeline is placed above the level of the boiler. The safety group is mounted on the nozzle of the device.

When the distance between the storage tank and the device is more than 2 m, the branching tee of the cold water pipeline is placed below the level of the water heater. The safety group is wound onto the inlet pipe.
Any of the considered schemes can be supplemented with a reduction gear. The unit is designed to reduce the water pressure in the pipeline if the indicator exceeds 6 bar.
Wiring diagram with recirculation
When an indirect storage water heater is being installed for a private house, a scheme is used where recirculation is provided. The system allows you to get hot water from the mixer immediately after opening the tap.

The system is a closed loop. Usually it is done through a heated towel rail. In the absence of this element, blunt recycling is allowed. Instead of a heated towel rail, use a flat pipe. The main thing in the scheme is to close the ring. The circulation pump drives the hot water around. The system has an expansion tank, as well as three valves: a check valve, a safety valve, and an air bleed valve.
Recirculation constantly keeps the water hot, even if a person does not use the appliance for a long time.
Electrical connection
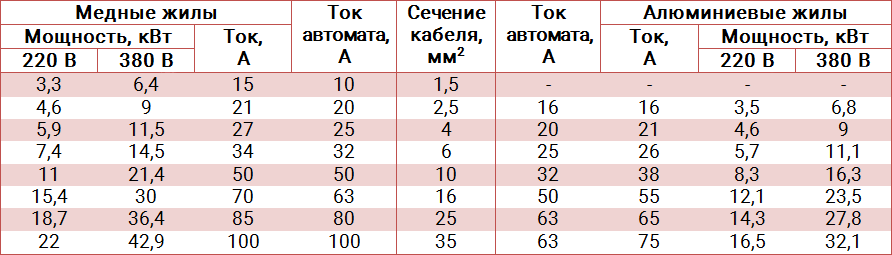
To connect the boiler to the mains, you will need an electrical circuit and an accurate calculation of the wire cross section. Any cable will not work. When calculating, it is necessary to take into account the power of the heating element, and take a wire with a small margin of section. Typically, household models are equipped with heating elements with a power of 1–3 kW. The connection of such a water heater to the mains is carried out with a three-core copper wire with a cross section of 2.5 mm 2. For the convenience of cable selection, use the mounting table.
There are three important nodes in the electrical circuit for installing a water heater: an RCD, an automatic machine, and a socket with a plug. All elements are designed for a rated current of 16 A. Regardless of the presence of a circuit breaker, connection through a socket is mandatory. For safety reasons, during the repair of electrical equipment, there must be a visible break in the electrical circuit.
Let's take a closer look at how to connect the boiler to electricity without seeking help from a specialist:
- A socket with a protection class of at least IP44 and an RCD is placed on the wall. To get to the contacts of the water heater, remove the decorative cover from below. From the boiler to the outlet, measure the distance to calculate the length of the cable.
- According to the measurement, a piece of three-core wire is cut off with a small margin. A chain is assembled from a plug, an RCD and the last connection is made on the contacts of the water heater. When connecting, it is important not to confuse the third wire - grounding. It is usually marked with yellow stripes on a green background.
- A three-core cable is laid from the outlet to the circuit breaker, and a line is led from it to the electrical panel.
Even before the boiler is connected to the network, the resistance of the ground loop is measured. The optimal indicator is within 4 ohms. If the question arises whether it is possible to connect a boiler without grounding, it is better to discard a bad idea. This is personal security. Grounding protects a person from electric shock during a breakdown of the heating element and the metal parts of the device from destruction by stray currents.
Some craftsmen adapt to turn off the heater from the outlet while swimming, if there is no grounding. The option is not bad, but this will have to be done every time you wash your hands or dishes, which is extremely inconvenient.
Turning on and checking the boiler after installation
Upon completion of the installation and connection of the water heater, the last question remained - how to check the device for operability:
- after the risers close the hot water tap and open the cold water tap;
- at the inlet of the boiler, the shut-off valves and the hot water tap of the mixer are opened;
- under pressure, water will fill the tank, forcing air out of the system through an open mixer;
- when the water pressure goes continuously without air pops, the mixer tap is closed.
The device is under pressure. It remains to check all the joints for leaks.
After successful filling with water, voltage is applied to the water heater and the desired operating mode is set. The heating time depends on the power of the heating element and the capacity of the tank. If after about 1 hour hot water appears from the mixer, the installation has been carried out correctly.
