Arranging a roof with your own hands is a difficult task, but quite feasible for those who have at least a little experience in construction. In order for the work to go smoothly, it is necessary to carefully prepare, study the technology of mounting the roof, the sequence of operations and methods of fastening individual structural elements. About how the roof of the house is erected with your own hands, and will be discussed in this article.
Roof types
The most common types of roofs include the following:
- Shed;
- gable;
- Hip four-slope;
- broken line;
- Combined.

Each design has a number of features, so it is worth considering them in a little more detail:
- shed roof . The roof, which has a single slope, differs primarily in cost - a minimum set of materials is required for installation. In addition, the installation process will be quite simple and fast. True, the price for these advantages in the end turns out to be quite significant: firstly, the design is not very attractive visually, and secondly, there will be too little free space under the roof for arranging an attic or attic.
- gable roof. This version of the roof structure is the most popular due to the ease of installation and the ability to equip a full-fledged room in the under-roof space. A roof with two slopes is a little more complicated and more expensive than a single-slope version, but simpler and cheaper compared to a four-slope design. A key feature of gable roofs is the presence of triangular gables, which are located at the ends of the building. How to make a triangular roof, you should read more in the corresponding article.
- hipped roof. For the installation of such a roof, thorough preparation and serious costs will be required. The design of the hipped roof includes many elements, so there will be a lot of work. The attic of this design cannot be equipped with windows due to the missing gables - but dormers and dormer windows are required without fail, because they will provide illumination of the room and evacuation if necessary.
- Roof with broken slopes. As a rule, this type of roof is mounted if there is a desire to make a full-fledged attic. The design of the roof in this case involves the installation of its lower part with a large slope compared to the upper section, due to which the ceiling of the room rises and the usable area increases.
- Combined roof. As the name implies, a combination roof can include features of several or all structures. This type of roofing has not gained much popularity, but in some situations only a combination of various design features can achieve the desired result.
The selection of the type of roof is always individual, so you need to build on your own wishes and capabilities.
Calculation of the roof of the house
Before making the roof of the house, it is necessary to perform calculations of all structural elements, to design the roof of the house. The best option there will be a full calculation of each indicator, but in practice this is rarely required.
The easiest way is to take the standard cross-sectional values of the roof elements, especially when it comes to a typical building:
- Mauerlat - 150x150 mm;
- Racks - 100x150 or 150x150 mm (the exact value depends on the section of the rafters);
- Struts - 100x150 or 50x150 (determined individually, depending on how convenient it will be to connect the struts to the rafters);
- Puffs - 50x150 mm;
- Runs - 200x200 mm;
- Overlays - from 32 to 50 mm.

An accurate calculation of the height and section is performed exclusively for the rafter legs, taking into account the following parameters:
- The material used for the roof;
- The level of precipitation in the region (usually the values obtained in winter are taken for calculation);
- Rafter step;
- span.
In principle, the calculation of the roof of a house with your own hands can be performed not very accurately, to approximate values - but in this case, you need to add at least a small margin of safety to the results. To finally simplify the calculation process, you can use an online calculator or special tables of standard values.
If we make the roof of the house with our own hands, then we often have to mount insulating material as well. In this case, the height of the rafter legs will depend on the thickness of the insulation. The installation of the heat-insulating layer must be carried out in such a way that the material is located below the load-bearing beams. Using mineral wool as a heater, it is worth considering that it requires a small gap through which the structure will be ventilated. This gap can simply be left if the rafters are high enough, or a counter-lattice can be mounted.
How to build a roof with your own hands
The general instructions for building a roof with your own hands look like this:
- Before building a roof, you need to take measurements of the building;
- Next comes the preparation of all materials (including impregnation wooden elements antiseptics and flame retardants) and tools;
- Work begins with the installation of the Mauerlat;
- Next, a ridge crossbar is installed (if necessary);
- Then the frame is attached;
- The design is fixed and reinforced with racks, struts and puffs;
- A waterproofing layer and a crate are attached to the assembled frame;
- Further, the necessary work is carried out to ensure good ventilation of the under-roof space;
- Then droppers are installed;
- The last step is the installation of the material chosen for roofing.
Mauerlat installation
Before you build the roof of the house, you need to create a structure designed to securely fasten the roof to the building - and this is the Mauerlat on which the assembled frame is installed. True, when installing a roof on a wooden house, a Mauerlat is not needed - its role will be played by the upper crown of the building. The roof will be attached to the walls with dowels.
The roof is installed in the same way. frame house- this time the upper trim will act as a Mauerlat. The connection of the elements of the building and the roof is carried out by cutting with the use of metal corners, in which there are holes for self-tapping screws.

It is quite another matter to install a roof on a brick or concrete house. In this case, you can install the Mauerlat in several ways, and the choice of a specific method directly depends on the result of the calculations and the experience of the master.
Mauerlat is mounted in one of four ways:
- Wire connection. To implement such an attachment, it is necessary to lay the wire in the masonry at a distance of four rows to the edge of the structure. Mauerlat will subsequently be screwed to the walls with this wire. This option is the least reliable, but anyone can do it.
- Mounting with brackets. This method involves laying wooden bars in masonry in four rows from the edge. One part of the bracket is attached directly to the Mauerlat, and the second to a pre-fixed bar. This method also does not differ in complexity, but it is highly undesirable to use it in buildings with a heavy load on the roof.
- Mounting with studs. Studs with a diameter of about 10-12 mm are mounted in the masonry. A Mauerlat is temporarily laid on top of them and tapped with a hammer, after which small depressions remain on it in those places where the timber will have to be fixed. These points are drilled through, after which the Mauerlat can be installed on the mounts and the nuts can be tightened.
- Mounting with anchor bolts. This method is characterized by maximum complexity and reliability. Anchor bolts are embedded in concrete along the entire perimeter of the wall. The resulting fastening not only provides high-quality fixation of the roof, but also increases the strength of the edge of the wall made of lightweight concrete.
Instructions for the construction of rafters
The load-bearing elements of the roof must be securely attached to the strapping, for which several methods are used. If the roof is being built wooden house with their own hands, then the rafters can be exclusively layered.
It's all about two mutually exclusive rules:
- rafters wooden houses can be fixed exclusively hinged;
- Hanging rafters can only be fixed in a rigid manner.
That is why, when arranging buildings made of wood, only a layered truss system mounted on hinges can be used. To install such a roof, you will have to purchase special elements (usually called skids), which will ensure self-leveling of the roof when the house shrinks.

DIY roof one-story house, whose walls are made of brick or stone, can be equipped according to any scheme, but the greatest efficiency is achieved with rigid fixation of the rafter legs. Installation of the frame system can be carried out both with a cutting and without it.
To create a notched roof, you must first cut the rafters so that they fit snugly against the Mauerlat. In this case, it will be necessary to take out the cornice by means of fillies, which are attached to the rafter legs with at least a meter overlap. Fixation of structural elements can be carried out using any fasteners, but the best option there will be metal corners fixed with self-tapping screws.
If the roof will be installed without cutting, then fillies will not be required - the necessary frame overhang will be made at the expense of the beams themselves. This option is somewhat easier to arrange, since it does not require an exact fit of all elements. In order for the rafters to fit well to the Mauerlat, stops or separate boards are used. It is better to fasten the elements in the same way as in the previous case.
Fastening and reinforcement of the frame
The assembled frame must be attached to the building box so that the entire structure is not blown away by gusty winds. For fixing, a 4-mm wire is quite suitable, pieces of which are wrapped near the rafter leg at its fulcrum. The free ends of the wire are attached to anchors installed in advance in the wall. In case of wooden houses it is quite possible to use staples - they will be quite enough to securely hold the roof in place.

To increase the strength of the frame, it is necessary to reduce the span of the rafters with the help of struts and racks. Struts are usually set at an angle of 45 or 60 degrees relative to the horizontal. Racks are supported by the walls below them or special elements located in the space between the walls.
Also, the design can be strengthened by tightening, which reduces the bursting load. This is especially true when using hanging truss system. To assemble the frame, two puffs are usually used, mounted with self-tapping screws on both sides relative to the rafter legs.
Lathing, waterproofing and ventilation
First of all, it is necessary to install the selected waterproofing material on the assembled frame, and after that the crate itself can be fixed. Its design and the dimensions of the elements used are selected individually. Before you make the roof of a house with your own hands, you should read a separate article on how to properly mount the crate.

You should also take care of ventilation, for which you need:
- Provide air passage under the roof through the cornices;
- Free movement of air under the roof;
- Unobstructed air outlet through the ridge part of the roof.
Roof installation and insulation
One of the final stages in the assembly of the roof is the installation of the roofing. On the choice of the appropriate material and the algorithm for its installation, it is worth reading an article on the relevant subject. The last stage is the laying of the thermal insulation layer. The most commonly used roof insulation mineral wool. The selection of the thickness of the mineral wool must be carried out, starting from the climatic conditions in the region where the construction is taking place.

Conclusion
Mounting the roof after a detailed study no longer looks like such an unbearable task. Before you make a pitched roof, you need to prepare well, stock up on everything you need and plan the work. If you follow a clear algorithm and do all the work with the utmost diligence, then the result will be a high-quality and reliable construction that can stand for decades and reliably protect the building from any external influences.
The correct roof of the house implies not only a beautiful appearance, but also robust design
The construction of the roof of private houses is a difficult and very responsible job. The easiest option is to order turnkey construction from a specialized company, and expect a happy moment when you can move into a brand new house or cottage. But this method is good if there are enough funds to pay for the expensive services of builders-installers. It is better to build a house yourself, it will cost about half the price. This will require a quality project.. A properly designed project with calculations requires knowledge and design experience. So it's better to use either finished project, or order it from a specialized organization. Below we will dwell on the technology of building a roof. Installation and repair of the roof directly depends on its type and design. Therefore, first we will tell you what roofs are.
Roof types
The specifics and features of the roof largely depend on its type. Currently, there are many typical projects of private houses, with original and sometimes very spectacular roofs. Consider several common varieties that differ in their design:
- Shed. The simplest option looks like a right triangle in section.
- Gable. Sometimes called gable, a roof structure with two inclined planes. The attic room is perfectly built in here.
- broken line. A variation of the previous type, having slopes with a break (changed angle). A large number of modern houses can be seen precisely with a sloping roof.
- Hip (semi-hip). A four-slope design that allows you to raise the ceiling and conveniently place an attic under it.
- Conical or domed. Generally best suited for buildings with polygonal or circular shapes.
- Multi-forceps. A non-standard design, as well as a variant with a broken roof, requires painstaking calculation. Only an experienced architect is able to make a good project, and the cost of work is very high.

 Various types of roofs for country houses and cottages
 The rafter system forms the roof frame, which is the skeleton that ensures the reliability and strength of the entire structure of the house. The frame determines the type and shape of the roof of the building, its task is not only to support the roofing, but also to evenly distribute the load on the walls of the house. Right choice rafter systems, its competent construction will ensure the reliability of the structure, its durability and strength.
The truss system is constructed, as a rule, from coniferous wood, well dried to a moisture content of 18-23%. It is possible to make a good and durable roof only from high-quality material.
When calculating loads, it should be taken into account that two types of forces act on the frame: constant and variable:
- The constants include the weight of the entire frame structure, together with the drainage system, insulation and roofing.
- The variables are the weight of people inside, snow cover and wind pressure.


Important!
The calculation of live loads is carried out on the basis of building codes for the climatic regions of Russia.
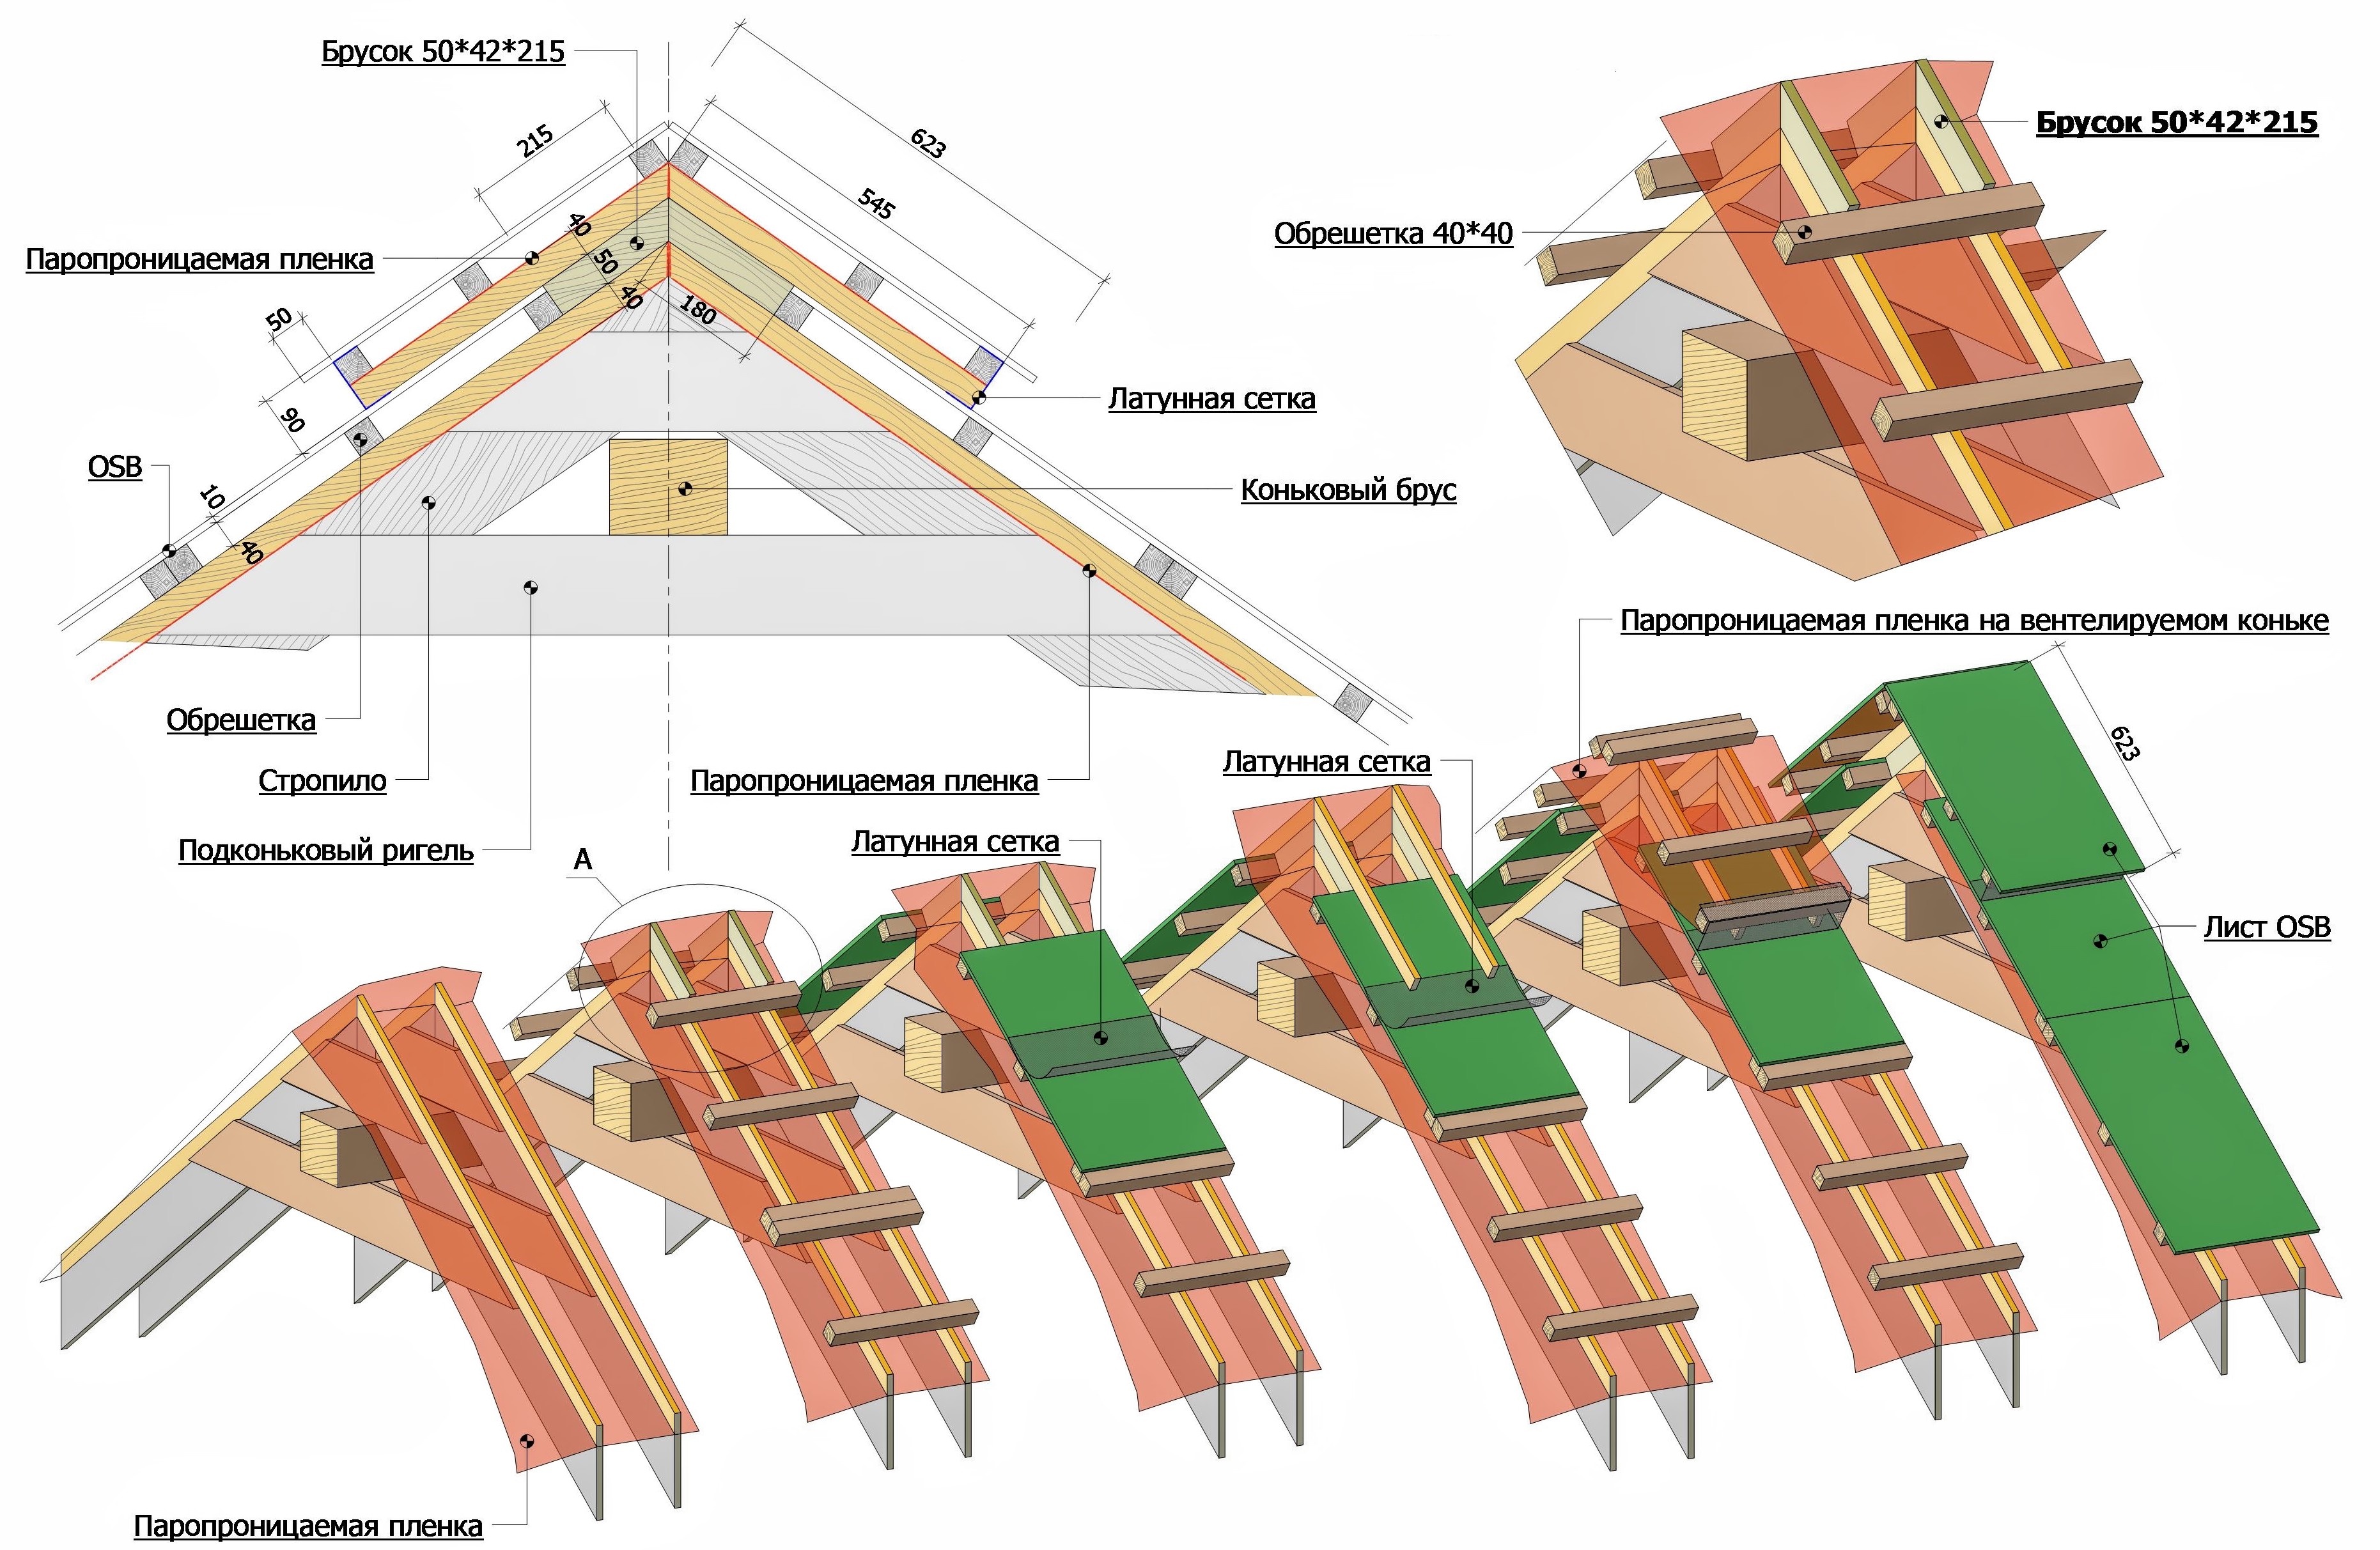
We will consider the components and elements of the frame using the example of the most common design with 4 slopes:
- Mauerlat, timber, laid on top of the walls of the house. It serves as a support for the rafters and evenly distributes the load on the building structure.
- Rafter, has another name rafter leg. An angled beam or board, with the lower part resting on the Mauerlat and the upper part on the girders. Determines the slope of the slopes, serves as a reference element to support the coating.
- Run. Horizontal beam to support the upper ends of the rafters. Can serve as a ridge beam. Mounted on vertical posts. It is better to make it from a bar or a thick board.
- Racks are vertical. They are a support for runs, located on load-bearing walls or on beds.
- Lie down. Beams laid horizontally on the walls of the house, playing the role of floor beams. They serve as a support for racks, carry vertical loads and the weight of the roof.
- Puffs. Boards fixing the rafters of opposite slopes, create rigidity of the structure, fix the rafters.
- Struts. Boards that perform a supporting function and protect the rafters from deflection.
- Wind beams. Boards fastening the rafters on one slope, fixed diagonally from the ridge to the Mauerlat. They perform the task of strengthening the frame and protecting it from wind loads.
- Filly. A board fixed on a Mauerlat, forming an overhang.
- Sprengel. A bar fixed at the corners of the house between the connecting Mauerlats of adjacent walls.

 Gable roof truss system
 The listed parts of the frame take place in almost all types of truss systems, of which there are several types.
The rafter system is the basis of any roof, its skeleton. Its main purpose is to give the roof structure strength and reliability. In addition, the rafter system is designed to evenly distribute the load on the walls of the house. There are several types of truss systems that allow you to make a reliable roof:
- Hanging or suspended rafter system. With this design, there are no intermediate pillars to support the rafters, and the connection is made with wooden or metal puffs. In the upper part of the rafters rest against each other, and the load is transferred due to puffs. In this system, various forces act on the rafters: compression, bending and the vertical component, bending the rafter down.
- Layered system. As a rule, it is used in gable roofs. It is used with the use of intermediate supports or in the construction of houses with a central load-bearing wall. Rafters are installed with support at one end on the walls and the other on intermediate pillars. SNiP regulates the device of a similar design for gable roofs only in cases where the distance between the bearing walls is not more than 6.5 meters. The layered system is lighter and easier to install.
- Sloped roof rafter system. complex structure that requires good project and careful calculations. For a broken structure, it is possible to raise the roof and make the attic higher, and minimize the unused area.

 Roof options
 Often a combination of these roofing systems is used. It is important that the rafter scheme is calculated at the design stage of the building. According to the results of calculations carried out according to a complex methodology, it is necessary to obtain data on the loads per 1 sq.m of the rafter system. SNiP regulates the standard value of 50 kg per sq.m. Also, according to the results of calculations, you can choose one or another type of rafter system.
Farms in roof systems
It is best to make a truss system from factory-assembled trusses. Calculated according to all standards, made of high-quality and well-dried wood, trusses greatly facilitate and speed up the construction process.
The entire structure built using trusses is much lighter and stronger. Trusses reduce wall loads by transmitting only vertical forces. The lower belt of the trusses is designed so that it can serve as an attic floor beam. The convenience of using trusses lies in the ability to cover a large span without additional support.
 A roof truss made of wood is the most common option.
 Advice!
If the structure of your house is more than six meters or the roof according to the project is very gentle (the slope of the slopes is less than 30˚), consider whether it is better to use ready-made wooden trusses.
The disadvantages of this design are that it costs a little more than building it on its own, and there are also some difficulties in raising it to the desired height.
Roof design
As mentioned above, a well-designed project should be the key to a reliable and durable roof structure. As a rule, it consists of several sections and drawings. It contains calculations and all information about the roof structure:
- first of all, the project determines the main parameters - the shape of the roof, its dimensions, the slope of the slopes, the presence of a pediment;
- the second, and no less important point, is a list of all materials for each node, indicating their quantity;
- a separate section should be devoted to the calculation of load-bearing structures, indicating the section of the rafter beams, the dimensions of the floor elements and other nodes;
- drawings in various projections with details of the main units;
- a section with calculations of the thermal properties of the roof structure and instructions on insulation and waterproofing, with a list of recommended materials;
- recommendations for roofing material based on the calculation of the maximum loads on the structure.

 Roof design in accordance with SNiP
 An important section of the project should be the section on insulation, waterproofing and ventilation.
Important!
Properly equipped under-roof space will avoid the accumulation of condensed moisture and leaks.
Proper insulation will create comfortable conditions for staying inside the building. All taken together will increase the strength, durability and reliability of the roof and the entire building.
roof project
Thermal and waterproofing
An important detail for the installation of roof insulation is the fact that not only external weather factors, but also internal:
- heat from the living quarters;
- evaporation;
- condensate formed from the temperature difference in the upper floor and outside.
Therefore, the requirements for roof insulation contain additional conditions compared to wall insulation. This is the laying of vapor barrier materials, a heat-shielding layer and waterproofing. In addition, it is necessary to equip the effective ventilation of the under-roof space, otherwise constant dampness in the room threatens.

 Roof waterproofing is one of the mandatory stages of its arrangement.
 To reliably insulate the upper floor, mineral or eco-wool is usually used. In combination with a waterproofing and vapor barrier film, good protection against external and internal influences is obtained. And the air gap between the different insulators will ensure the ventilation of the gables and the roof.
Step-by-step instructions for ensuring moisture resistance and functionality of the roof
To keep the roof from blowing
An important nuance that must be taken into account during installation and during the reconstruction of the roof is its attachment system to the house. A once-in-a-century hurricane shouldn't lift and blow our roof off. For this, fastenings of the frame to the walls are provided. When choosing a method of fastening, it should be ensured that the truss system does not burst the walls.
If fastening is carried out in a stone house, then it is recommended to fasten the rafters with crutches driven in from the inside of the wall. Fixation is made with a wire tie in several turns. In some cases, you can fasten the rafters to the floor beams. Such fastening provides for a small backlash in the joints of the rafters with the Mauerlat, which avoids the expansion of the walls.
In addition, do not forget to install wind boards (see above) during installation and repair. Such a bundle protects against wind loads from the inside. Wind boards prevent structural vibrations that eventually lead to destruction.

 A roof with steep slopes can be overturned by strong gusts of wind, with gentle slopes - lift
 The crate is designed to hold the roofing. It is done at the last stage of the construction of the frame (truss system). If the floor beams are installed in the openings of the walls, then fillies should be fixed to the first rafters from the bottom, which will help to make the roof overhang. In cases where the ceiling is laid along the Mauerlat, there is no need for fillies, since the beams in this design protrude beyond the perimeter of the walls, thereby creating a roof overhang.
The type of lathing is selected in accordance with the planned roofing material. The crate is made either with small gaps, or solid, with the laying of the board close.

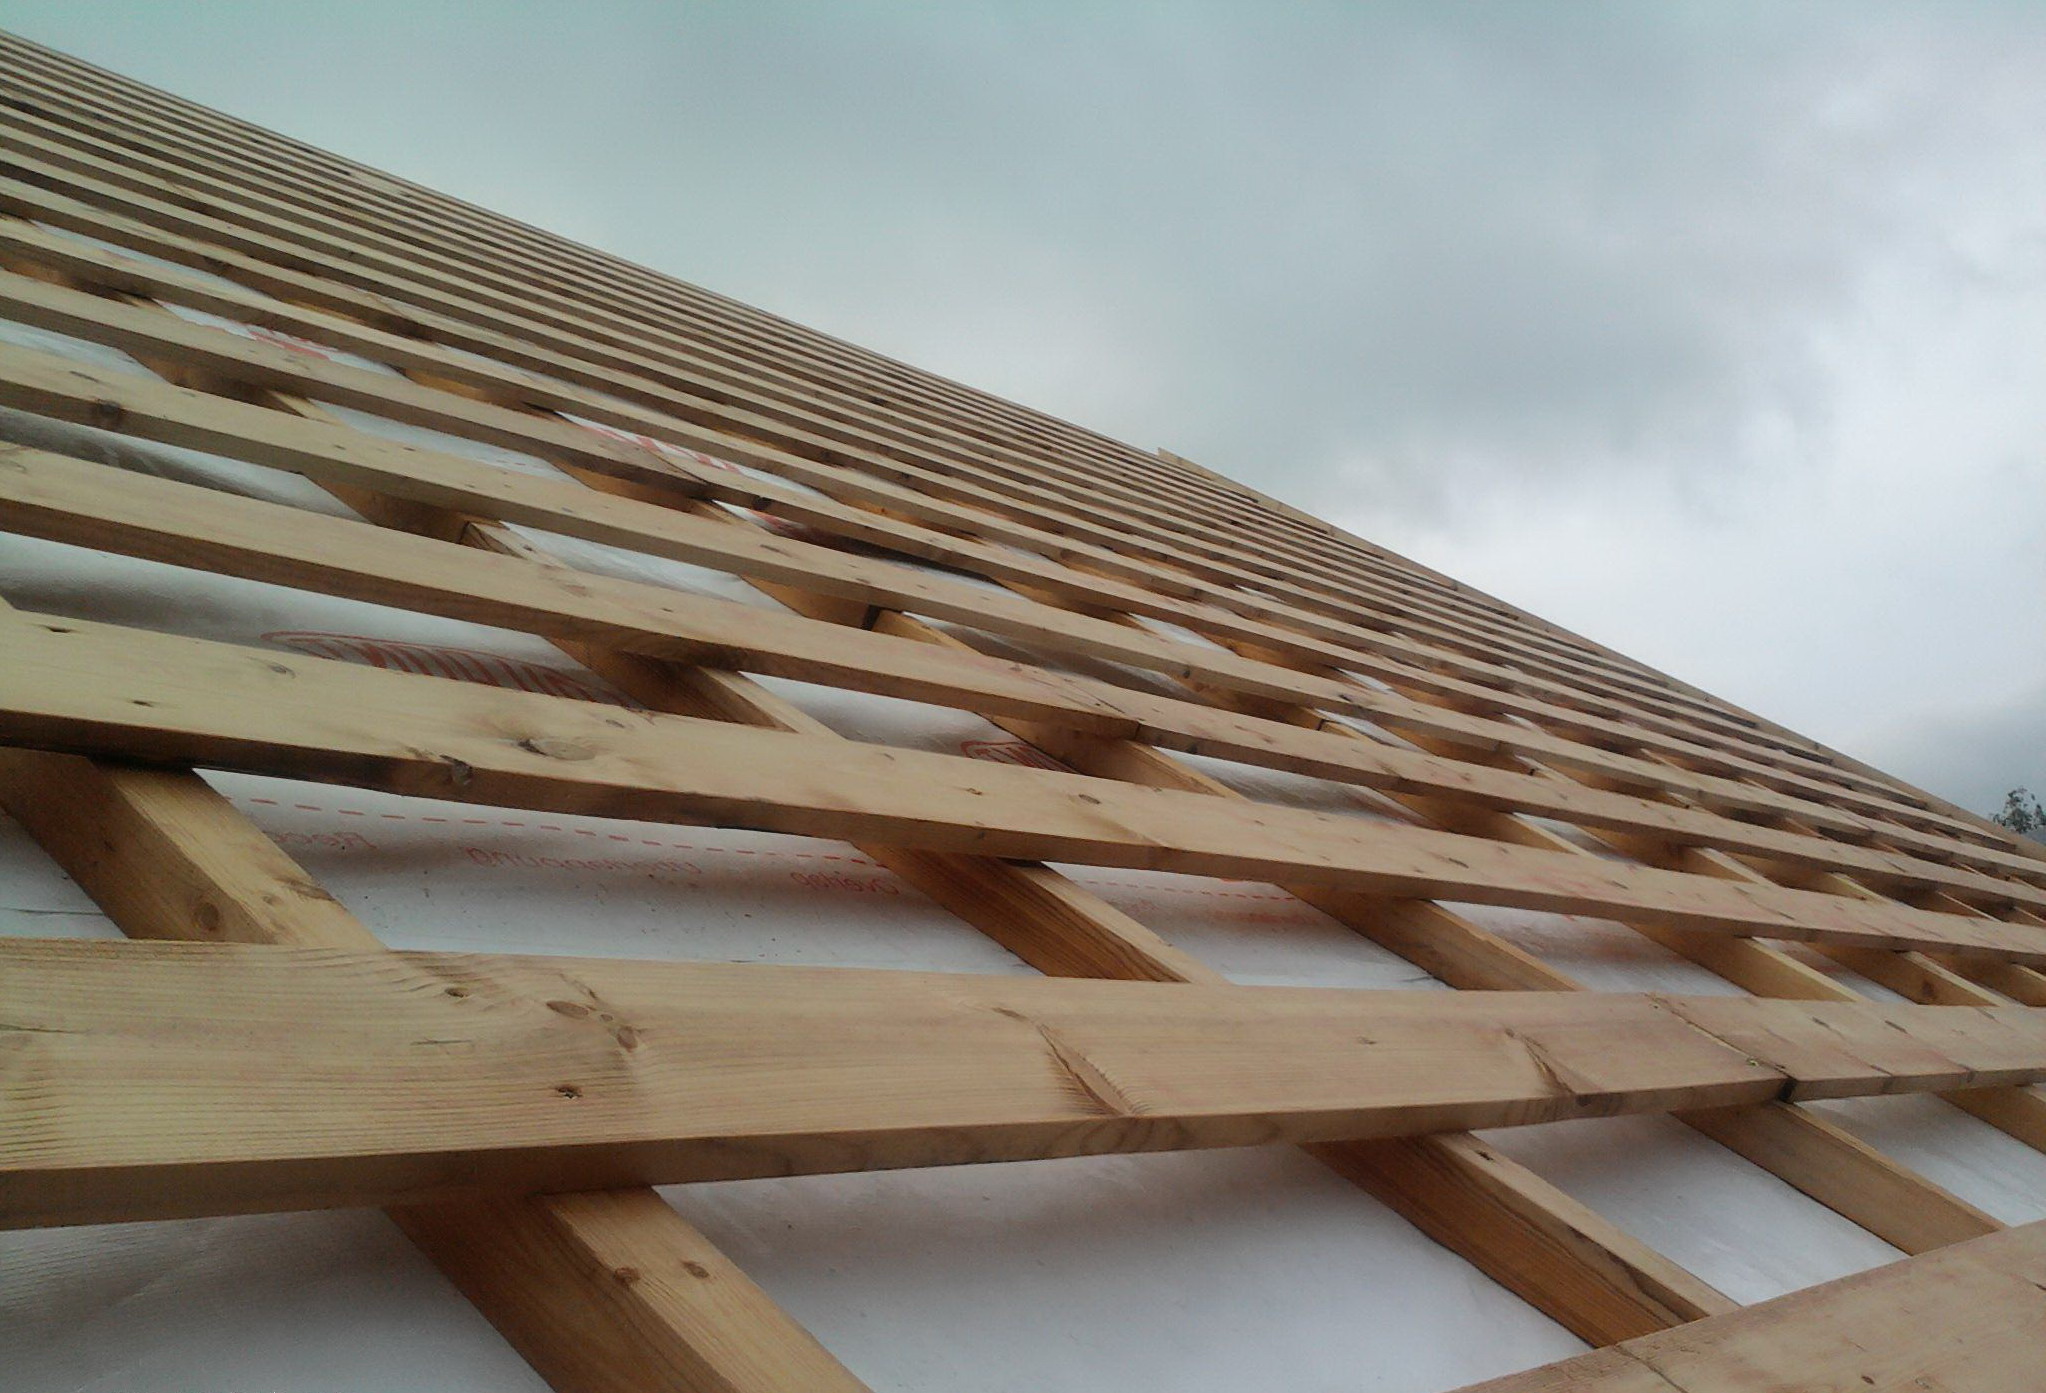 An important element roofing for the integrity and durability of the future roof is the crate - the foundation and guarantee of your peace of mind with its correct and reliable fastening
 We lay a layer of waterproofing on top of the crate. Now you can sew up the gables and proceed with the installation of the finish coating.
Roof repair: installation of lathing
Many owners of suburban areas prefer to build a house on their own. The final stage of the construction of the building is the erection of the roof. With certain skills, you can reduce labor costs for employees and do the work yourself. Many do not know how to make a roof - in such cases it is better to take the help of skilled workers.
Types of erected roofs
First of all, you need to determine the type of roof, prepare necessary tools and materials. Roofing is one of the most important steps in building a house.
To make a roof, you will need to choose its type correctly. The simplest structures that you can make yourself include gable roofs with straight frames.
Overlapping the roof with one slope will save the material. If you make such a roof frame with your own hands, the laboriousness of the work will be less, and the installation speed, on the contrary, will be higher. But this method has several drawbacks. The first of them is not the most attractive: there is no way to equip an attic or attic. In this case, the space under the roof is too low.
 Very often a gable roof of a private house is mounted with my own hands. It is easy to make and allows you to get more space. Compared to the four slopes, it has less complexity and weight. Also in this case, less material is required. The roof of the house differs significantly from other types. In this case, you need to make triangular gables at the ends of the building.
Before you build a roof with your own hands with four beams, you will have to seriously prepare. This design has more elements compared to previous roofs. Moreover, in the attic no option to make full windows, since the design is devoid of gables. Do-it-yourself roof installation in this case involves the installation of attic windows and skylights. They are designed for lighting and evacuation.
An excellent option would be a combined design. It can combine features of all these types. Another option for an attic is to build a roof with broken slopes. In this case, the lower part of the roof has a greater slope than the upper. This assembly allows you to raise the ceiling in the room and make the house more comfortable.
Materials for work
The modern construction industry offers a huge number of traditional and innovative roofing materials. To understand all their diversity, you need to consider in detail the main types of parameters. However, first you should understand what principles are used when choosing certain roofing materials. The choice of material depends on many factors:

The modern market is full of various roofing materials. They must not only be strong enough. A prerequisite is the ability to withstand various negative atmospheric factors.
The construction of the roof of a private house requires the preparation of tools and materials.
In particular, you will need:

Construction methodology
 Consider how to properly make a roof. To determine the configuration and size of the roof, it is necessary to take into account the snow and wind load in the existing climatic conditions- how less angle, topics better design withstand loads. But a small angle (40 degrees or less) does not allow full use of the attic space.
The shape and structure of the roof are designed in accordance with the project plan: the key supports of the roof system must coincide with the lines and points of the supporting structures of the lower floor. Thus, it is necessary to take into account the width of the house, the presence of a longitudinal load-bearing wall in the center. If the attic is not going to be used as a usable living area, you can build a secure roof with multilayer rafters. In this case, the rafters are attached to a track that supports the posts resting on the inner support wall.
If it is decided that the gable roof will be installed by yourself, you should carefully read step by step instructions. The functional parameters of the roof also depend on the correct insulation, characteristics and quality of the installation of the topcoat.
Independent Mauerlat device
Before you build the roof of the house securely, you need to take care of fastening the mauerlat - the wooden dressing of the house, which serves as the boundary of the transition from the stone to the wooden part.
Block it in the following ways:
- The bay strengthens the belt around the perimeter and fixes the studs in it. The step of the hairpin should be from 1 to 1.5 meters.
- Then the studs are fixed in the last rows of masonry at home.
Cutting and installation of rafters
 The rafters are the hardest part of the job. It is important not only to mount the legs of the rafters, but also to cut them correctly. In the event of a skew, the entire roof will “walk”, which is bad for the house.
Now it is necessary to cut off the upper edge of the board so that the system of rafters of two parallel legs can be connected with cutting edges without voids and gaps. To do this, you need to lift the board up, lean against the Mauerlat and raise it to the desired angle. In the center, overlapping to the rafter floor, you need to draw a line. This will be the board cut line. That is, in the upper part of the rafter we get an inclined cut. All rafters, cut with a pattern, are assembled securely at the top with staples, ties and bolts.
Roof gable device
The pediment is a continuation of the wall bounded by the slopes of the roof. If there is a gable roof, then the gables of the house are triangular. When installing the structure, the first parts are first installed, which subsequently serve as a frame for the gables. It is necessary to strictly check the verticality of the structure and make sure that they have the same height. A mountain range is attached to the upper part of the gables, on which the rest of the truss structures are later mounted.
Usually, gables are sewn up after roofing works , but this can be done at an earlier stage. Boards 50 x 100 or 50 x 150 mm are mounted in a vertical or horizontal direction. The pediment, which can be built by hand, is often provided with windows. Gables need to be insulated.
Installation of the frame and roofing pie
 In continuation of the topic, it is worth noting that the next step will be the installation of the frame and building roofing cake. Once the system is ready, the framework needs to be laid, which will form the basis for other materials of the pie - steam and waterproofing, as well as other insulation and roofing materials.
Roofing can be installed from unedged boards 100x50 mm. In this case, the step of the arrangement of the boards depends on the final roofing material. The heavier, the smaller the rack step should be. Usually it is 30 cm.
Important: under the frame, it is desirable to lay down a layer of vapor barrier. It will protect the insulation from evaporation from the house. Boards have already been installed on top of the barrier.
Now, perpendicular to the tree, you need to lay the beam in steps equal to the width of the plates or rolls of insulating material. Insulation is placed between them, neatly into the existing grooves.
From above, everything is covered with a layer of waterproofing and fixed with another perpendicular frame (in this case, horizontal). And already the last roofing material is being installed on it.
At the very end of the installation of the roof in the house, it is necessary to install a drainage system. It is made from cut plastic pipes, they are bought in advance. Now it remains to sew up the roof with the selected material.
Do-it-yourself roof covering
The plank is stuffed onto the truss system, the pitch of which is calculated based on the characteristics of the roofing material - its size and rigidity, installation method. If the use of flexible materials (tiles, rolled bitumen) is required, it is necessary to make an even frame.
Roof tiling work is carried out in the following order:

 Overlap must be reinforced in each wave. When covering the roof with metal tiles, special attention should be paid to the reliability of fastening the sheets and the accuracy of their connection.
When installing the roof, everything must be done as carefully as possible, otherwise heat losses will be very significant. Usually a gable roof is immediately carried out taking into account the use various materials. This allows you to build a roof with minimal economic costs. In addition, this approach speeds up and simplifies the installation of thermal insulation and vapor barrier systems. The construction of a gable roof is recommended to be carried out in stages with assistants. Compliance with the technology of work allows us to build a reliable, durable structure.
To learn how to make a roof with your own hands correctly, you need to study a few instructions for doing this rather complicated work. It should be noted right away that there are several types of roofs, each of which has its own device scheme and requires a special approach. In addition, the choice of the type of roof will depend on the purpose of the building that will be covered by it.
Properly erected roof elements will be able to protect the house not only from precipitation, but also keep precious heat inside the building in winter. Therefore, a well-built and insulated roof is no less important than reliable warm walls.
Roof types
As mentioned above, there are several types of roofs. When choosing an option suitable for a particular building, it is worth considering some of them to know what they are.
 Different types of roofs...
 To date, the following main types of roofs are satisfied in construction practice: single-pitched, gable with a slope, tent, mansard, hip four-slope, half-hip, multi-slope.
 … from the simplest to the most complex
 shed roof
This option is usually used to cover garages or outbuildings, but sometimes such a roof is also suitable for residential private houses.
Such a design can be called one of the simplest of all existing ones, especially in cases where the slope of the slope is very small. If there are plans to equip another room under the roof, then the design becomes somewhat more complicated. Nevertheless, this type of roof is the most economical in terms of roofing and lumber consumption.
Gable roof
The gable version of the roof is considered traditional for residential buildings, country houses and is installed more often than all other types. Apparently, this is due to the fact that such a roof can be arranged for any structure of the building. The slope of the slopes will depend on the distance between the outer walls and the location of the load-bearing walls inside the house.
hipped roof
This is a fairly complex design, which is almost never used in recent years. However, if it is decided to choose it, then it is better to use a beam-tightening system with struts and racks for the device.
The roof consists of four isosceles triangles - their vertices converge at one point. The hipped roof resembles a tetrahedral pyramid or tent, hence its name.
Double pitched roof
Such a roof is arranged according to the scheme of a gable roof, but it has bevels of different slopes in the front part.
Hip or pitched roof
This design is somewhat reminiscent of a hip roof version, but, unlike it, it has a ridge. The roof is quite complex in design, and most often a scheme with double puffs and beams is used to build it.
Half hip roof
This design has hardly been used in recent years, since it is rather complicated in the device. If it is chosen, then it is mainly arranged according to the truss scheme with puffs.
pitched roof
Such a roof is arranged in houses with complex layouts, or if an extension is made to the main building. The design of a multi-pitched roof is quite complex, and it is used only in extreme cases.
mansard roof
 mansard roof you can’t call it simple in execution ...
 Due to the fact that this design allows you to solve two problems at once - to get an additional room at the same time as a reliable roof, the attic version can be called one of the most popular after the gable type.
 ... but under certain conditions, a residential attic can also be located under a conventional gable roof
 Roof pitch
It is very important to make the correct slope of the roof - the durability of not only the structure covering the house, but the entire building will depend on this. In regions with cold winters and a lot of snow, the slope plays a particularly important role, since if it is insufficient, then snowdrifts will collect on the surface, which, when melted, can simply fail the roof. That is why it is recommended to make the slope at least 40 ÷ 45 degrees.
In addition to the location of the building, the roofing material also affects the choice of roof slope. So, if it is planned to use tiles or slate for coating, then the slope should not be less than 25 degrees, otherwise water may seep into the attic at the joints, as there will be a small intensity of water runoff.
On device gable design, the slope is usually made from 30 to 45, and single-sided 25 ÷ 30 degrees.
Components of the roof structure
In different roof systems, the elements vary, but the main ones still remain the same. These include the following:

- Skate - the upper part of the roof, the place where its slopes are connected. This element is absent in the tent and single-sided version.
- Slopes are the main planes of the roof covered with roofing material.
- Endova - the inner corner of the roof, formed at the junction of two slopes. This element is present only in complex structures. When arranging the roof, valleys should be given special attention during waterproofing work, since such a site is one of the most vulnerable places in the structure, it is in them that the largest accumulation of snow occurs.
- The eaves overhang is the overhang of the roof on the sides of the house. They are installing drainage systems.
- Gable overhang - the protruding part of the slopes above the front side of the roof.
- The rafter system is a structure that is the basis for the installation of slopes. There are several varieties of these systems, but the most reliable of them is the triangle, since it is this figure that gives the structure rigidity.
Rafter systems
Before installing any structure made of wood, the material must first be coated with antiseptics and fire retardants, which can protect it from fungal formations, insect colonies and increase the fire safety of the entire system.

The main element in the rafter system is the rafters, laid on the Mauerlat, supported by racks, fastened with beds and puffs.
In the upper part, the rafters are overlapped and fastened, while the lower ones are fixed to the Mauerlat or to the bars laid between the rafters.
The rafter system has different shapes and can be layered or hanging.
You can make a simplified version when a crate is stuffed on the rafters, and roofing material is immediately laid on top of it. But the very first winter will show that the roof requires insulation. Therefore, it is best to immediately do everything right and not return to this issue again.
 Approximate structure of the "sandwich" of the insulated roof
 - The first thing that is recommended to be done is to sheathe the truss system from the inside with a vapor barrier film. It is stretched and attached to the rafters with a stapler and staples.
- Further, on top of the vapor barrier film, the roof from the attic side is sheathed with drywall plates - it is screwed with self-tapping screws. Drywall will not only give the attic space neatness, but also serve as the basis for insulation boards.
- At the next stage, you will have to climb the roof so that between the rafters, on the vapor barrier film, lay a heater, which is most often mineral wool in mats or rolls.
- A boardwalk is laid on top of the insulation. The boards for it should not be too thick so as not to make the structure heavier. Instead of boards, plywood sheets (or OSB) 4-5 mm thick can also be used.
- The next layer is sheets of waterproofing material - it can be a dense polyethylene film or roofing felt. The waterproofing sheets are overlapped by 20 ÷ 25 cm on top of each other.
- On top of the waterproofing, a counter-lattice is arranged, which consists of slats 10–20 mm thick and is stuffed directly onto the rafters.
- By counter-lattice fixed roof sheathing, with a distance between adjacent guides, which should be less than the tiles, by about 5 mm.
- A frontal board is nailed along the eaves, to which a drain system will later be arranged.
- Before laying the roofing material, hooks are fixed to the rafters, on which drainpipes will be mounted. gutters. After their installation, a cornice strip is installed, which is fixed to the frontal board
- Having arranged the crate and drainage system, you can proceed with the installation of tiles. It starts from the right or left side of the roof, from the bottom row, the tiles are aligned along the edge of the cornice and overlapped, in accordance with the locking system available on it.

- The second row of tiles begins to be laid on the same side as the first - it covers the first row by 50 ÷ 70 mm. Installation is carried out in the same order, up to the roof ridge.
- Having completed laying on the roof slopes, it is necessary to install a ridge at their junction.
- An end bar is fixed to the side rafter, having a size of 25 × 50 mm, and is installed on the corner of the roof corner - stub.
- A self-adhesive sealant is placed between the end bar and the tile.
- The entire side of the roof is closed with an end plate, which is designed to protect the roofing material from wind, which can tear off the coating with strong gusts.
Above, the process of arranging the under-roofing system and roofing with tiles was outlined briefly, with a simple enumeration of the main steps. It probably makes sense to consider it in more detail, literally step by step.
Prices for different types of tiles
Roof tiles
Step-by-step instructions for covering the roof with a tiled roof
Installation of the base under the roofing material
Nowadays, a very wide variety of different roofing materials is presented on the construction market. Nevertheless, tile against this “background” does not lose its popularity, although it is one of the most complex and time-consuming roofing installations.
Ceramic tiles are represented by several European and domestic companies, and it may differ in some design nuances. But the principle of mounting the crate and the coating itself is the same.
For the installation and fixing of the tiles, it is necessary to create the correct basis - the crate, therefore, it is necessary to begin the consideration of the process with the installation of this particular design department.
| Illustration | |
|---|---|
 | At the initial stage, of course, one of the types of truss systems is created, the design of which is described above. Before starting work on the installation of the batten on the rafters, the elements of the system must be additionally checked for their evenness and correct geometry. If irregularities are found on one of the rafter legs, then it must be leveled, since this flaw may adversely affect further work. The check is carried out using a perfectly flat beam and building level. |
 | The next step along the entire cornice line, a metal cornice strip is nailed to the edges of the rafters, which will protect the ends of the rafters from moisture getting on them. Separate planks are laid and overlapped. |
 | Further, on top of the truss system, a vapor-permeable membrane is stretched and fixed with brackets. Its first canvas is laid from left to right on top of the cornice strip. |
 | The next strip of material is laid horizontally, overlapping 150 mm on the bottom sheet. The membrane is mounted with an inscription, which is applied to one of the surfaces, outward. Along the cornice edge, the canvas is additionally fixed on the cornice strip with the help of construction double-sided tape. |
 | The last top sheet should protrude above the ridge, as it bends onto the second roof slope. |
 | At the next stage, the vapor-permeable membrane is fixed from above to the rafter legs with counter rails. It should be noted that if the length of the slope is not more than 6000 mm, the thickness of the counter rail should be 24 mm, with a length of not more than 12000 mm - 28 mm, from 12000 mm - 40 mm. The counter rails should not reach the ridge rib by 120÷150 mm. |
 | Further, on the ridge at the top of the junction of the rafter legs, pieces of timber 150 ÷ 200 long and with a section of 50 × 50 mm are fixed. The space remaining between them will play the role of ventilation gaps. |
 | After that, the ridge is covered with a sheet of a vapor-permeable membrane, which should be on the slopes and go beyond the structure from the gables to a distance of 200 ÷ 250 mm. |
 | On top of the membrane, laid along the ridge, for its fixation, sections of the beam are fixed in continuation of the counter-rails. Their size should be equal to the distance from the end of the counter rail to the crest of the ridge. |
 | When forming the cornice overhang, a perforated mesh-plate is mounted on the ends of the counter-rails and on the cornice strip, designed to provide ventilation of the space formed under the roofing material and protect against the penetration of various insects into this gap. |
 | Further, brackets are fixed in the eaves of the counter-rails for mounting gutters on them. Each of them is fixed with two screws or nails. |
 | In order for the gutter to be laid into the brackets without problems, they must be installed exactly in line with the formation of a slope for free flow of water. To do this, craftsmen often install two extreme brackets with the necessary difference, then pull a cord between them, and, already focusing on it, fix the rest of the hooks. |
 | After installing the brackets, a hinged beam is nailed along the cornice edge of the counter-rails along the entire length of the slope eaves. It also becomes the starting beam of the crate under the tiles. |
 | From the hinged beam on the extreme (at gables or roof profile fractures) counter-rails of the slope, the distance (step) with which the battens of the crate will be fixed is marked. This step will depend on the length and overlap of the particular shingle model. Most often it varies from 340 mm to 370 mm. Marking must be done on the extreme counter-rails. Then, on the marked risks, a nail is hammered in, a tracer colored cord is fixed and pulled on them, and with the help of it, a common line is beaten off on all counter-rails to secure the battens of the crate. |
 | The next step on the entire plane of the slope along the markings, horizontal battens of the crate are nailed to the counter-rails. Their cross-sectional size should be 70 × 30 or 70 × 25 mm. |
 | Upon completion of the installation, the crate should look like this. |
 | Next, it is necessary to prepare the roof ridge for further installation of ridge tiles on it - this can be done by attaching two beams to the ridge along the entire length, one on top of the other. |
 | Another option is to use special elements called ridge bar holders. They are screwed to the counter rails using two self-tapping screws on each side of the ridge. |
 | A wooden bar is installed and fixed in the fixed holders. Holders are convenient in that they can have different sizes and heights, so you can always choose it according to the required parameters. |
 | Further, a gutter is installed and fixed in the brackets along the entire length of the eaves. |
 | The gutter is additionally pressed by another cornice strip mounted on the eaves rail. This element, fixed along the entire length of the cornice, closes the entrance to the under-roof space, thereby protecting it from moisture, and descends into the gutter. |
 | Further, on top of the crate along the edges of the slope from the side of the gables, bars with a section of 70 × 70 mm are nailed. They will become the basis for fixing the wind board from the gable part of the roof, as well as limit and close the edge of the tiled masonry. |
 | After that, wind boards are installed and fixed along the pediment, which are additionally interconnected in the ridge area with a metal corner. On this, the preparation of the crate for the installation of a tile coating can be considered completed. |
Installation of tiles on the prepared crate
The installation of most models of ceramic tiles is almost identical, no matter what manufacturer's material is chosen by the owners.
| Illustration | Brief description of the operation to be performed |
|---|---|
 | Installation of tiles starts from the eaves on the right side of the slope. The corner tile is laid first, which is fixed to the second rail from the eaves. |
 | The first tile is fixed in the upper part with the help of two self-tapping screws that are not completely screwed in. |
 | Further, the entire first row of tiles is laid out, each of which is fixed in the upper part on the lathing rail with the help of one self-tapping screw through a hole drilled in it in advance. |
 | At the end of the first row of tiles, the last left corner tile is installed and screwed with two self-tapping screws. |
 | Further, from the bottom to the ridge, the first vertical gable row is mounted, consisting of corner tiles, each of which is fixed with two self-tapping screws. |
 | Next, you will need to prepare the tiles, which will be laid on top of the bracket for mounting a snow barrier on it. In order for the tile to neatly stand up and close the bracket, its location is marked on its reverse side and part of the lock is carefully knocked out with a hammer. |
 | Now, in the second horizontal row with a step of 900 mm, the brackets themselves are installed. This element is hooked with a hook and screwed to the third lath of the crate from the eaves. With the lower side, it is installed on top of the lower tile of the first row. |
 | Once installed and secured, the bracket should look like this illustration. |
 | Further, the prepared tile is installed on top of the fixed bracket and screwed to the third lath of the crate. |
 | The tile covering the bracket is additionally fixed with a wire hook, with which it is hooked to the side edge and twisted to the crate rail. In this way, every third tile of this row is fixed, which is laid on brackets-holders. In this illustration, a wire hook is clearly visible, located on the left edge of the tiles of the second row. |
 | Having installed the shingles of the second row, and having fixed all the brackets for the snow barrier, you need to try it on in place as it will be fixed later. It does not make sense to fix the barrier yet, as it will interfere with the further installation of the tiles. |
 | Further, laying of ordinary and corner tiles is overlapped, with their connection to locks, also from right to left, from bottom to top to those areas where additional elements necessary for the normal functioning of the roof structure are built into the coating. |
 | In this way, most often it is necessary to lay special ventilation tiles. If the roof has a length of up to 4500 mm, then these elements are not used. With a length of 4500 to 7000 mm, one row of ventilation tiles is mounted on the second row, counting from the ridge. On longer roofs, ventilation tiles are installed in three rows with a spacing of 1500 mm between them. |
 | On the third or fourth row from the ridge, in the middle part of the slope, a tile with a ventilation pipe, called a passage, is installed. |
 | In combination with other elements of the roof, this element looks like it is shown in this illustration. |
 | Having tried on this tile on a slope, it is temporarily removed, and a round hole is marked and cut out in the membrane under it. Then a sealing ring is installed in it. |
 | Further, from the attic side, a corrugated connecting pipe is inserted into the ring. Usually its diameter is 120 mm. Then, it is connected with the reverse side to the ventilation duct of the building. |
 | A protective cap is put on top of the ventilation pipe, which will protect the entire channel from atmospheric precipitation, dust and debris. |
 | Complete with tiles, a bench (step) for a chimney sweep is often purchased. This element of the roofing system is fixed on the fourth or fifth row from the ridge. The bench brackets are also of a hook design, and they are hooked and screwed to the top lath of the batten in the laying of the row. The lower side of the brackets is installed in the recesses on the tiles of the underlying row. |
 | In order for the closing brackets of the tiles of the upper row to fit snugly against the lath of the crate, chips are made in its locks located in the upper part after fitting. Then, the tiles are laid on top of the hook-brackets and fixed with screws and a wire hook - by analogy with what has already been discussed above. |
 | Another important and complex node when covering the roof is the design of the adjunction of the roofing material to the walls of the chimney. The joint between them must be sealed correctly and tightly. The most convenient way to work on the formation of the abutment is to use a flexible self-adhesive tape made using lead and aluminum. It well accepts a relief form of a tile and is well pasted to it. Adjacency finishing works are carried out in a certain sequence. First, the tape is glued to the front of the pipe with a call to its side walls, as well as to the tiles of the row passing in front of the chimney. To do this, in place, cuts of the desired shape are made on the tape. Then, it is measured and cut off, and then the tape is glued to the side walls and the tiles adjacent to them. |
 | To form a joint on the back side of the pipe, two pieces of tape of the same length are taken, which exceeds the width of the pipe by 20 ÷ 30 mm. They are glued to each other in width. Then, having combined the middle of the tape and the width of the pipe at a height of 150 ÷ 200 mm, the waterproofing is glued to the wall of the chimney and onto a metal sheet previously fixed to the crate on the upper side of the pipe. After that, on a tape glued to the metal, a row of tiles is laid on top. The parts of the tape protruding at the corners are cut, wrapped on the sides of the pipe, and overlapped on the waterproofing already fixed to them. |
 | Some craftsmen prefer to decorate the junction with sheet metal, which is cut into strips of the desired width, mounted according to the same principle as a self-adhesive waterproofing tape. The connection of the edges of the metal at the corners is carried out with the help of rivets and folding. |
 | Having fixed a waterproofing tape or a metal casing around the entire perimeter of the pipe, along its upper line on the pipe walls, a metal profile bar is fixed, pressing the flexible tape to the surfaces of the chimney. Then, the gap remaining between the upper edge of the plank and the wall of the chimney pipe is filled with a roofing sealant. Often a groove is cut through the wall of the pipe, into which the bent edge of this metal tide is inserted. Then the shtraba is sealed with the same sealant. |
 | Next, proceed to work on the ridge knot. First, a perforated sealing ventilation tape made using aluminum and lead is laid on the fixed ridge beam overlapping the top row of tiles. |
 | Due to its flexibility, this ribbon skirt perfectly adapts to the shape of the tiles without much effort. |
 | After the tape has been laid, the end ridge element is screwed on the pediment side of the ridge, and the first ridge tile is tried on to it. |
 | Further, the first tile is removed, and a ridge clamp with a bracket, which comes with the ridge tile, is screwed to the timber fixed on the ridge of the roof. |
 | Then the first ridge tile is installed in it. Further, it is fastened on the other side with the next clamp using a self-tapping screw. |
  | The next step is to install the second tile into the fixed bracket, which is also fixed at the end with a clamp - and so on, until the ridge is fully formed. |
 | When finished, the roof ridge should look like this illustration. |
 | The final stage in the design of the ridge is the fixing of the second end element. If necessary, the last tile of this row is cut to the desired size. |
 | When all additional elements roofing will be installed, the last step to the brackets installed in the lower part of the slope is the lattice barrier that restrains the sliding of snow. |
 | This illustration shows a view of the finished roof slab as viewed from the eaves side. |
 | This is how the roof slope will look with all the elements installed on it. |
After completing the roof covering, you can move to the attic to remove the temporary decking and lay the already stationary wooden floor. Installation begins to be carried out from the side of the attic or from the side of the room. The attic floor also consists of several layers and is arranged in different ways. The main thing is that if the roof is arranged, then work can be carried out slowly, without fear of precipitation on permeable materials and inside the premises.
In conclusion, it is worth emphasizing once again that the installation of a roof is a laborious, responsible and rather dangerous process. Therefore, to carry out the installation of the entire roofing system, it is sometimes better to invite specialists who are professionally engaged in the construction of houses, arrangement and roofing.
There are currently a large number of different types, among which are the following:
- multi-slope;
- gable;
- half hip;
- lean-to;
- hip four-slope;
- gable with a slope;
- attic;
- tented.
Among this list there are very simple options, and very complex for every taste.
Shed
This version of the roof is often used as a covering for households. buildings, sheds, garages, but it happens when it is also used for private residential buildings.
This is the most simple design, which does not cause any difficulties for any person who wants to create or repair it. The ease of work is especially evident in the case of a slight slope.
If it becomes necessary to create another room, then the roof will be a little more complicated in its design. But in any case, this is the simplest and cheapest option regarding the consumption of lumber and roofing.
gable
This is the most traditional option for country or private residential buildings. This type can be found everywhere, more often than others. Most likely, this is due to the fact that such a roof will be the most successful option, regardless of the structure of the building. As for the slope of the slopes, it directly depends on the distance between the outer walls and the location of the inner ones.
Shatrovaya
Compared to other types of roofs, the design of the hipped version is much more complicated and is becoming less and less common. In any case, if this type is chosen, it is necessary to use a beam-pulling system together with racks and struts.
Such a roof consists of 4 isosceles triangles that converge in the middle at one point. The name comes from its appearance, which resembles a tent.
Double pitched roof
As its name implies, the roof implies a classic gable version, but along with bevels of different slopes.
Hip or four-slope
This design may resemble a tent type, but among the differences it is worth noting the presence of a ridge. The device is quite complex, therefore, options with beams and double puffs are often used for construction.
Half hip
Due to its rather complex structure, such a roof can be seen less and less. But in the event that this particular type is chosen, then the rafter system with puffs is most often used.
Mnogoskatnaya
If the building has complex layout, then this option is most often used. It can also be found on ordinary houses, to which an extension has been made. Due to the fact that the design of this system is very complex, it is used only by specialists in very rare cases.
Attic
This is also a rather complicated option, but under certain conditions it can be done under the classic gable option.
The design is able to simultaneously solve 2 tasks at once:
- Get a secure roof over your head.
- Get an extra room.
This method is the most popular after the gable.
Roof pitch
The correct slope is very important. Not only the durability of the building structure that it covers, but also the entire house as a whole, directly depends on it. Of particular importance is the slope in those houses that are located in a harsh winter climate, where a large amount of snow can fall. If the slope is not enough, then large masses of snow will form on the roof, which negatively affect the roof and can collapse it. In such cases, the slope must be at least 40 degrees.
The choice of slope is determined not only by the climate and location features, but also by the roofing material. Using a slate or tile coating for these purposes, it is imperative to control the slope, which should not be less than 25 degrees, because otherwise rainwater may seep into the attic due to the fact that the intensity of its flow down will be insufficient.
In the event that a shed roof is being equipped, then the slope should not be less than 25 degrees, and for a gable roof, a slope of 30-45 is made.
Components of the roof structure
Despite the fact that the elements of the roofs may differ based on the types, the main elements are the same:
- truss system - is a structure that is the basis for creating slopes: there are several options for such structures, but a triangle is used as the most reliable, which provides the necessary level of rigidity to the entire system;
- ridge - the uppermost part of the roof, in which all the slopes converge. As for the single-slope and tent type, skates are not provided for in them;
gable overhang - part of the slopes that protrudes above the front side of the roof; - slope - the plane of the roof, which is covered with roofing material;
eaves overhang - represents overhangs on the sides of the building, to which drainage systems are brought; - valley - represents the inner corner of the roof, which occurs at the junction of 2 slopes. Such an element can only be found on roofs with a very complex structure. Once roof construction is initiated, valleys need to be given special attention during waterproofing work due to the fact that this is one of the weakest points in the structure.
Rafter systems
Before mounting any wooden structure, it must first be treated with special means that will help protect the tree from fungus, mold and insects. In addition to treatment with antiseptic or other means, it is also necessary to think about increasing safety by treating it with fire-fighting compounds.
The main elements of the truss system
As for the main details in the rafter system, the main ones are the rafters, which are laid directly on the Mauerlat, which is supported by racks and puffs.
The upper part of the rafters is overlapped, after which it is fixed, and the lower part is attached to the bars, which are laid between the rafters. The design of the truss system may be different.
During the construction of the roof, it is necessary to carefully calculate the length of the rafters. This must be done, taking into account the distance between the walls and the rafters themselves.
Laminated rafter system
This option is often used in those rooms where internal load-bearing walls are used, which provide the basis for the entire truss system. This option is a much more common type, compared to hanging, due to its ease of installation.
It is also worth noting that during installation it is saved and construction material. As the main point of support for the structure, a ridge is used, in which all paired rafters are fastened.
The classic options for the layered construction of the rafters are as follows:
- In this embodiment, the rafters are connected on the ridge and fixed with a support, which is referred to as sliding, and the lower end is fixed directly to the Mauerlat by means of a tie-in. Among other things, as an additional fixation, the rafters are also attached to the wall by means of wire.
- Using this method, the rafters are fastened together on a ridge using special sheets of metal and bolts, and the lower part is fixed to the Mauerlat with a special movable joint.
- The latter option implies the use of a rafter with its fixation with a run on a ridge. For these purposes, bars and boards are used to make the fastening more rigid. The bottom edge is attached in the same way as in the previous method.
Layered fixation system
The main difference and advantage of this type of systems from hanging systems is the floating fixation option. The design of the roof does not create pressure on the walls, so that they will last much longer, and they will be less damaged.
But there are also cases when the spacer system will be more relevant, when the lower edge of the rafters is fixed with a rigid attachment to the base. In this case, in order to reduce the load on the walls, additional reinforcement is applied using puffs and struts.
This design is not similar to both versions of the circuit, it is considered more intermediate.
Before starting installation roof structure, it is necessary to put a temporary flooring from the boards on the floor beams that are built into the wall. This is necessary to create maximum safety during the work on creating the basis for roofing. Only after creating such conditions, you can proceed to the main stage of creating a truss structure.
As an arrangement of a private house, it is often the layered version of the rafter design that is used. That is why it is very important to know all the stages of installing such a system:
- as a first step, waterproofing material is laid on the longitudinal walls of the building. For these purposes, roofing material is often used, but other types of waterproofing can be taken;
- now it is necessary to lay the Mauerlat along the upper end of the wall and fix it with anchors, a pre-treated wooden beam with a cross section of at least 150 by 150 mm is taken as this element;
- rafters are laid on top of the timber, which are fixed with brackets to the base, and the upper part is fixed with an overlap using special steel plates or mounted on a ridge;
- among other things, the rafters must be additionally fixed to the wall using twisting; for these purposes, at a distance of about 30 cm from the top, a crutch is installed, for which the wire clings. It is attached to the rafters and then twisted. This method is called twisting. It is necessary so that during a heavy wind, the roof is not blown away;
- the wall must be protected from rain as much as possible. For these purposes, you need to make an overhang and bring the puffs and rafters beyond the outer edge of the wall. The overhang must have a length of at least 55-60 cm;
- now it remains to strengthen the rafters using racks, girders and struts.
Hanging truss system
For those buildings that do not have capital partitions inside, and the distance between the bearing walls, which are opposite to each other, does not reach 6-11 meters, the design of hanging rafters is used.
This option is optimal for those buildings where the roof will rest only on the walls around the perimeter.
The principle of a hanging truss system
It must be understood that this version of the system gives a strong expansion load on the walls, therefore, to reduce it, it is necessary to use special horizontal parts that will fix the rafters between themselves. Puffs are used as such elements.
Such elements can be fixed anywhere in the rafters. Among other things, they are also used as a log for the attic floor, when fixed at the bottom.
Popular options for tying and strengthening hanging rafters
Installation of this design takes place using rafters, which are taken as timber with a cross section of at least 50 by 200 mm. It is very important that an accurate calculation be made by a professional architect:
- during the installation of such a design, the Mauerlat must first be mounted;
- the second stage prepares the first 2 paired rafters. Their upper and lower parts are specially cut at a sufficient angle, cuts are created along the lower edge to increase the stability of the structure;
- further, 2 rafters rise up for further fixation on the base, but at this stage they do not need to be fixed, while the upper parts are connected at an angle, also without fixation;
- at this stage, it is necessary to pay maximum attention to the exact fit of the first two rafters to each other, since they will be the basis for creating other elements of the truss structure. Next, you need to lower the first pair of rafters to the ground and make other elements in their image;
- as soon as all the elements are prepared and numbered, they can be lifted up, mounted and fixed first at the extreme parts of the structure. Next, the upper corners are connected using a stretched cord, which will become the level that determines the position of the remaining parts;
- as soon as all the rafters are laid, their upper part must be connected using a beam, taking into account the distance that must be between them - it must be exactly the same as in the lower part during fixation to the base;
- then puffs are installed, which are best mounted with an overlap in the lower part;
- initially, all connections of the structure must be fastened with nails, in order to further firmly fix the entire system using metal corners, plates and bolts. Only such fixation will provide the necessary strength, rigidity and reliability;
- if necessary, then the structure can be additionally reinforced with racks and slopes.
Installation of a tiled roof
Before you make the roof of the house, it is very important to understand the installation system of the tiled roof, as this method is quite popular in modern times. As soon as the work regarding the installation of rafters and all other details has been completed, it is necessary to proceed with tiling.
It is worth noting that some use the simplest type of roofing “pie”, when a crate is stuffed over the rafters, after which the roofing material is laid on it, but this option must be insulated. It is necessary to pay maximum attention to this issue so as not to return to this process after the first winter.
Insulated roofing "pie"
An example creation scheme looks like this:
- initially it is necessary to sheathe the rafter structure with paraisol (vapor barrier film). The process is carried out by stretching the film and attaching to the rafters using a construction stapler;
- on top of the vapor barrier film on top, it is necessary to sheathe the roof with sheets of drywall, which is fixed with self-tapping screws. This is done not only to give the attic more aesthetics, but also to create the basis for insulation;
- now you need to lay the insulation boards between the rafters on top of the film. For these purposes, mineral wool is often used;
- on top of the insulation it is necessary to lay the flooring from the boards. It is very important not to take unnecessarily thick boards for these purposes, so as not to make the whole structure too heavy. To do this, you can use OSB or plywood 4-5 mm;
- now it's time for another layer, which should be of waterproofing material. Roofing felt or polyethylene film is often used. The layers should overlap by about 20 cm;
- then a counter-lattice is stuffed, for which slats 1-2 cm thick are used, which is fixed to the rafters;
- a roofing crate is fixed on top of the counter-lattice with a step from neighboring guides less than the tiles by 5 mm;
- for the installation of a drain system along the eaves, a frontal board is fixed;
Before laying the tiles, hooks must be attached to the rafters so that gutters can later be installed to drain rainwater. Next, a cornice strip is mounted, which is also fixed on the frontal board; - the last step after performing all the above steps is laying the tiles. You can start laying from any edge of the roof from the bottom row. Roofing material must be aligned with the edge of the eaves and overlapped using a locking system;
- the second row of material should be laid from the same edge as the previous one, and should cover it by about 5-7 cm. In this way, all subsequent rows are laid up to the very ridge;
- after all the slopes are covered with roofing material, it is required to install a ridge at the junction of the tiles;
- an end beam 2.5 by 5 cm is fixed on the side rafter, a plug is mounted on the corner of the roof;
- a self-adhesive sealant is placed in the space between the roofing material and the bar;
- the side of the roof is closed using an end strip, the main purpose of which is to protect the roof from strong winds that can blow the roof away with strong gusts.
The roof arrangement diagram presented above is figurative, showing the main actions. To fully understand all the nuances of this process, at each stage it is necessary to dwell in more detail.
Step by step process of roof tiling
Even though the shelves construction stores Overflowing with a huge number of different roofing materials, shingles are still one of the most popular options, even though they are considered one of the most difficult materials to install as a roof.
Ceramic tiles are produced not only by several domestic, but also by well-known European factories. Although it may differ in its design features, the coating and preparation process remains the same.
To install and fix this roofing material, you first need to make a crate. Roof installation should begin with the creation of the right foundation.
First step
Initially, it is necessary to mount one of the options for truss structures that were described earlier.
Before proceeding with the installation of the crate over the rafters, all structural elements must be additionally checked for their evenness. If an unevenness is found at any of the rafter legs, it must be eliminated, otherwise problems may arise during installation.
It is necessary to perform such work using a building level and an even beam.
Second step
At this stage, it is necessary to fill the cornice strip along the entire line of the cornice on the edges of the rafters, the main purpose of which is to protect the end of the rafters from water ingress. Separate strips are installed and fixed with an overlap.
Third step
Now, on top of the truss structure, it is necessary to stretch and fix the vapor barrier with a construction stapler. It is necessary to lay this membrane from left to right on top of the cornice strip. The second strip should stretch horizontally, overlapping the previous canvas by 15 cm.
The inscription, which is on the film, should look outward during installation. Further, in addition, the film must be fixed along the edge of the cornice strip. For these purposes, double-sided construction tape is used.
The last strip of the membrane should be located above the ridge, as it will need to be bent for the second roof slope.
Fourth step
It is very important to take into account the following case, when the length of the slope is not longer than 6 meters, then the thickness of the counter rail should be 2.4 cm. In the case when the slope reaches 12 meters, then the thickness should be 2.8 cm and over 12 meters - 4 cm.
Important! The counter rails should not reach the ridge rib by 12-15 cm.
Fifth step
Do-it-yourself step-by-step instructions for the roof continue by fixing pieces of timber with a section of 50 by 50 mm and a length of 15-20 cm on the ridge, over the junction of the rafter legs. The space between them is used as ventilation gaps.
Next, the skate should be covered with a vapor-permeable film, which should go beyond the structure by 20-25 cm and be on the slopes. On top of the film along the ridge, it is fixed with pieces of timber, as a continuation of the counter rails. The size should be equal to the distance from the end of the counter rail to the crest of the ridge.
sixth step
During the creation of the eaves overhang, a perforated mesh strip is installed on the ends of the counter-battens and the cornice strip, which acts as ventilation under the roofing material and at the same time protects this space from the penetration of various insects into it.
Now, brackets are fixed in the eaves area of the counter-rails for the subsequent installation of gutters for rainwater drainage on them. They need to be fixed with nails or screws.
For simple and easy subsequent installation of gutters, it is very important that the brackets are installed as evenly and securely as possible along the entire slope formation line, so that water does not stagnate in the gutters, but flows down freely.
To facilitate this process, experts proceed as follows. Initially, it is necessary to install only the first and last bracket with the required drop, and then pull a cord between them, which will later be a guideline along which other hooks will be installed.
Once all the hooks are installed, along the cornice edge of the counter rails, it is necessary to fix the hinged beam along the entire length of the slope eaves. This will be the first timber to create the crate for the roofing material.
seventh step
The construction of the roof of a private house must be continued with markings from the hinged beam at the extreme. This distance will serve to determine the step with which the battens of the crate will be attached.
This distance directly depends on the overlap and the length of the tile that was purchased. Often it varies between 34-37 cm.
Marking is carried out on the extreme counter-rails. Next, you need to hammer in one nail at the marks and pull a colored cord between them, in order to subsequently use it to beat off a common line to fix the lathing battens.
eighth step
Now, according to the created markup, horizontal slats of the crate should be nailed. The cross section of the crate should be 7 cm by 3 or 2.5 cm.
Ninth step
At this stage, it is required to prepare the ridge in order to further install ridge tiles on it. This is done by fixing two bars on the crest along the entire length, one on top of the other. Some craftsmen use special ridge bar holders.
Such elements are fixed to the counter rails on both sides using 2 self-tapping screws. Once the holders are fixed, a wooden beam is fixed in them. It is much more convenient to work with special holders, since they have different heights and sizes, since in this case you can select the necessary parameters before you make a roof with your own hands.
tenth step
Now it remains to install and fix the gutter. As an additional fixation, the gutter is fixed with another eaves strip on the eaves rail. Such an element closes access to the under-roof space, performing protective functions from moisture ingress.
Bars with a section of 7 by 7 cm are hammered over the crate from the side of the gables along the edges of the slope. This is necessary in order to fix the wind board from the gable part of the roof and close the edge of the brickwork.
Now you need to mount and fix the wind boards along the pediment, which are additionally fixed to each other in the area of \u200b\u200bthe ridge using a metal corner. Thus, the crate is ready for the installation of the tiling.
Laying tiles on the crate
Before you properly make a roof, you need to prepare all the material and suitable tools. As soon as the crate is ready, it's time to proceed to the most important stage - the installation of tiles.
Almost all types of tiles, regardless of the model or manufacturer, are installed using the same method. The installation of this roofing material begins on the right side of the slope, its lower part. First you need to fix the corner element, which must be fixed on the second rail from the eaves.
The first element of the tile is fixed in its upper part using 2 self-tapping screws, which must not be completely screwed in.
Now you need to lay the entire first row of tiles. It is enough to fix each one with only one self-tapping screw at the top of the element. The hole will need to be drilled in advance so as not to complicate the process of working on the roof. At the end of the row, the last element is the corner tile, which is fixed with two self-tapping screws.
Now, from the bottom to the ridge, you need to install the first vertical gable row corner elements. All of them must be securely fastened with two self-tapping screws. To be able to install a snow barrier, it is necessary to prepare the tiles for this purpose.
So that the tiles have a neat appearance and covered the bracket with itself, it is necessary to mark its location on the reverse side, after which, as carefully as possible, knock out part of the lock using a hammer.
The next step in the second horizontal row is to install brackets with a distance of 90 cm. This part is hooked and fixed to the third rail of the crate, if counted from the eaves. At this point, its underside is mounted on top of the lower tile of the first row. Thus, the device of the roof of a wooden house gives maximum reliability.
The pre-prepared shingles are mounted on top of the fixed bracket and screwed to the third rail. As an additional fixation of the tiles, which closes the bracket, it is necessary to use a wire hook, which clings to the side edge and is attracted by twisting to the lathing lath. This method secures every third tile in a row that is laid on the holders.
After the installation of the second row is completed, and all the brackets for the snow barrier are fixed, it is necessary to try it on as it will be further fixed. Now you do not need to think about installing a barrier, since at this stage it will only interfere.
Now it is necessary to carry out the laying of corner and row tiles with lock connection from bottom to top and from right to left until other additional roof elements that are necessary for its stable, natural and durable functioning must be built into the coating.
If the length of the roof is not more than 4.5 meters, then the laying of special ventilation tiles is not required. In the case when the length is from 4.5 to 7 meters, one row of ventilation tiles is installed on the second row from the ridge.
For roofs from 7 meters, such elements are installed in 3 rows with a distance of one and a half meters from each other. Approximately 3-4 rows from the ridge, in the middle of the scan, it is necessary to mount a tile with a ventilation pipe, which is referred to as a through pipe. If we build the roof of the house with our own hands step by step, then it is very important to try on this tile, then remove and mark a suitable circle on the membrane in order to cut a hole there.
After that, it is required to install a sealing ring in it. Having penetrated into the attic, it is necessary to insert a connecting corrugated pipe into the ring. Often its diameter is at the level of 12 cm.
Its other end is connected to the ventilation duct of the building. To prevent snow, rain or any debris from getting into the pipe, a protective cap is installed from the outside of the roof. It is also worth thinking about buying an additional so-called chimney sweep bench and installing it on the 4-5th row from the ridge.
The design of the bench has brackets that cling and are fixed to the top lath of the crate in the laying of the row. The lower part of the brackets is mounted in recesses on the tiles of the underlying row.
In order for the closing brackets of the tiles in the top row to fit as tightly as possible to the lath of the crate, it is necessary to make special chips in the upper part of the locks after fitting. So the design of the roof of a private house will be the most reliable.
It is important to pay attention to other weakness which can cause premature loss of performance. It is necessary to tightly and correctly make a joint between the walls of the chimney pipe and the roofing material.
To increase comfort during abutment work, it is most convenient to use a flexible self-adhesive tape, which is created using aluminum and lead. Thanks to this composition, it is ideal for these purposes due to the ease of taking on a relief shape.
So that the junctions do not cause a loss in the performance of the entire roof, they must be made in a certain sequence.
- Initially, the tape must be glued to the front of the pipe with a call to the side walls and tiles of the row that is in front of the chimney. For these purposes, it is necessary to make cuts of the required shape on the tape.
- After that, it is necessary to make the appropriate dimensions, and the tape is cut out, after which it is glued to the side walls and the tiles adjacent to them. To create the correct joint from the back of the pipe, you need to take 2 identical pieces of tape, which exceeds the width of the pipe by 2-3 cm.
- They need to be glued together in width.
- Next, you need to combine the middle of the tape and the width of the pipe at a height of 1.5-2 cm. The waterproofing must be glued to the metal sheet and to the wall of the chimney. The sheet must first be fixed on the upper side of the pipe and on the crate.
- After the tape is fixed over the metal, a row of tiles is laid on top.
- Those parts of the tape that protrude at the corners must be notched and wrapped into the sides of the pipe to glue the overlapped waterproofing.
Some craftsmen, before assembling the roof, prepare sheet metal, cut into strips of the desired width, in order to subsequently mount them according to the same principle to form a joint. The edges of the metal at the corners are connected using folding and rivets.
The shingles can now be laid over the hook-brackets and secured with screws using a wire hook. As soon as a metal casing or waterproofing tape is fixed around the entire circumference of the pipe, a metal profile bar is fixed along the entire upper line of the pipe walls, the task of which is to press the flexible tape against the surface of the chimney.
ridge knot
First of all, it is necessary to lay a perforated ventilation sealing tape, which includes lead and aluminum, on the fixed ridge beam with an overlap of the upper row of tiles.
Due to its unique composition, this tape easily takes the form of a tile. As soon as the tape is in place, it is required to attach the end ridge element from the gable side of the ridge, to which the first ridge tile should be tried on.
After fitting, the tile must be removed and a clamp with a bracket, which is provided together with the ridge tile, must be screwed to the beam fixed on the roof ridge. After it is fixed, it is necessary to insert the first tile into it and fix it with the other side with the next clamp using a self-tapping screw.
Before you put the roof on the house with your own hands, it is very important to study the instructions from the very beginning to the end.
After the bracket is fixed, you need to install the second tile and all the others according to the same method until the ridge is completely finished. To finish with the creation of the ridge, you need to install the second end element. If necessary, the last tile element in this row can be trimmed to the required size.
As soon as all additional details of the roofing are mounted, it remains only to install a lattice barrier on the brackets, which restrains the sliding of snow.
Once the roof covering is complete, you can go back to the attic and remove the temporary decking that was installed for convenience and replace it with a permanent wooden floor. Installation can be started from the side of the room or attic. Choice attic floor remains with the owner of the premises, but now you don’t have to worry about rain or snow entering the premises.
Now you know how the roof is made and that it is quite complicated, laborious, but required process. When complex roofs, it would be advisable to use the services of professionals.
